Stop Flipping Wrists in Your Golf Swing & Take Control of the Club at Impact
Ever wonder why your iron shots go sky-high and lack distance? The cause of the issue could be wrist flipping.
Most golfers don’t realize they flip the club until they watch a slow-motion video of their swing.
The question is, what CAUSES you to flip? If we can get rid of this cause, you can keep your wrist from flipping at impact and gain power and consistency.
This guide will explain why golfers tend to flip their wrists and how to work on fixing this problem for good.
How to Stop Flipping Wrists at Impact? (Key Takeaways)
Learning the correct setup and synchronizing wrist and body movements are essential steps to eliminate wrist flipping in your golf swing.
Here’s what you can do to stop flipping and achieve a stronger, more consistent impact:
- Center Your Hand Position: Ensure your hands are positioned centrally at the address without excessive shaft lean and without the hands being behind the ball.
- Check Your Grip: Specifically, make sure your grip isn’t too weak.
- Practice the Correct Release with a Shorter Swing: Start with smaller swings to build the feel for a proper release without wrist flipping.
- Focus on Weight Transfer with Body Rotation: A smooth weight shift supported by body rotation is crucial for a powerful, stable impact.
- Maintain a Flat or Slightly Flexed Wrist at the Top: This wrist position controls the clubface, minimizing the urge to flip at impact.
- Using HackMotion, you can get real-time feedback on your wrist position, along with targeted drills to fine-tune your form. This valuable feedback allows you to make quick adjustments and practice purposefully, leading to consistent improvement.
Watch instead of read! Click here to access our free Stop Flipping Wrists at Impact video course.
Contents
What Causes Flipping Wrists in the Golf Swing?
Wrist flipping in golf is when the lead wrist quickly extends (just before impact), attempting to square the clubface at impact. In this motion, the clubhead overtakes the hands before impact.
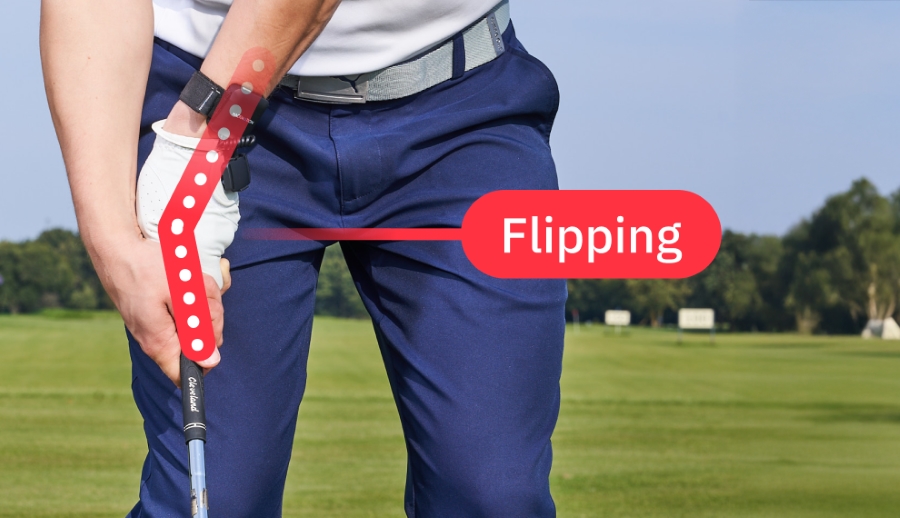
The result is poor strike quality and high spin. Most importantly, you’ll lose power and control.
Flipping is typically caused by a lack of synchronization between body and wrist movement.
When the body and wrists aren’t working together, the hands are forced to compensate, trying to square the clubface manually at impact.
When the swing is properly synchronized, the body rotates smoothly with a forward weight shift, while the arms and wrists maintain their angles.
This allows the clubface to square naturally at impact without requiring extra hand action (or flipping).
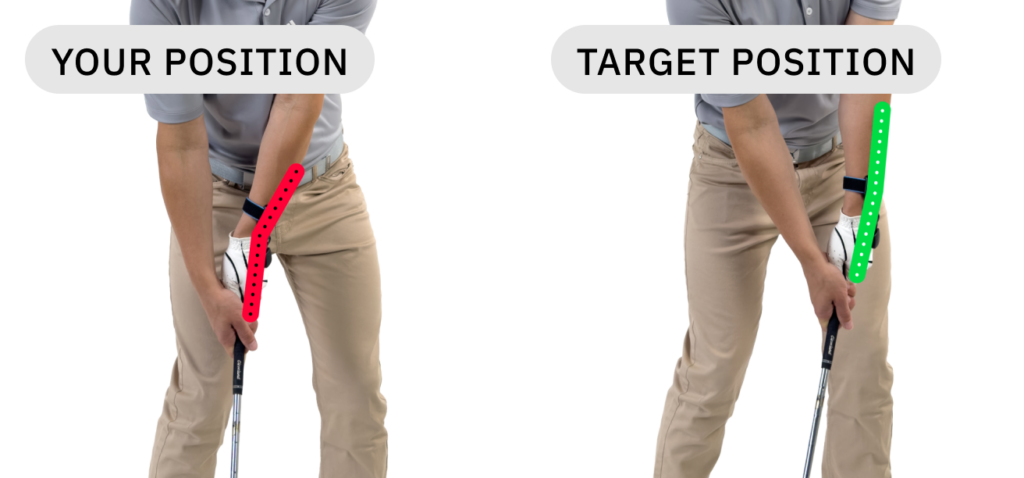
How to Stop Flipping Wrists in a Golf Swing
If you want to stop flipping and start becoming more efficient at impact, the first place to start is the grip. It’s the only connection with the club, so it has to be perfect.
Once the grip is perfect, you can move to the backswing, wrist action, and weight transfer issues.
Fix your impact the easy way!
Click here to watch our free Stop Flipping at Impact video course now.
1. Common Setup Issues That Lead to Wrist Flipping
Weak or Palmy Grip
A weak grip—where the hands are rotated too far towards the target—keeps the clubface open during the swing, often causing golfers to flip their wrists to square the face at impact.
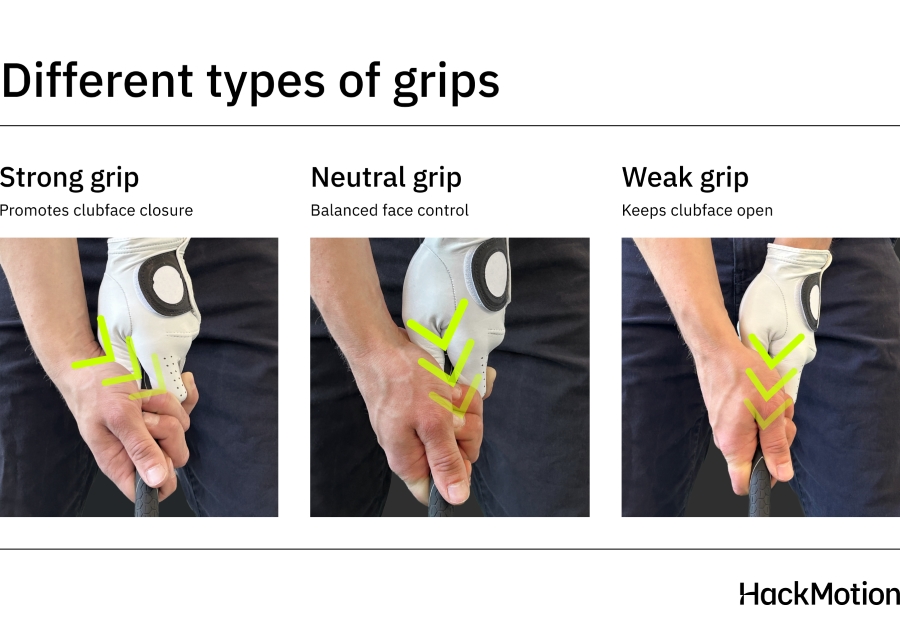
This leads to inconsistent shots and loss of power. Additionally, a palmy grip (where the grip rests too much in the palm rather than the fingers) reduces clubface control, increasing the likelihood of a flip.
Improper Hand Position at Address
Setting your hands too far behind or in front of the ball at setup can disrupt your swing path and timing.
When the hands are positioned too far behind the ball, golfers may compensate by scooping or flipping to square the clubface at impact.
Conversely, when the hands are too far forward, it becomes challenging to maintain wrist angles, often leading to an early release or flip.

How to Setup and Grip the Club for Reducing Flipping
- Hand Position at Address – When setting up with irons, your hands should be slightly ahead of the ball, creating a subtle forward shaft lean—about 1-2 inches. Avoid excessive forward shaft lean, as it can reduce power and limit proper body rotation through the swing.
- Neutral Grip – To maintain control and reduce flipping, your grip should be neutral rather than weak or overly palmy:
- Keep the club in your fingers, not your palms.
- Check that the V formed between your thumb and index finger on your lead hand points to your trail shoulder.
- Hold the club about a half inch down from the top if you still feel you lack control, you may gain a little more stability through impact.
Important note
While a stronger grip can sometimes help with reducing slices or flipping, be cautious not to overdo it. Small adjustments to your grip can significantly impact your swing consistency and control.
2. Learn to Release with Shorter Swings
A small swing, from the 9 to 3 o’clock position, is like a miniature version of a full swing. If you can get the perfect movement from 9 to 3, the full swing becomes much easier.
The best way to practice this is to use the HackMotion 9-to-3 drill.
You will move the club from a 9 o’clock to a 3 o’clock position and check for flipping. This drill focuses on maintaining clubface control, body rotation, and proper wrist mechanics through a simplified motion.
Perfect Your Release with HackMotion
Fine-tune your release for consistent contact. Start with a short swing to master control before adding power.
How to Perform the 9-to-3 Drill
- Start by taking the club back to waist-high (the 9 o’clock position). Allow a slight wrist hinge, but keep your lead wrist flat, ensuring the clubface stays under control.
- Begin your downswing by rotating your body toward the target, keeping your hands ahead of the clubhead.
- Maintain forward shaft lean through impact to prevent wrist flipping.
- Continue swinging until the club reaches waist-high again (the 3 o’clock position) on the other side of your body. Make sure the clubface remains square as you complete the motion.
- Your finish should involve a full body rotation toward the target with a stable lead wrist—no flipping involved.
Progressing to the 10-to-2 Drill
Once comfortable with the 9-to-3 drill, you can transition to the 10-to-2 drill to add more body rotation and a fuller release:
How to Perform the 10-to-2 Drill
- Start by taking the club back to 10 o’clock (just above waist height) with a slight wrist hinge.
- Begin your downswing by focusing on body rotation and keeping your hands ahead of the clubhead.
- Rotate through impact and finish at 2 o’clock.
- By practicing the 10-to-2 drill, you’ll have worked your way up from a half to a ¾ swing, leaving you ready to start taking full swings and eliminating the flip completely.
3. Lead the Downswing with Hip Rotation
Proper body rotation is essential for avoiding wrist flipping in the golf swing.
By initiating the downswing with your hips, you create a powerful, controlled motion that keeps the clubface square through impact.
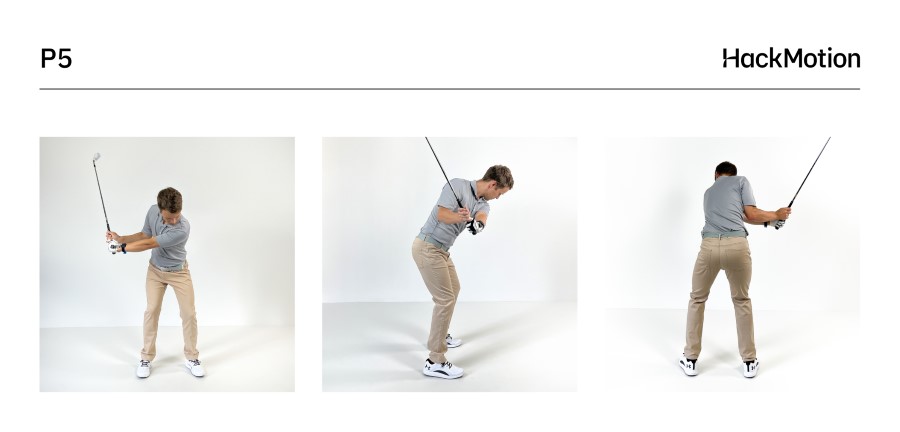
Downswings that lead with the body are easier to repeat, and once you have your lead wrist in a flat position at the top of the swing, you can focus on hip and body rotation through the ball.
This continuous rotation allows your hands to remain passive, reducing the need for last-second adjustments like flipping to square the clubface.
Additionally, effective rotation helps you maintain forward shaft lean and wrist stability, ensuring consistent, powerful contact.
To improve hip rotation try the Hip Sway and Turn Drill as seen in the video below from Rob Cheney.
How to Perform the Hip Sway and Turn Drill
- Set Up: Place an alignment stick through your belt loops or hold a golf club across your pelvis at your belt buckle.
- Backswing: Take the club back while allowing your trail knee to lose flex and your lead knee to gain flex. Rotate your hips about 45° at the top of the backswing.
- Downswing – Sway First: Move your pelvis laterally toward the target, focusing on shifting your belt buckle over your lead ankle. Avoid rotating your hips at this stage.
- Add Rotation: Once your weight is on your lead side, rotate your hips toward the target. The stick or club should point to a position where your hips are open about 90° at the finish.
- Practice: Start with slow, controlled swings to focus on the sequence: sway first, then rotate. Gradually build up speed as the movement feels natural.)
4. Shift the Pressure on the Lead Foot at Impact
Correct weight transfer is key to avoiding wrist flipping in your swing.
Shifting pressure onto your lead foot during the downswing supports balance, promotes a forward motion, and keeps your hands leading the clubhead through impact.
This weight shift helps maintain forward shaft lean, stabilizes the wrists, and enables a full body rotation—reducing the need for a compensatory flip.
Practice Proper Weight Transfer with Step-Through Swings
To develop a feel for effective weight transfer, try step-through swings:
- Step-Through Drill: Begin your swing as usual, and just before impact, take a small step forward with your lead foot. This movement encourages a natural forward weight shift and momentum that prevents flipping.
Incorporating this drill into your practice helps ingrain the sensation of a smooth, forward weight transfer, leading to a more solid and controlled swing without the need for wrist adjustments.
5. Stabilize the Clubface with Wrist Flexion
If your lead wrist is extended at the top of your swing, it can cause the clubface to open, making it challenging to avoid flipping at impact.
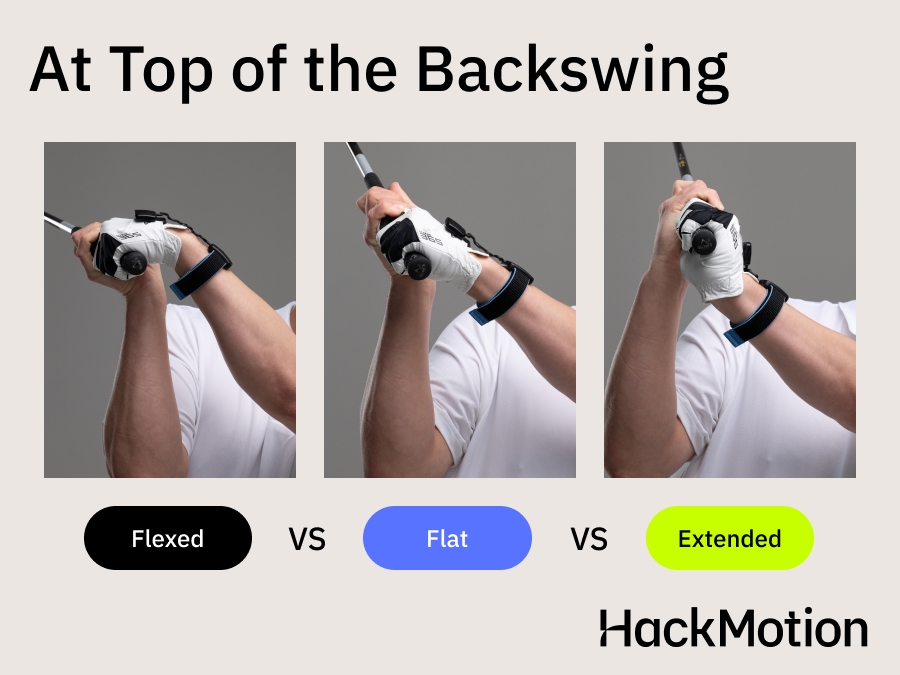
A simple adjustment—adding wrist flexion—can help solve this by keeping the clubface stable and reducing the need for compensatory wrist movement.
Wrist flexion promotes forward shaft lean and stabilizes the clubface through impact.
Practicing the Motorcycle Drill can lead to a controlled wrist position with a square clubface.
Motorcycle Drill (Wrist Flexion Drill)
You can use the HackMotion Motorcycle Drill to learn how to transition properly into the downswing. At the top of the swing, you will feel your lead wrist start to “rev” the grip just as you would a motorcycle.
This reduces extension in the lead wrist on the downswing. In addition, be sure not to add any extension from setup to the top of the backswing so you’ll have an easier time getting to square.
Motorcycle Drill – Master Wrist Flexion in the Downswing
Focus on continuously adding flexion until the club reaches parallel, then smoothly complete your swing.
HackMotion Casting Drill – Step by Step:
- Slow Rehearsals: Make a normal backswing, then begin the downswing by shifting weight left and rotating hips. Don’t pull down with your arms.
- Maintain Trail Wrist Bend: Check HackMotion data on your trail wrist. Keep it extended (bent) as you initiate the downswing.
- Arms Follow: Allow the arms to drop naturally, letting the club “lag” behind.
- Progressive Speed: Start slowly, building up speed while retaining your wrist angles.
HackMotion Tip: If your trail wrist extension straightens too soon, you’re casting. Keep the extension longer to store power.
Use HackMotion to Stop Flipping Wrists
HackMotion is like having a coach on your wrist as you practice.
With the HackMotion you will be able to understand not just why you are flipping, but you’ll get a training plan on how to fix this issue.
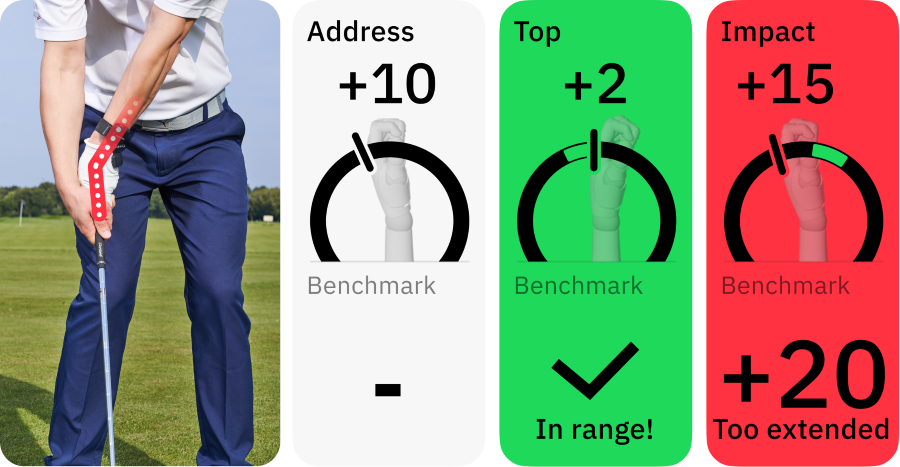
The first step here is to collect data about your swing, and HackMotion will diagnose the classic signs of flipping just before impact.
Then you will get a personalized training plan with drills and guidance.
Getting rid of the flip takes some practice time, but with HackMotion, you’ll ensure that time is well spent.
Final Thoughts
Now it’s time to get out there and improve your wrist position and stop flipping the wrists for good.
Eliminating the flip isn’t magic—it’s measurement plus practice. You’re just a few reps away from more powerful, consistent strikes.
HackMotion will allow you endless hours of practice (with direction), knowing you are working on the right things. When the flip disappears, the impact feels entirely different, making this learning curve well worth your time.


