HackMotion Golf Drills: Train Smarter with a Virtual Coach on Your Wrist
Have you ever said, “If I could just get the feeling, I could repeat it”? In golf, sometimes all it takes is experiencing the correct motion once to build muscle memory and improve.
The easiest way to develop that feeling is through drills, especially those measured in real-time with actionable data.
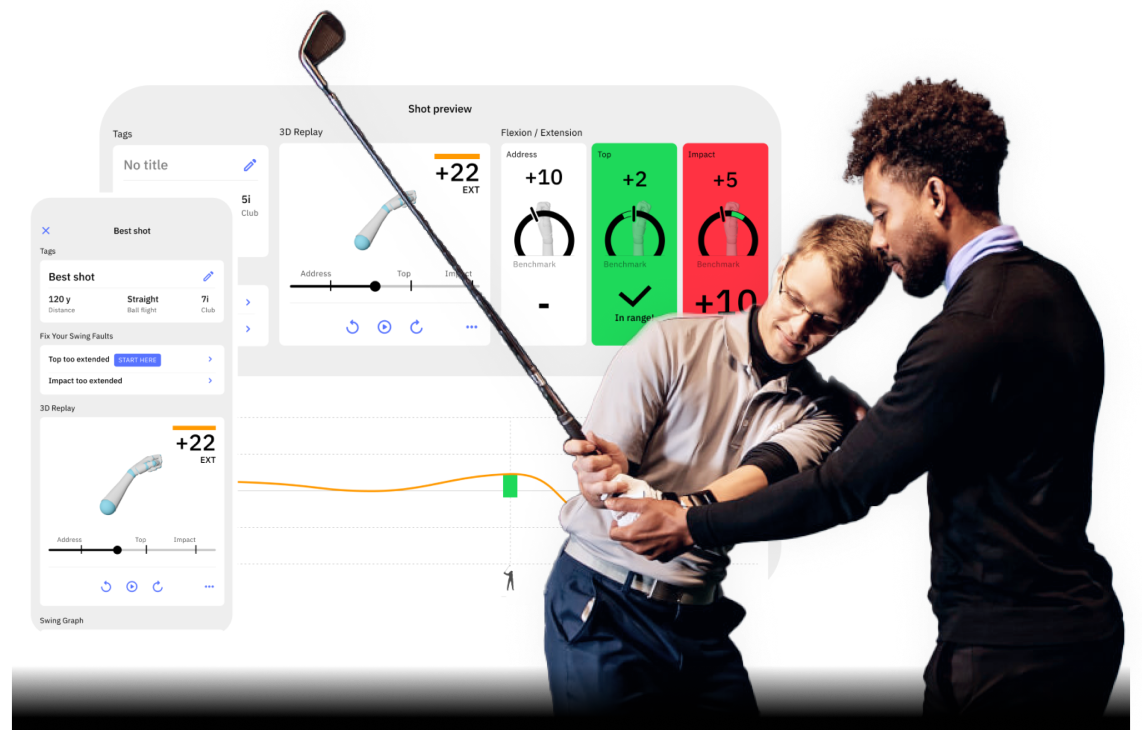
The HackMotion offers full swing and putting drills designed to provide instant feedback, helping you track your progress as you practice.
If you want to make your driving range sessions more effective and more fun – try these HackMotion app drills today.
If You Struggle With… Try This Drill
- Inconsistent wrist position at the top of your backswing – Combined Top Drill
- Flipping at impact or struggling with a weak release – Release Drill
- Transition issues or poor sequencing in the downswing – Transition Drill
- Slicing or leaving the clubface open at impact – Motorcycle Drill
- Early casting and power loss – Casting Drill
- Unstable wrist angles in putting – Putting Flexion/Extension Drill or Putting Ulnar/Radial Drill
The Secret to Mastering Golf Lies in Your Wrists
Did you know that 80% of your golf ball’s direction is determined by your clubface angle at impact?
To hit the ball straight, you must control the clubface at impact. It’s that simple.
And it’s your wrists that control that angle.
If you want straighter, more powerful, and more consistent ball striking, training your wrist mechanics is essential.
Whether you’re struggling with wrist angles at the top, losing control in transition, or flipping at impact, HackMotion’s real-time feedback and interactive drills make improvement simple.
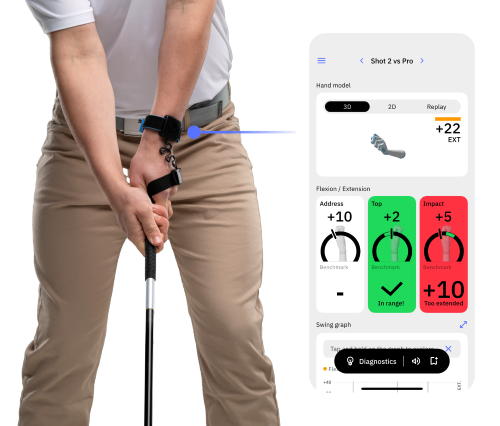
Combined Top Drill
This drill is a “bridge” between slow-motion top-of-swing practice and a true full-speed backswing.
The goal is to move your wrist into the green zone at full-swing speed. Training you to reach an optimal top position while swinging aggressively.
Combined Top Drill in HackMotion
Train your top position by mastering optimal wrist angles. Challenge yourself to reach the ideal wrist position during a full-speed backswing.
HackMotion Combined Top Drill – Step by Step
- Full-Speed Backswing: Address the ball normally with HackMotion on. Make a rapid backswing, just like a real shot, no pausing.
- Check Wrist Angles at the Top: As soon as you reach the top, look to see whether you hit the desired wrist position in the HackMotion green zone.
- Transition & Swing Through: From that checked top position, continue down smoothly. Blending the correct top-of-swing wrist angle into your normal downswing sequence is the idea.
- Refine: You may need to do a few “false starts”: go full speed to the top, pause for just an instant, then come back down. Gradually reduce the pause until you can hit the desired top position on a fast backswing.
Release Drill
The release drill is a great practice drill for golfers who struggle with their impact position.
With this drill, you train your release on a short swing before adding more power and length to the golf swing.
If your release from club parallel to club parallel is perfect, the rest of the swing should fall into place.
Perfect Your Release with HackMotion
Fine-tune your release for consistent contact. Start with a short swing to master control before adding power.
HackMotion Release Drill – Step by Step
- Set Up: Address the ball with a shorter swing in mind.
- Club Parallel to Ground (P7) to Impact: Swing from club parallel in the downswing into impact.
- Hands Forward: Aim to keep your hands slightly ahead of the ball at impact.
- Check Wrist Angles: Use HackMotion to confirm that your wrist angle is in the correct “in range” zone.
- Perform at least 10 reps to establish consistency before progressing to the Dynamic Transition Drill, which helps refine sequencing on a slightly longer swing.
Transition Drill
The Transition Drill helps you work on body sequencing, pivot and wrist angles on a slightly longer swing.
If you get the Transition Drill down you can actually use it to hit punch shots or wedge approach shots.
Transition Drill in HackMotion
Master your sequencing and pivot to improve your swing efficiency and control.
HackMotion Transition Drill – Step by Step
- Set Up: Begin with the same setup as the Release Drill but prepare for a slightly longer backswing.
- Longer Backswing to Impact: Swing back to arms parallel (or slightly beyond), then transition down.
- Maintain Wrist Control: Keep your wrists in the green zone as you swing through the ball.
- Hands Forward at Impact: Just like the Release Drill, ensure a forward hand position at impact with more flexion than address.
Motorcycle Drill
The Motorcycle Drill is the best wrist action golf drill. If you are just starting to learn about how wrist action in the golf swing works and what you can do to get yours correct, the motorcycle drill is a perfect way to get it done.
With the Motorcycle Drill, you will flex your wrists in the downswing to ensure you have more flexion at impact than you did at setup.
The number one reason golfers slice and hit inconsistent shots is an open clubface angle at impact, the motorcycle drill can fix that.
Motorcycle Drill – Master Wrist Flexion in the Downswing
Focus on continuously adding flexion until the club reaches parallel, then smoothly complete your swing.
HackMotion Motorcycle Drill – Step by Step:
- Set Up: Address the ball as usual.
- Downswing Flexion: As you begin your downswing, gradually add wrist flexion so that by the time the club is parallel to the ground (P6), you’ve achieved your desired wrist bend.
- Continue to Impact: Maintain that flexion into impact, then release naturally through the finish.
- Experiment with Speed: Start slowly, then increase speed while retaining proper angles.
- Practice while hitting golf balls but also work on this drill by completing the motion and not hitting shots.
- Find your “just right” amount of flexion—too little or too much can cause mishits.
Casting Drill
Early casting (throwing the club from the top) is a power killer.
Many amateurs mistakenly think it adds power, but in reality, it disrupts sequencing and leads to weaker contact.
This drill trains a proper kinematic sequence by letting the lower body start while arms and wrists “lag” behind to store power.
Fix Your Casting with HackMotion
Train to fix casting by generating power with your core and lower body.
HackMotion Casting Drill – Step by Step:
- Slow Rehearsals: Make a normal backswing, then begin the downswing by shifting your weight left and rotating your hips. Focus on not pulling down with your arms.
- Maintain Trail Wrist Bend: Check your HackMotion trail wrist data.Keep the trail wrist extended (bent) as you initiate the downswing, avoiding an early “throw” of the club.
- Arms Follow: Let the arms drop naturally; the club should “lag” behind your hands. This maintains stored power and prevents an over-the-top cast.
- Progressive Speed: Start slowly, gradually building up speed in your downswing. Keep monitoring your wrist angles, looking for late release (not early cast).
HackMotion Tip: If your trail wrist extension “straightens” too soon in the downswing graph, you’re casting.
Putting Flexion / Extension Drill
The Flexion / Extension Putting Drill helps train a quieter wrist action by focusing on keeping wrist flexion and extension movement within 2 degrees throughout the stroke.
The goal here is to control the putter’s loft for more consistent roll and start direction.
HackMotion Putting Flexion / Extension Drill
Get a feel for the wrist movement that controls your putter’s loft.
HackMotion Putting Flexion / Extension Drill – Step by Step:
- Set Up: Address a standard-length putt with your HackMotion sensor on.
- Make a Putt: Roll a putt while focusing on holding your flexion/extension angles steady.
- Review Data: Check your HackMotion graph to ensure flexion/extension movement stays within 2 degrees
- Repeat: Keep hitting putts with the goal of repeating the same stable motion.
Putting Ulnar / Radial Drill
The Ulnar / Radial Putting Drill helps you control the putter plane by limiting wrist movement in the ulnar and radial directions.
The goal is to keep ulnar/radial deviation within 2 degrees throughout the putting stroke for a more stable and consistent path.
HackMotion Putting Ulnar / Radial Drill
Get a feel of the wrist movement that controls the plane of the putter.
HackMotion Ulnar / Radial Putting Drill – Step by Step:
- Set Up: Take your normal putting setup with the HackMotion sensor on.
- Make a Putt: Roll a putt while focusing on minimizing any upward or downward wrist movement.
- Review Data: After each putt, review the ulnar/radial graph and verify that the movement stayed within 2 degrees.
- Repeat: Continue hitting putts while monitoring for stable wrist deviation.
Final Thoughts
HackMotion drills provide immediate data to help you groove optimal wrist positions. The wrists are directly responsible for controlling the clubface of your golf club. If you can square the clubface the ability to hit straight and repeatable shots is greatly increased.
Progress through each drill at your own pace, aiming to achieve at least 50% of reps in the green zone before moving to the next challenge.
By training proper wrist angles step by step, you’ll build a more consistent and powerful golf swing from tee to green.
Give these drills a try, and keep an eye on your HackMotion metrics to ensure each rep moves you closer to the perfect wrist action!