How to Stop Slicing Driver (Forever): 7 Simple Steps + Proven Drills
The slice is the most common miss among amateur golfers and one of the most frustrating.
Some golfers try to live with it, aim farther left, and hope for the best. But slicing the driver does not need to be your signature shot.
A slice almost always comes down to two things:
- The clubface is open at impact, and
- Your path works across the ball from outside to in.
Both of these are fixable once you understand what’s happening at setup, the top of the backswing, and during your transition. With a few small changes (and a little feedback), you can square the face, fix your path, and start hitting straighter, longer tee shots.
If you prefer watching over reading, you can watch the complete 7-part video training course on how to fix your slice below.
Contents
What Causes a Slice?
A slice happens when the clubface is open relative to the swing path at impact.
- If the face is slightly open, you get a fade.
- If it’s significantly open, the ball starts left (or straight) and curves hard to the right.
What makes this worse is the path. Most slicers swing outside-in with an open face, which exaggerates the curve.
Setup positions and wrist angles at the top of the backswing heavily influence whether you can return the face to square. Players who add extension (cupping) in the lead wrist going back struggle to remove it before impact.
Why You Slice the Driver but Not the Irons
Many golfers slice only the driver and hit their irons relatively straight. That’s normal, and there are typically two reasons behind it.
- The driver is longer. You stand farther from the ball and have more club to control. That extra length makes it harder to square the face consistently.
- The driver has much less loft. Loft helps reduce sidespin. When a driver’s low loft meets an open face, the curve becomes extreme.
Golfers also tend to swing the driver harder in search of distance. Adding speed without fixing face control only exaggerates the miss.
Once you improve your setup, wrist angles, and swing path, the driver becomes just as controllable as your irons.
7 Steps to Stop Slicing Your Driver for Good
These seven steps combine the clarity and detail of both versions of your article. Follow them in order; they build on one another.
Nail the Setup and Alignment
If your setup is incorrect, the slice is already built into your swing.
Your feet, hips, shoulders, and clubface should all be parallel to the target. Slicers often aim farther left to “play the slice,” but this only encourages a more outside-to-in path.
Start setting up like you expect to hit the ball straight. This gives your swing a chance to work back on a neutral or slightly inside path.
Strengthen Your Grip
A stronger grip helps you square the clubface, especially if you’ve lived with a slice for years. A strong grip has nothing to do with grip pressure. It’s about hand position.
For right-handed golfers:
- Rotate your lead hand (left) slightly to the right so you can see more knuckles.
- Let your trail hand sit more under the club.
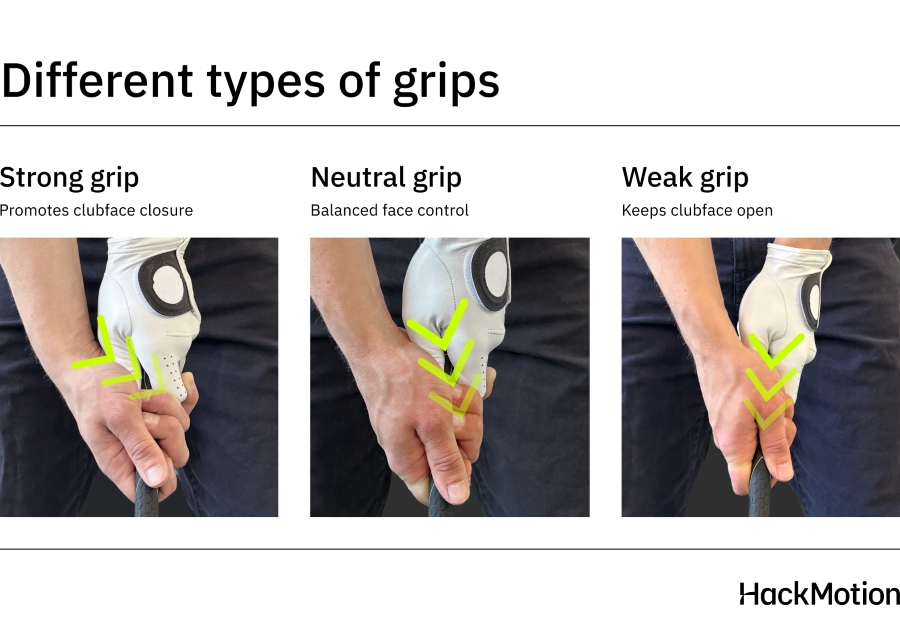
This trail-hand position gives you more natural face rotation and helps the club close earlier in the downswing.
You may not need this forever, but it’s one of the fastest ways to stabilize the clubface while working on the deeper mechanical fixes.
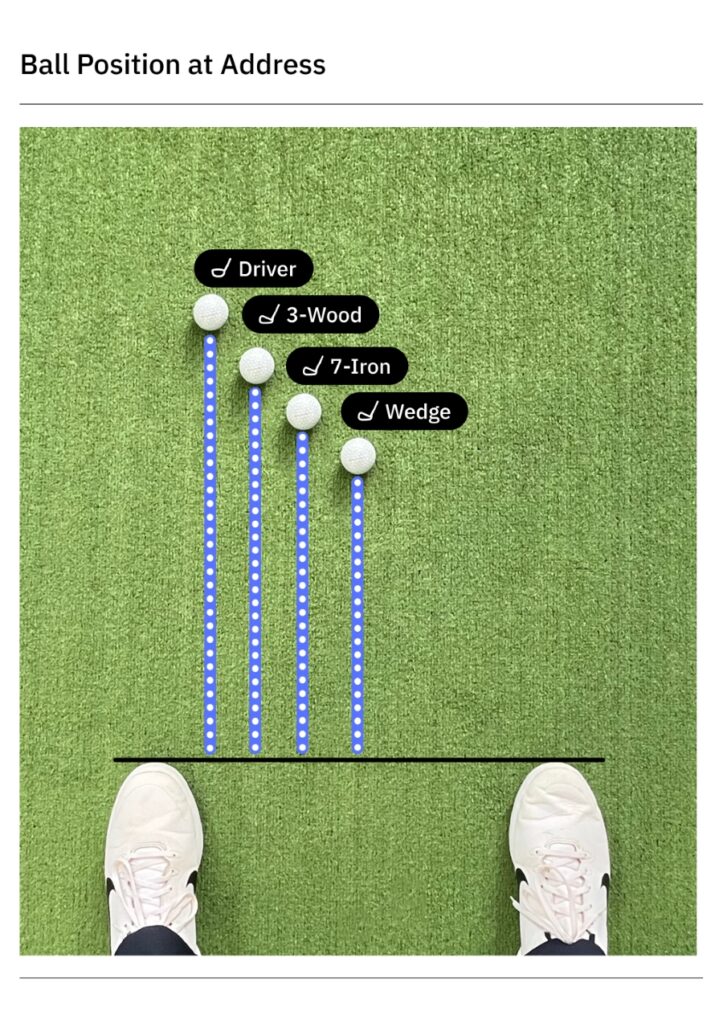
Fix Your Ball Position
The standard driver setup is to place the ball off your lead heel.
But many slicers unknowingly play the ball too far forward or too centered, both of which make it harder to return the face to square.
A simple trick:
- Start with your feet together and the ball in the middle.
- Step back with your trail foot while keeping your lead foot in place.
This places the ball correctly every time and encourages a more neutral-to-inside path.
Minimize Wrist Extension at the Top (The Fastest Slice Fix)
Slicers often let the lead wrist extend (cup) too much at the top. An extended lead wrist leads to an open clubface and a slice.
After analyzing over 1,000,000 swings, we know slicers often:
- Add extension from setup to the top.
- Can’t reduce that extension fast enough.
- Arrive at impact with the face still open.
If you can get to a flat or slightly flexed lead wrist at the top, your clubface is in a position where it can return to square naturally.
HackMotion is the easiest way to monitor this pattern:
- Keep the extension stable from setup to top.
- Reduce extension early in transition.
- Arrive at impact with the lead wrist flat or slightly flexed.
Leave the Club Alone in Transition
Most slicers start the downswing by pulling the handle down. This steepens the shaft, sends the club outside, and locks in the slice.
Let your lower body start the downswing while the arms and club stay passive. Some golfers do well with the swing thought of “leave the club at the top.”
This creates:
- A more efficient sequence
- A shallower club path
- Space for the club to approach from the inside
Rotate to Square the Clubface
One of the most common pieces of advice golfers like to give each other is to slow down in the golf swing.
However, slowing down won’t fix your slice.
If you are not rotating the clubface to square it won’t matter the speed you are swinging the club. Your goal is to rotate the wrists and body so the lead wrist is flat at impact and the face is square.
If you’ve minimized extension at the top of the backswing, this rotation becomes easier. You won’t feel like you need last-second action with your hands.
Practice With Feedback
You can fix a slice with one or two good range sessions – if you train the right patterns. During practice, focus on:
- Lead wrist extension from setup to top.
- Getting the wrist flatter at the top.
- Reducing extension early in transition.
- Arriving at impact with a stable, square wrist pattern.
HackMotion provides real-time audio feedback when you exceed your ideal wrist angles, which accelerates the process and removes guesswork.
Fixing a slice is very hard to do mid-round. But with structured range time and feedback, you will get there.
Drills to Fix a Slice with the Driver
Sometimes the easiest way to fix a slice with the driver is to work on specific drills.
Each of these drills helps you square the clubface and some of them you can train with feedback from HackMotion.
Motorcycle Drill – Master Wrist Flexion in Transition
The Motorcycle drill is the most popular wrist action drill in the game. This drill helps eliminate excessive lead-wrist extension and square the clubface.
HackMotion Motorcycle Drill – Step by Step:
- Address the ball normally (slight wrist extension is fine).
- Take the club to the top.
- In transition, “rev” your lead wrist like a motorcycle, creating flexion.
- Use HackMotion to track how much extension you reduce.
- Too much flexion = hooks. Too little = face stays open.
- Train until your extension range stays consistent every swing.
Headcover Path Drill – Fix the Over-the-Top Move
While the Motorcycle drill works on your wrist action in the golf swing, the headcover drill is a great way to work on your path. Place a headcover just outside and behind the ball.
- Backswing: Miss the headcover.
- Downswing: Swing inside the headcover without hitting it.
This promotes an inside-to-out path and better face-to-path matchups.
- Video timestamp – 7:37
Headcover Path Drill – Step by Step:
- Set Up: Place a headcover just outside and behind the ball, angled down the target line.
- Takeaway: Make sure your backswing clears the headcover.
- Downswing: Swing inside the head cover — missing it completely.
- Feel the Path: Promote an in-to-out motion and better face-to-path matchups.
Alignment Rod “Whoosh” Drill
Slicers almost always swing with too much tension in the hands, forearms, and shoulders. Tension prevents the wrists from hinging or flexing, which keeps the clubface open.
The “Whoosh” drill teaches a relaxed, athletic release so the clubface can finally square up.
- Video timestamp – 2:20
Whoosh Drill – Step by Step:
- Grab an alignment rod (lightweight works best).
- Make small, relaxed swings, letting the wrists “wash” through the hitting zone.
- Listen for a loud whoosh at the bottom this indicates a late, free release.
- If the whoosh is quiet or early, you’re gripping too tightly.
- Transfer that same loose-wristed feel into your driver swing.
- Use HackMotion to confirm your lead wrist can actually move toward flexion instead of staying locked in extension.
- The louder the whoosh, the easier it is to square the face and eliminate the slice.
FAQs
Why am I slicing my driver but not my irons?
Drivers are longer and have less loft, which makes face control harder and exaggerates any open-face pattern. Irons are easier to square because you stand closer, and the extra loft reduces sidespin.
Is there a driver that can fix a slice?
A draw-biased head or more loft can help reduce curvature, but no driver can overcome wrist extension or an open face. The mechanics must be fixed first – equipment only fine-tunes the result.
Should I adjust my driver if I slice?
You can:
- Add loft
- Close the face angle
- Increase upright lie settings
These help reduce the magnitude of a slice, but they don’t replace fixing wrist extension and path.
How much distance do you lose with a slice?
A slice costs distance (sometimes 20 yards or more) because an open face adds sidespin, the ball starts offline, energy is spent curving the ball instead of sending it forward.
Fixing the face-to-path relationship almost always adds distance without swinging harder.
Final Thoughts
You don’t have to live with a slice. Once you fix setup, grip, ball position, wrist mechanics, and transition, your driver becomes predictable and much longer.
HackMotion dramatically speeds up this process by showing you exactly what your wrists are doing at the top and in transition.
Combine that feedback with the Motorcycle Drill, the headcover drill, and the alignment stick path drill, and you’ll start hitting straighter, more confident tee shots.