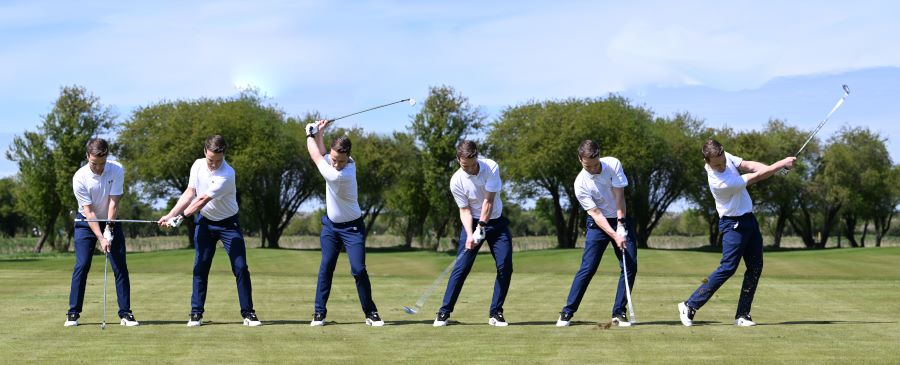
Fix Your Chicken Wing Golf Swing with These Tips and Drills
The chicken wing looks and feels terrible. It causes poor shots and makes you lose distance and accuracy.
If you want to start striking the ball like the pros, you need to move away from the chicken wing. We will show you some of the main causes of this move and, most importantly, how to fix it.
Here’s the good news: fixing the chicken wing could be easier than you think.
If your wrist positions are correct and you have the right mindset about where the club travels, you can reach a powerful and mechanically sound release position.
Stop the Chicken Wing (Key Takeaways)
If you don’t have time to read our entire guide on fixing a chicken wing in golf, here are the most important takeaways:
- Poor wrist action (especially an extended lead wrist) often leads to an open clubface and a steep angle of attack, promoting a chicken wing finish.
- Excess tension in the arms and shoulders restricts natural rotation and prevents a proper release through the ball.
- Proper rotation and extension at impact (with the arms away from the body) is key for eliminating the chicken wing.
- Shorter swings with the ball on a tee can help build muscle memory before moving on to full shots.
- HackMotion can provide real-time data on your wrist angles, helping you understand and correct the movements that cause a chicken wing.
What Causes the Chicken Wing in Golf?
One of the most common causes of the chicken wing in golf is an out-to-in club path. This movement of the club causes the lead arm to move away from the body in the follow-through because it has nowhere else to go.
A few other causes include:
- Too much extension in the lead wrist.
- An open clubface.
- A steep downswing.
- Misunderstanding of the proper golf club path.
How do You Fix the Golf Chicken Wing?
More important than what causes the chicken wing is how to fix it.
For most players, the best fix is a drill that clicks and helps you feel exactly what is necessary to get the arms closer to the body and less.
Below are the main solutions, drills, and fixes to eliminate the chicken wing in your golf swing for good.
Some may resonate more than others, but all of these drills encourage solid fundamentals that help you release the club and remove the chicken wing.
1. Drop the Hands Down – Don’t Move Them Out
At the top of your backswing, it’s common to want to move the arms out away from your body. This move feels powerful, as if you can “muscle” the ball or hit at it with your arms.
However, if you want to be consistent the club should drop into place.
1. Feel the Drop
- Swing to the top and pause.
- Instead of moving your arms and shoulders “out and over,” allow them to drop down.
- The club should fall naturally from the top toward your trail side.
2. Add Rotation
- Once the club has dropped, rotate the chest and hips.
- With a more inside-out path, your lead arm no longer “chickens” away from the body.
3. Rehearse & Repeat
- Practice a slow rehearsal (top -> drop -> rotate) a few times.
- Then hit short shots, gradually building up speed while maintaining that “drop” feel.
2. Eliminate Wrist Extension at the Top (Use the Motorcycle Drill)
At HackMotion, we’ve analyzed more than 1,000,000 swings. Many great players have a flat or slightly flexed lead wrist at the top of their backswing.
If your lead wrist is cupped (extended), you risk an open clubface and a steep, over-the-top downswing.
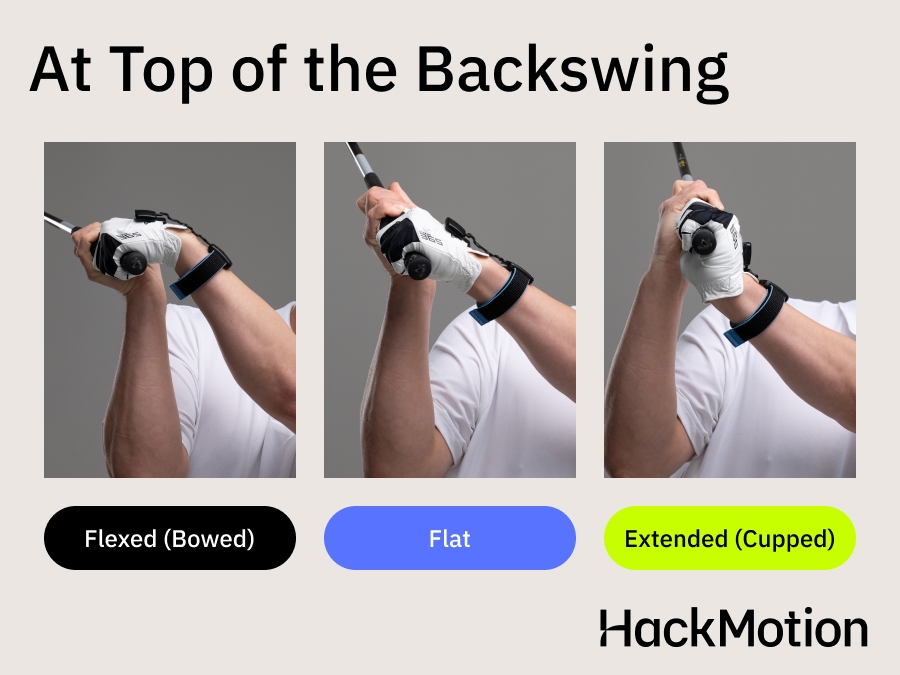
The lead wrist being extended will cause other issues in addition to the chicken wing and the motorcycle drill is one of the best ways to fix it.
Motorcycle Drill – Master Wrist Flexion in the Downswing
Focus on continuously adding flexion until the club reaches parallel, then smoothly complete your swing.
1. Setup
- Take your normal address position.
- If using HackMotion, activate the Motorcycle Drill.
2. Check the Top
- Pause briefly at the top and note your lead wrist angle.
- Using HackMotion, aim for a neutral or slightly negative (flexed) angle rather than a large positive (extended) angle.
3. “Rev” In Transition
- When you transition from backswing to downswing feel like you are revving the handle of a motorcycle. This motion will eliminate the chance of you cupping your lead wrist through impact.
4. Practice & Monitor
- Make slow practice swings with a pause at the top, ensuring correct wrist angles.
- Use the HackMotion drill to check progress and see if you are successfully completing the motorcycle drill.
- Progress to hitting balls at half-speed, then build to full swings.
- Check HackMotion data to verify your changes in real time.
When you watch golfers who struggle with the chicken wing it’s easy to see they are not aggressive when coming through the golf ball.
3. Use the 4:30 Path Drill to Correct Out-to-In Swings
Another big cause of the chicken wing is swinging out-to-in to compensate for the open face.
Encouraging an inside-to-out path frees you to release the club fully without fear of pulling the ball left (or leaving it wide right).
How to Perform the 4:30 Path Drill:
1. Set the Path
- Place an alignment rod or spare club on the ground at a 4:30 angle relative to the ball (imagine standing in the middle of a clock face: 12:00 in front, 3:00 to your right, so 4:30 is slightly behind/to the right).
2. Backswing
- Make a normal backswing, ensuring your lead wrist remains in a neutral or slightly flexed position.
3. Drop to 4:30
- From the top, let your arms fall so the club head “tracks” down that 4:30 path.
- You’ll feel more inside-out and less “over the top.” It’s a good drill to do in combination with the Drop the Hands drill.
4. Slow-Mo Rehearsals
- Make several slow-motion swings, stopping halfway down to confirm the club is on, or close to your 4:30 line.
5. Hit Shots
- Begin with short or half swings.
- Focus on the inside-out path and watch the ball start right of the target (for a right-handed golfer) with a slight draw.
- Increase speed as you gain confidence.
- Video timestamp – 5:00 – 6:15
4. Reduce Tension
Grip pressure issues are another problem for golfers who struggle with the chicken wing. One easy way to combat this is to ease tension in your arms and forearms.
Most golfers feel like letting go of grip pressure makes them feel like they lose control of the club.
You don’t need to reduce tension in your hands only, this tension builds up into the arms and forearms and that’s where you really should let it go.
Try experimenting with grip pressure. Grip the club at different pressures (from extremely light to extremely tight).
Swing the club waist-high to waist-high in front of you. Identify a grip pressure (often around 5–7 out of 10) that allows fluid wrist hinge and release while still feeling secure.
5. Allow the Chest to Rotate (Use the Impact Fix)
If you don’t rotate your chest, your arms run out of room to clear and the lead elbow flares.
The more you keep your arms in front of your chest and turn your body through impact, the less chance you have of developing the chicken wing.
You can learn to rotate your chest by putting an object like a soft ball between your forearms as you swing.
You can also try this Impact Fix Drill that works with or without wearing the HackMotion.
Impact Fix Drill:
1. Identify Setup vs. Impact
- Take your address position.
- Then “preset” an impact position: open hips, a slightly flexed/flat lead wrist (check with HackMotion), and some forward shaft lean.
2. Mini Backswing
- From your preset impact, move the club halfway back.
- Keep feeling your hips and chest in a partially open position.
3. Move Through
- Swing gently through to a short follow-through, maintaining that open pelvis, forward shaft lean, and stable wrist.
4. Slow Repetitions
- Do 5–10 slow “impact fix” rehearsals.
- Then hit short shots at half speed, focusing on returning to that same impact condition.
5. Blend Into Full Swing
- Once comfortable, integrate this preset into a normal backswing.
- Monitor with HackMotion to ensure your release matches the app’s recommended wrist angles.
- If you can perform this motion with a half swing shot, you’ll learn to do it with full swings much faster.
6. Keep the Lead Elbow Closer to Your Side
Some players find it helpful to think about keeping the lead elbow a bit closer to the body through impact.
You may have seen this drill done with a towel or a glove. It’s pretty simple. You place the towel or the glove under your lead arm at setup and make sure it stays there through the golf ball.
1. Use a Glove or Towel
- Tuck it under your lead arm at setup.
- If it falls out right after impact, it’s a sign your lead elbow is separating.
- Take shorter controlled swings until you feel like you can keep it in place.
2. Short Practice Swings
- Make a few slow-motion swings, focusing on staying connected.
- Rotate your chest fully so your arms naturally extend instead of flaring.
3. Integrate Full Swings
- Remove the glove/towel and see if you can maintain the same connection at higher speeds.
Final Thoughts
Fixing a chicken wing in golf comes down to correcting your wrist angles, managing your club path, and relieving tension so the arms can rotate naturally.
With HackMotion, you can get real-time data on your wrist positions, see exactly where the breakdowns happen, and confirm that the changes you’re making truly eliminate that dreaded lead-elbow flare.