Fix a Flat Golf Swing: Tips & Drills for a Better Swing Path
There tends to be a lot of focus on golf swings that are too upright. It’s a common mistake that many players struggle with. However, a flat golf swing can be just as problematic.
A flat golf swing happens when the club travels too much around the body instead of up and over the trail shoulder.
This can result from a few swing flaws, but one is too much flexion (bowing) in the lead wrist. We will give you some simple steps and drills to help fix a flat golf swing.
Key Takeaways
Here are the most important things about fixing a flat golf swing. Take a look at these and then head out to the range to work on this process:
- Lead wrist extension at setup is a crucial fix: A flat golf swing often stems from too much flexion (bowing) in the lead wrist. Adding 15–25° of extension (cupping) at address helps put the club on a steeper plane right from the start.
- Maintaining wrist extension to the top improves club position: Golfers with flat swings should focus on keeping the lead wrist in slight extension throughout the backswing.
- Clubface and wrist angle at the top must match: A flat or slightly extended lead wrist at the top helps square the clubface. Too much flexion opens the face and forces compensations. Matching wrist angles and face angles is key to better consistency.
- HackMotion can be used to monitor wrist extension in real-time: Use HackMotion to track and train your wrist extension from setup to the top of the backswing. It shows how consistent your angles are and helps you avoid the flexion that leads to flat, inconsistent swings.
How to Fix a Flat Golf Swing
Get Your Setup Right
A flat swing often begins before the club moves. You may be setting yourself up for a flat swing without realizing it. Here are the steps to ensure your setup does not cause the flat swing.
- Bend from the hips, not the waist.
- Let the arms hang naturally.
- Hold the club so the shaft points at your belt buckle.
- Grip check: You should see two knuckles on your top (lead) hand.
This neutral setup gives your wrists room to work correctly and keeps the takeaway from going flat early.
Add a Little Wrist “Cup” at Address (15–25° Extension)
Having a little wrist cupping or extension at setup is common and could benefit golfers who swing too flat.
The standard for most players is 15 to 25 degrees of extension in the lead wrist at setup.
Using HackMotion, setup the ball and check your lead wrist extension. Try checking this initial wrist position a few times to see how much variation there is from one swing to the next.
- Video timestamp – 0:45 – 1:30
Keep That Extension to the Top
Generally speaking, adding extension in the backswing is a mistake. However, for golfers who swing too flat, the goal can easily be tweaked to maintain the extension at setup to the top of the golf swing.
Avoid adding too much flexion during the backswing, and at the same time, don’t feel the need to add extension.

If you struggle with a flat golf swing, try to maintain that slightly extended lead wrist position in the backswing. You’ll feel like your thumbs are pointing up at the top of the backswing.
Match the Clubface and Lead Wrist at the Top
How you control your clubface at the top of your backswing will impact your ability to hit a straight shot.
If the clubface points too far down (toe toward the ground), it’s open. Too far up? It’s closed.
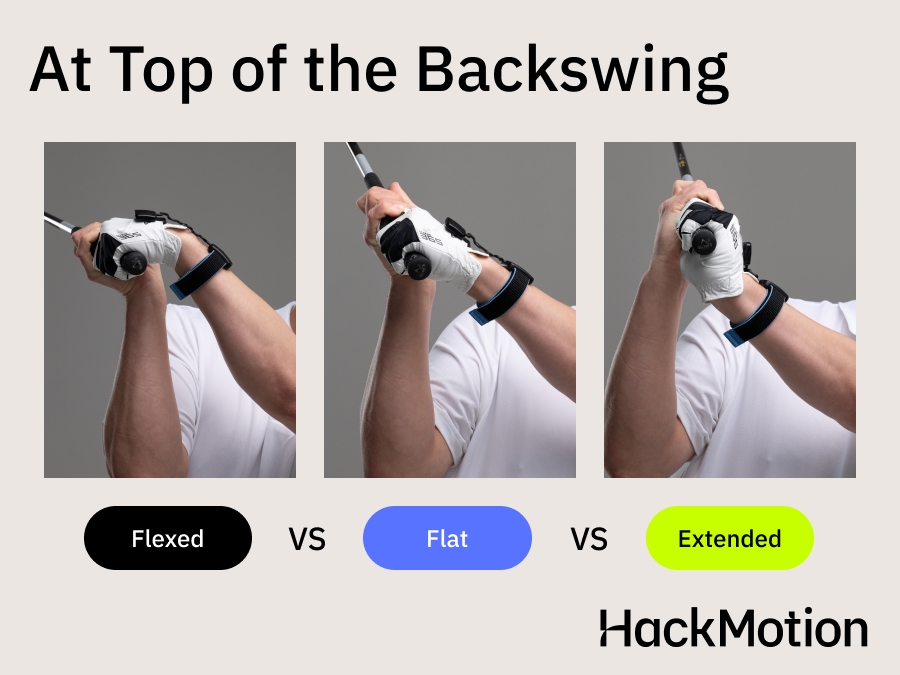
Overly flexed wrists often lead to an overly flat swing and timing issues when trying to square the clubface. Work on getting to a flat or slightly extended wrist at the top.
You’ll see some players like Dustin Johnson with this overly flexed lead wrist at the top. However, he has a unique swing and has trained his body to rotate to accommodate this flexed position.
If you are struggling with a flat swing, the overly flexed lead wrist will likely make the situation worse.
- Video timestamp – 1:00 – 2:00
Use Wrist Extension to Keep the Club in Front
One of the most important benefits of lead wrist extension at the top is that it helps keep the clubface square and the shaft on a better path.
For golfers with a swing that is too flat, the position will be to keep the club in front of the body.
The clubface doesn’t need last-minute adjustments when you maintain extension instead of bowing the wrist.
That makes keeping the club and arms moving with your body on the downswing easier than dropping too far inside or behind you.
Instead of “dropping the elbow,” think of keeping the club in front of your chest as you rotate through. This helps eliminate the need to reroute the club or stall your body to square the face.
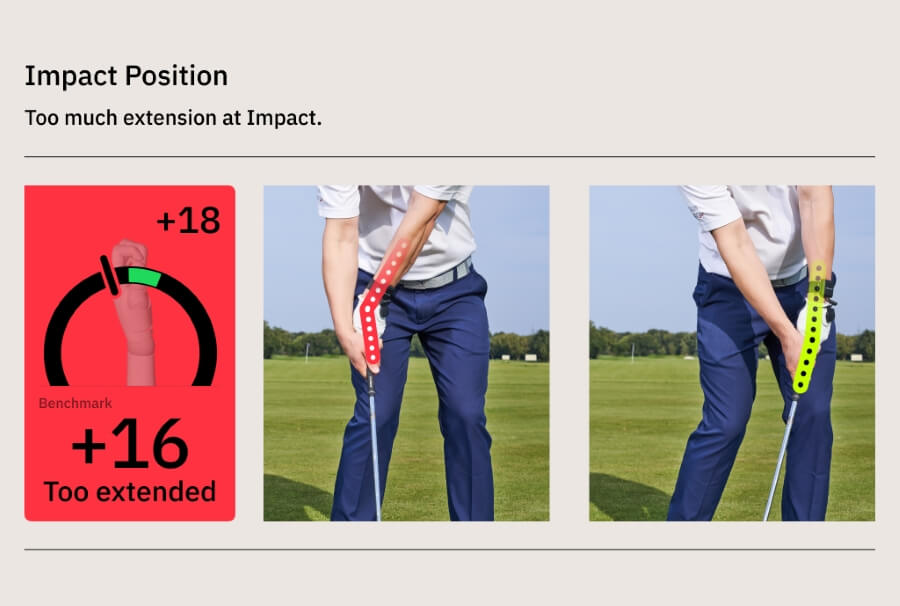
Turn Through (Don’t Stall)
Flat swings often lead to early extension or flipping the wrists through impact. With the face square and the club on plane, you can keep rotating through.
Once you have your wrist in the right position, start to turn through the ball, don’t stall. One good swing thought is to get your belly button to the target and let your chest lead the motion.
Drills to Fix a Flat Swing
Credit-Card Flat-Wrist Check
For a simple way to check your wrist position, you can use a credit card. This is a great drill to work on issues with both extension and flexion in the lead wrist because it brings some awareness to the position of the hands.
- Video timestamp – 6:40 – 8:15
Credit-Card Flat-Wrist Check – Step by Step:
- Insert the Card: Slide a credit card (or stiff card) under the wristband of your glove hand.
- Set Up Normally: Take your address position and feel a light touch from the card.
- Slow Backswing: Swing back slowly and try to keep the card from digging into your forearm (indicates a flat or slightly extended wrist).
- Rehearse and Hit: Practice this feel, then hit a shot while maintaining the same wrist position.
T-Peg Clubface Guide
If you are having trouble understanding where your clubface should be lined up and what it looks like at different positions throughout the swing, the T-Peg Clubface guide could be helpful.
In addition to using this as a drill, keep it in mind as a general learning exercise to improve clubface awareness.
- Video timestamp – 10:45 – 11:45
T-Peg Clubface Guide – Step by Step:
- Insert a Tee Peg: Place a tee peg in the small hole at the end of your grip so it sticks out like a pointer.
- Swing to Waist High: As you reach waist-high (P2), the tee peg should point slightly down toward the ground—not straight up or way inside.
- Check at the Top: At the top of your backswing, the tee peg should point slightly behind you—not directly toward the sky.
- Use as a Visual Cue: The tee peg gives instant feedback on whether your clubface is staying square or rolling too far open.
Alignment Stick Plane Gate
Finally, if you need a way to practice using alignment sticks, this Alignment Stick Plane Gate is a great setup. Giving yourself a guide will ensure that you are not taking the club on too flat a plane.
- Video timestamp – 0:53 – 1:30
Alignment Stick Plane Gate – Step by Step:
- Set the Alignment Stick: Stick an alignment rod in the ground so it matches your shaft angle at address.
- Position the Ball: Place a golf ball about a foot ahead of the stick, directly on your target line.
- Make Half Swings: Swing back and through, focusing on avoiding the stick on your downswing.
- Up and Down Feel: This drill encourages a more vertical swing path and prevents swinging too far around your body.
Final Thoughts
A flat swing can make you have issues with blocks, hooks, and contact problems. While you don’t want to get your swing too steep, a slightly steeper swing can lead to cleaner strikes and better face control.
Try wearing your HackMotion to ensure your swing is not too flat, and make it difficult to play consistent golf.