How to Fix a Fade in Golf: Simple Tips to Hit It Straight
While a fade can be a helpful shot with a high launch and a soft landing, it’s not always the ball flight you are looking for. If you are hitting an unwanted fade, it’s likely because your clubface is left open at impact.
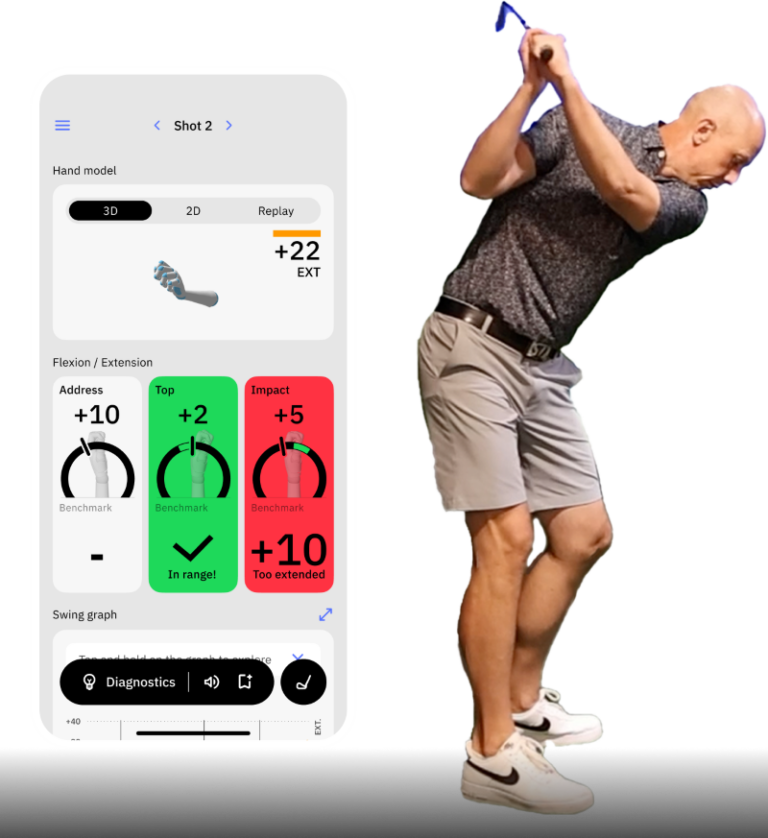
The open clubface is controlled by the angle of your wrists at impact.
If you want to get rid of the fade, we will help walk you through the steps and provide a few actionable drills you can bring to the driving range to fix it before it turns into a slice!
Key Takeaways
Here are a few things to know about how to fix the unwanted fade in your golf game.
- An Open Clubface at Impact Is the Main Culprit: Most unwanted fades stem from a clubface that’s open relative to the swing path. Excessive lead wrist extension, a weak grip, and an open stance all contribute to leaving the face open.
- HackMotion Data Pinpoints Excessive Wrist Extension: By tracking your lead wrist angles in real time, HackMotion helps you see exactly when and where you’re cupping (extending) the wrist.
- Actionable Drills Accelerate Improvement: Drills like the Motorcycle Drill and Combined Top Drill teach you how to maintain a square or slightly closed clubface at impact. This will help stop the fade before it becomes a slice.
Contents
What Causes a Fade in Golf?
A fade happens when the clubface is open relative to your swing path at impact. The most common reasons that could happen are:
- Excessive Lead Wrist Extension – Your lead wrist is cupped (extended) at the top and/or at impact, leaving the face wide open.
- Weak grip – Your lead hand is too far under the handle (not seeing enough knuckles), making it harder to close the face.
- Open stance at setup – If your feet, hips, or shoulders are aligned left of your target (for right-handed golfers), you create a left-to-right bias.
- Lack of rotation in the forearms: You never fully rotate your forearms or flex your lead wrist in time, so the face stays open.
Three Simple Steps to Fix Your Fade Forever
Walk through each of these steps individually to help build better fundamentals and ensure your fade goes away for good. These tips will help straighten your shots out and give you more consistent results on the course.
Strengthen Your Grip
Your weak grip could be making it difficult for you to rotate the clubface and hit a square golf shot. Strengthen your grip to give your trail hand a little more control in squaring the clubface.
- Turn your lead hand slightly to see at least two or three knuckles at address.
- Cover your lead thumb with the lifeline of your trail hand.
- A stronger grip naturally promotes earlier face closure.
Square Your Feet and Shoulders
Sometimes, you may not realize that you are setting up to hit a fade before you even take the club back. Try a square setup like this to see if it straightens out your fade.
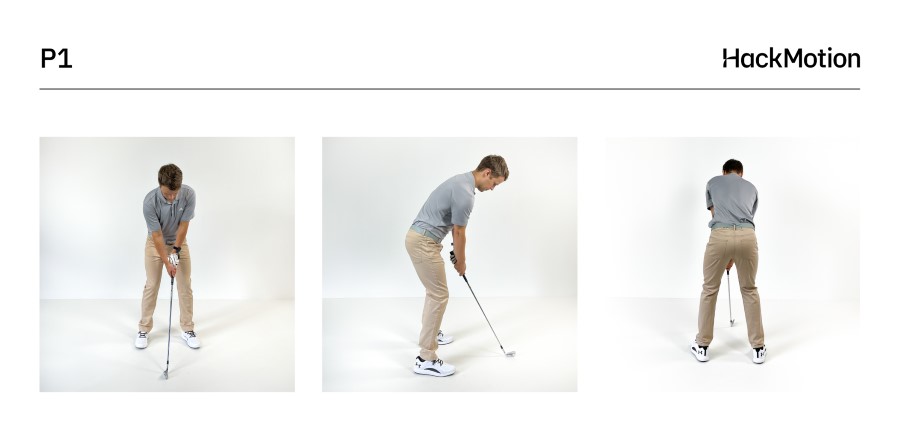
- Align parallel to or slightly right of your target (for right-handers).
- If you’re unsure, use alignment sticks to confirm everything is square.
- Check feet, hips, clubface, and shoulder alignment to ensure everything is square.
Reduce Lead Wrist Extension
Understanding wrist action in your golf swing is key to hitting more controlled shots!
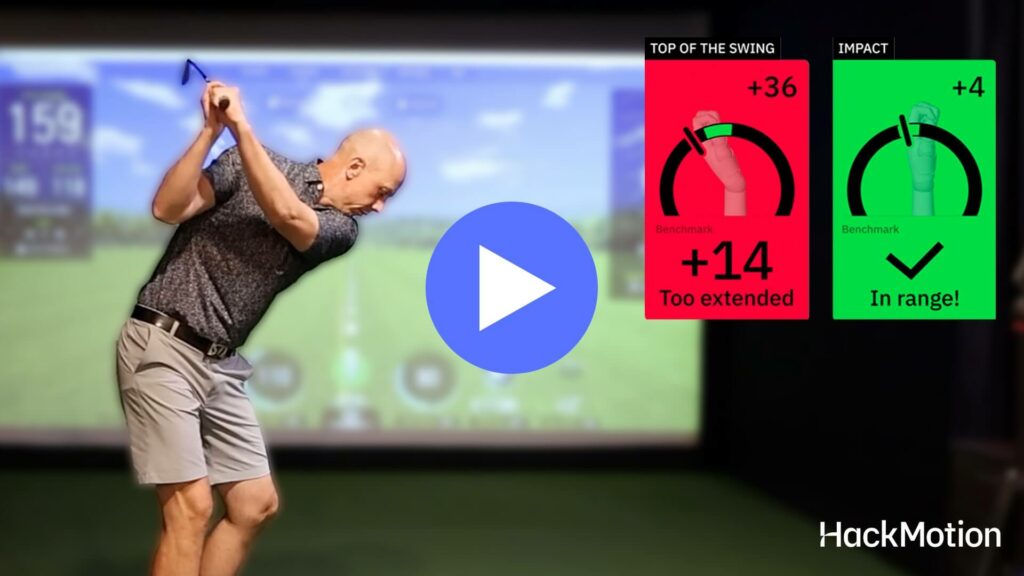
Lead wrist extension or cupping of the lead wrist will cause your clubface to open. Many amateur golfers increase the extension in their lead wrist from the setup position to the top of the backswing.
This leaves an open clubface at the top and not enough time to square it on the way to the golf ball.
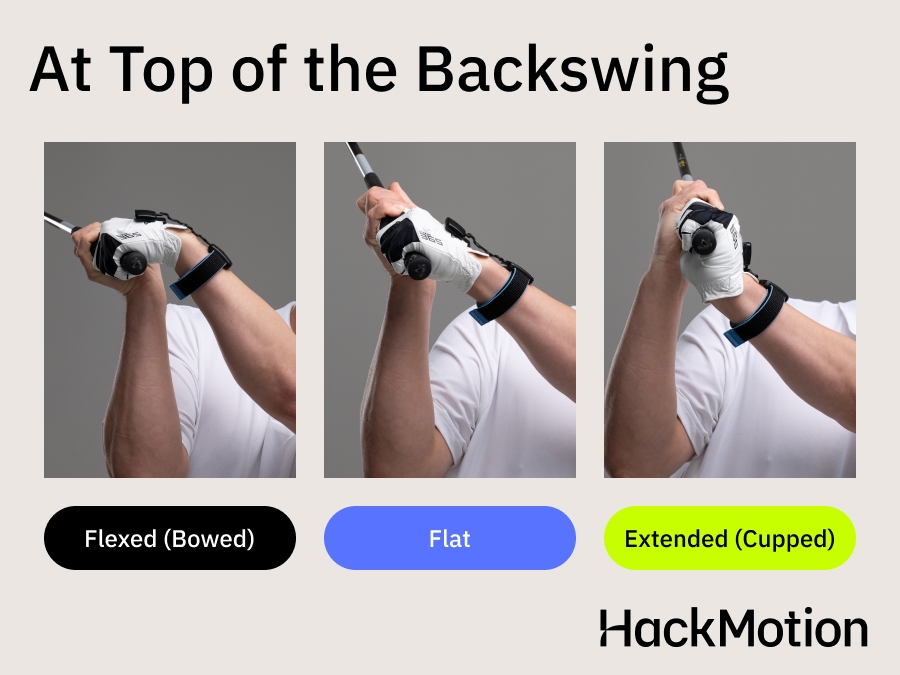
- Check your HackMotion to ensure you are not adding extension in the lead wrist from setup to the top of the backswing.
- At the top and into the downswing, feel your lead wrist flatten or bow slightly.
- Use HackMotion to check if you’re moving from extension toward flexion.
- This ensures the face is more closed (or at least neutral) by impact.
Drills to Help You Stop Fading the Ball
Below are four drills tailored to reduce a fade by focusing on how your wrists control the clubface. Each drill is actionable, and two of them can be paired with real-time feedback using the HackMotion app.
Motorcycle Drill
If you’ve determined that your lead wrist angle at the top of your backswing is the issue causing you to fade the ball, then the Motorcycle Drill is a perfect option to train the proper wrist angles.
The Motorcycle Drill trains you to twist the handle as if you’re rolling a motorcycle throttle downward.
It reduces lead wrist extension and helps to square the clubface earlier. The Motorcycle Drill is in the HackMotion app so you can work on it in real time.
Motorcycle Drill (HackMotion) – Step by Step:
- Set Up With HackMotion On: Address the ball normally, noting your baseline extension.
- Find the Top and Pause: Swing to the top. If your HackMotion indicates high extension, that’s your culprit.
- Twist the ‘Throttle’ Down: Move the wrist into flexion (bowing) to rotate the face closed.
- Transition Smoothly: Swing down while maintaining a more flexed lead wrist.
- Check Real-Time Data: If the fade persists, add a stronger “motorcycle” feel. If you start hooking left, ease off.
- Repeat in Small Sets: Begin slowly, gradually increase speed, and continuously compare HackMotion data to ball flight.
Arm Straight / Punch Finish Drill
Working on hitting punch shots makes it easier to maintain the correct angles through impact. If you want to learn to hit the ball a little more left of your target this arm straight punch finish drill is the way to go.
- Video timestamp – 10:00 – 16:39
Arm Straight / Punch Finish Drill – Step by Step:
- Address and Choose Target: Set up as normal with a mid-iron.
- Punch Finish Mindset: Intentionally finish low, arms straight, and wrists firm (no flipping).
- Monitor Lead Wrist on HackMotion: Aim to see minimal extension or “cupping” through impact and into your follow-through.
- Evaluate Left-Right Misses: If you still fade, you’re flipping late or not squaring enough.
- Progress in Speed: Start with half swings, then increase to full swings, keeping that “punch” style finish.
Static Impact Position Drill
If you are unsure as to where your golf club should be at impact, the Static Impact Position Drill is a good one to practice. This helps to develop muscle memory so you can consistently find this correct impact position.
Forward shaft lean and a flat or flexed lead wrist reduces the change of an open face at impact.
- Video timestamp – 0:50 – 4:42
Static Impact Position Drill – Step by Step:
- Pose in “Impact” Without a Swing: Manually set your hands ahead of the ball and flatten (or slightly bow) the lead wrist.
- Check HackMotion: See if you’re truly in the green zone (low extension). Adjust if needed.
- Hit Small Chips From That Pose: Keep your wrist angles stable through the strike, then gradually expand to bigger swings.
- Build Up to Full Swings: Once the correct feel is established, blend that static impact position into a normal backswing-to-impact motion.
Combined Top Drill
This drill is a “bridge” between slow-motion practice and a full-speed backswing. By training the wrist to stay in the correct “green zone” at the top, you set yourself up to have a square face (or slightly closed) as you transition and hit the ball.
Sometimes working on fixing the wrist at impact leaves you having to do too much squaring with very little time to do it.
Combined Top Drill in HackMotion
Train your top position by mastering optimal wrist angles. Challenge yourself to reach the ideal wrist position during a full-speed backswing.
Combined Top Drill – Step by Step:
- Full-Speed Backswing: Address the ball normally with HackMotion on. Make a rapid backswing, just like you would on a real shot with no deliberate pause.
- Check Wrist Angles at the Top: The moment you reach the top, note whether you’ve achieved the desired (lower extension) lead wrist reading in HackMotion’s green zone. If you have time, pause briefly to confirm your wrist position.
- Transition and Swing Through: From that top position, flow smoothly into your downswing. The goal is to blend a stable, square wrist angle from the top into your normal delivery.
- Refine with “False Starts”: If the top-of-swing numbers still show extension, do a few reps where you swing quickly to the top, pause for just an instant, and then come down. Over time, reduce the pause until you can maintain the correct wrist position in a continuous, full-speed backswing.
FAQs
Why Would You Want to Fix a Fade?
While a slight fade can be helpful at times it’s better to hit a fade when you are planning one and not unintentionally. Squaring the clubface earlier gives you more consistent contact, better accuracy, and often more yards.
What’s the Difference Between a Fade and a Slice?
A fade is a small left-to-right curve that’s often controlled and intentional. A slice is a severe curving ball flight veering well right (for a right-hander).
How Does HackMotion Help With Fades?
HackMotion gives real-time wrist data. If your lead wrist is overly extended at the top or during impact, you’ll see it on the sensor.
Can I Practice These Drills Without Hitting Balls?
Yes. Slow-motion or paused rehearsals help you feel proper wrist positioning. Once comfortable, introduce a ball and compare your HackMotion data with actual ball flight.
Final Thoughts
A chronic fade generally comes down to an open face. By focusing on lowering lead wrist extension (especially from the top of your swing down), you can square the face much sooner.
Use HackMotion for exact, real-time wrist measurements and then apply the wrist related golf drills to get the right feel and get rid of your fade for good.
