How to Stop Shanking Irons: 7 Proven Tips & Drills to Fix a Shank Fast
Once you hit one shank, getting the shot out of your head is hard. You’ll stand over the ball and hope another shank isn’t coming.
The tricky thing about a shank is that it doesn’t always take a terrible swing to shank the golf ball. It often shows up when you think you’re doing everything right.
That’s why it can be hard to diagnose and even harder to eliminate when it appears on the golf course.
But there are patterns. Whether it’s your wrist angles, your posture, or your path, the causes of the shank are distinguishable, and once you find these causes, you can fix them.
How to Stop Shanking The Golf Ball (Key Takeaways)
If you’re in a hurry to fix your shank, here’s a quick summary of what causes the dreaded shank and how to fix it:
- Watch your lead wrist extension. Too much extension leaves the face open and exposes the hosel. Work on flattening the lead wrist in transition.
- Fix your path and the face. A shank can come from both outside-in and inside-out paths. Prioritize a neutral path with a square clubface at impact. Use HackMotion to ensure your lead wrist stays flat.
- Re-center your ball position. When in doubt, move the ball to the middle of your stance to avoid hitting it too early in the arc.
- Eliminate the sway. Replace lateral movement with rotation, feel the lead hip clear around, not slide forward.
- Stay off your toes. If your weight shifts forward during the swing, you’ll lunge toward the ball with the ball getting closer to the hosel. Rehearse half swings while keeping your weight centered.
- Don’t drag the takeaway inside. Keep the clubhead outside your hands during the takeaway to avoid setting up a hosel-first swing path.
Prefer watching instead of reading? Watch the video below to finally understand why the shanks keep showing up and how to eliminate them using practical drills.
Contents
Why do I Shank My Irons?
Shanking is when the hosel of the golf club makes contact with the golf ball. Instead of hitting the ball off the center of the face, you actually make contact with the hosel.
The most common reasons for hitting a shank include:
- Standing too close to the golf ball: this typically makes a swing too upright.
- Failing to shift weight: weight stays back, you get unstable, and the clubface doesn’t return to the correct position.
- Hands are too active: excessive wrist action, especially in the form of extension, can lead the clubface open at impact.
- Outside in swing path with open face: when the swing path comes from outside the line of the ball towards the hosel.
It’s good to understand why you shank the ball, but the most important thing here is the fix.
7 Effective Ways to Stop Shanking Your Irons
These are the best ways to stop shanking your irons. I know it’s frustrating when this happens on the golf course, and sometimes you can’t immediately fix it.
If you run into real trouble in the middle of a round, just know that switching to short irons and focusing on less movement and solid contact can be enough to get you through a round.
When that round is done, these are the solutions you need.
1. Practice Short Chip Shots
This fix for a shank sounds much too simple, but it’s not.
The key here is that you are no longer making solid contact with the face of your club, and you need to see why that is happening.
Taking the swing down to a much shorter chip shot type swing could give you the information you need, and naturally fix the shank.
Try to hit 10 or 15 little short chips where you strike the ball, and then a little turf, and the ball is hit squarely off the face.
Then move back into the full swing and see if you feel better about making contact with the irons.
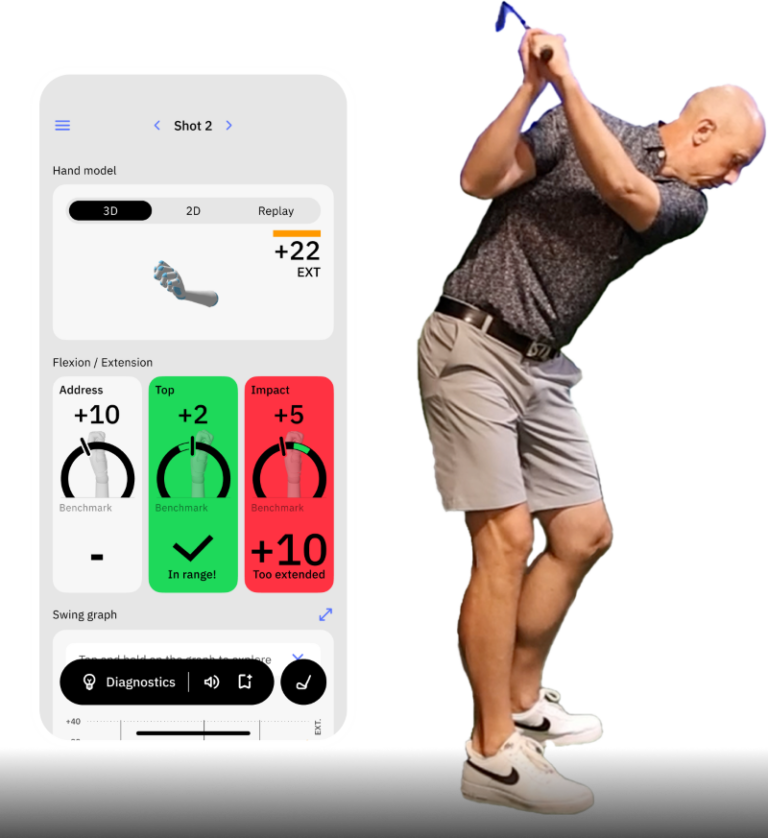
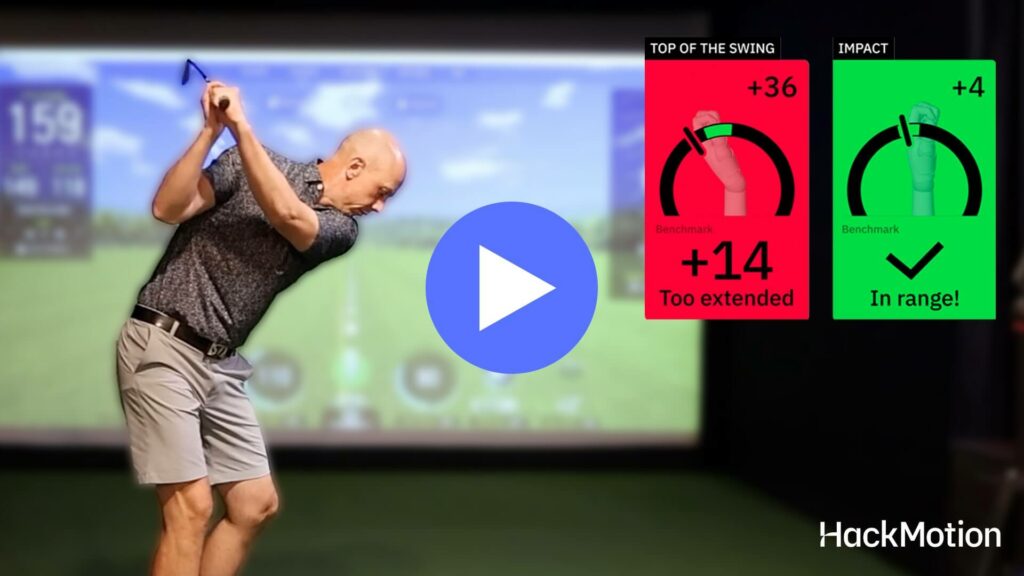
2. Measure Your Wrist Extension Throughout The Swing
If your lead wrist gets too extended during the swing, the clubface stays open and the hosel gets exposed, a common setup for a shank.
In our analysis of more than 1,000,000 golf swings, we’ve seen a consistent pattern among better players:
- From setup to the top, there’s no extra extension added.
- From the top down to impact, that extension is reduced.
- At impact, the lead wrist is flat or slightly flexed.
When you can get into that impact position, shanking the ball becomes much less likely.
One of the best ways to train this move is the Motorcycle Drill, which teaches you to move the wrist from extension toward flexion in transition. (We’ll cover this drill in detail later, along with step-by-step instructions.)
With HackMotion on your wrist, you’ll see the data shift from extension into flexion as you practice the clearest way to verify that your clubface is square and no longer drifting toward the hosel.
Motorcycle Drill – Master Wrist Flexion in the Downswing
Focus on continuously adding flexion until the club reaches parallel, then smoothly complete your swing.
3. Check Your Ball Position
Fixing a shank can be as simple as making sure your ball position is correct.
If you start shanking the irons out of nowhere, find the middle of your stance again. It doesn’t matter what iron you have in your hands; find the middle and start from here.
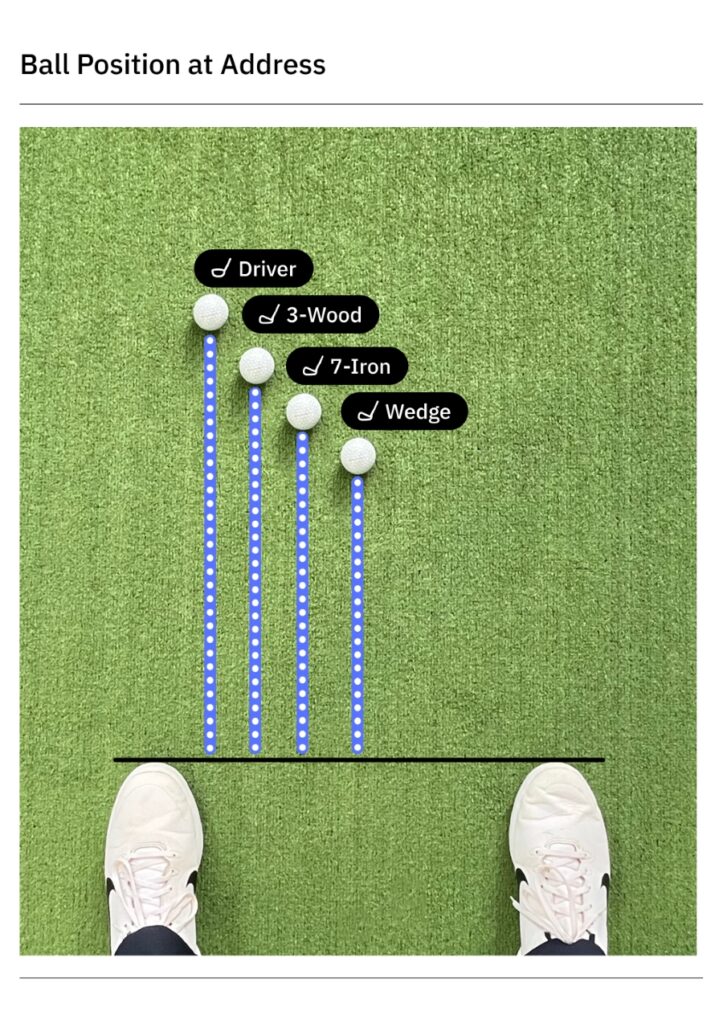
You may hit the ball a little thin or heavy, but the shank could go away.
Most times, golfers with the ball too far back in their stance can hit the shank because the clubface is still rotating towards closed as it approaches the ball.
4. Fix The Swing Path
If you come from the outside in, the chances of hitting a shank are higher.
The inside to out swing path will avoid the hosel making contact with the ball. To accomplish this in your game all you need is a headcover and a little time at the range.
5. Get Rid of The Sway
The golf swing involves a lot of pivoting and turning, but swaying is a major cause for concern.
If you sway towards the target (instead of turning) on your way through the ball, your body will be open, the clubface open, and the club will be lagging behind.
There’s a chance you’ll make contact with the hosel.
My favorite drill to eliminate the sway is to put an alignment stick on the side of my lead hip. As I swing through the ball, I want to clear my hip around this stick instead of bumping into it and sliding through impact.
6. Don’t Let Weight Move to The Toes
Keep your weight balanced in the middle of your feet. When it drifts onto your toes during the swing, the club moves closer to the ball, and the hosel comes into play.
Hit 10–20 half swings, focusing on staying centered no “dive” toward the ball. Use slow-motion reps if needed to feel the balance, then build into full swings while keeping that same centered contact.
7. Watch Out for The Low Inside Takeaway
The golf takeaway is such an important part of the swing because it can set you up on the right track for the rest of your swing.
Taking the club back low and slow is great, but low and inside can cause a shank.
Use a takeaway drill like the one seen in this video.
If you’ve been taking the club too far inside and too low on the backswing, you will realize it right away.
Additional Drills to Fix The Shank
Now that you have these shank fixes lined up, I thought it might be helpful to see a few additional drills.
Each of these could give you that feeling you need to get rid of the shank for good.
Headcover Path Neutralizer (Outside-In Shank Fix)
If your shanks come from swinging across the ball with an open face, create a simple “don’t-hit-this” barrier to force a more neutral path.
This gives instant feedback and pairs perfectly with wrist control training.
Headcover Path Neutralizer Drill – Step by Step
- Set the obstacle: Place a headcover (or towel) just outside and slightly behind the ball, close enough that an over-the-top move would clip it.
- Neutral setup: Aim body parallel to the target line; ball centered to slightly forward with irons.
- Backswing check: Take it back without touching the headcover—no early roll inside, no lift outside.
- Deliver from inside-neutral: On the downswing, miss the headcover and feel the hands/club returning slightly from the inside rather than across.
- Face awareness: Pair 5–10 reps with HackMotion on; watch lead-wrist extension drop toward neutral/flexion from transition to impact.
- Progression: Start at half speed; once you can miss the headcover 8/10 times, build to full swings.
Inside-Blocker Path Reset (Too-Inside Shank Fix)
If you drag the club too far inside (low/flat takeaway) and shove the swing out at the ball, set your barrier on the inside to clean up the arc.
This prevents the hosel-first approach caused by an excessively in-to-out path.
Inside-Blocker Path Reset Drill – Step by Step
- Set the obstacle: Place a headcover just inside the ball, a centimeter or two under the shaft line at address.
- Takeaway discipline: Keep the clubhead outside your hands for the first 12–18 inches; don’t clip the inside blocker.
- Top position: Allow normal shoulder turn; avoid a super-flat hand path.
- Neutral delivery: Swing down over (not into) the blocker so the club returns on a neutral arc to center face.
- Contact cue: Feel the sweet spot passing the ball, then swing left slightly through impact (not at the ball).
- Reps: 10–15 half swings missing the blocker, then 10 full swings. If you touch the blocker, reset and slow down.
Motorcycle/Release Combo (HackMotion “Shank-Proof Impact”)
Most shanks trace back to a face that’s too open for the path.
This combo teaches you to add lead-wrist flexion in transition (Motorcycle) and keep a compact, forward-hands release into impact.
Headcover Path Neutralizer Drill – Step by Step
- Calibrate HackMotion: Note your lead-wrist extension at address.
- Backswing: Make a normal backswing—don’t add extra extension at the top.
- Motorcycle in transition: As the club starts down, feel you’re twisting the throttle “off”—lead wrist moves toward flexion by club-parallel (P6). Watch HackMotion for extension ? flexion trend.
- Compact release reps: From club-parallel in the downswing, swing into impact with hands slightly ahead and lead wrist flatter/more flexed than address.
- Feedback target: Aim for consistent green-zone readings on HackMotion from P6 ? impact; if hooks appear, slightly reduce flexion rate.
- Build up: Do 8–10 slow reps (no ball), 8–10 half shots, then 10 full swings—maintaining the same wrist numbers each time.
Final Thoughts
At this point, you should feel more confident about your ability to fix your shank. I know that this shot feels like the end of good golf, as you know it, but you can work through a fix.
Make sure your wrist angles are correct, watch your path, and keep that weight centered on your feet. These tips should lower the chance of a slice and get you on a path to success.