Push Slice in Golf (The Most Common Causes & Effective Fixes)
If you want to know what’s worse than a slice, ask the golfer who hits a push slice.
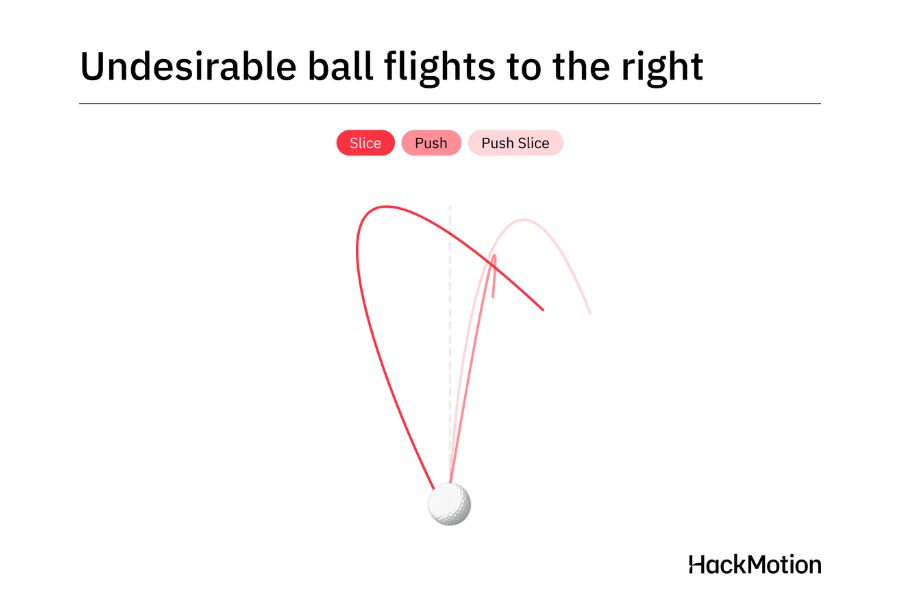
A push slice starts out right and then goes further right; if you want to take a look at the golf course next door, the push slice is the golf shot to use.
If you have ever hit a push slice, you know it’s time for it to go. This guide covers why you hit a push slice, what can be done about it, and the easiest ways to fix it.
Contents
Push Slice in Golf (Key Takeaways)
A push slice is caused by a clubface that is open both to the target and the path at impact.
If you don’t have time to read our entire guide on fixing a push slice we have two options for you. First, here are the key takeaways:
- Fix your setup – Placing the ball too far back in the stance often leads to an open clubface at impact and can be one of the main causes of a push slice.
- Close the club face early – Excessive wrist extension (cupping) opens the clubface. Practice keeping the wrist flatter at the top of the backswing to improve control and set up for a straighter shot path.
- Don’t slide laterally – Sliding instead of rotating the lower body can also open the clubface. To keep the face on track, work on controlled hip rotation rather than excessive lateral movement.
- Shallow the club correctly – Start the downswing with a controlled hip rotation and weight shift. Let the arms fall naturally without forcing the club too far inside.
If you want a more detailed guide on fixing a slice, check out our free seven-step mini-course.
Check out how coach Rob Cheney describes the course:
It covers the root causes of your slice and how to fix them, no matter the type. Access the free video course here!
What Exactly is Push Slice in Golf and Why Does it Happen?
A push slice is a shot that starts right of your target line (for righties) and then proceeds to curve to the right even more. A push slice happens because the clubface is open to both the target line and also to the swing path.
Fixes – How to Fix Push Slice in Golf
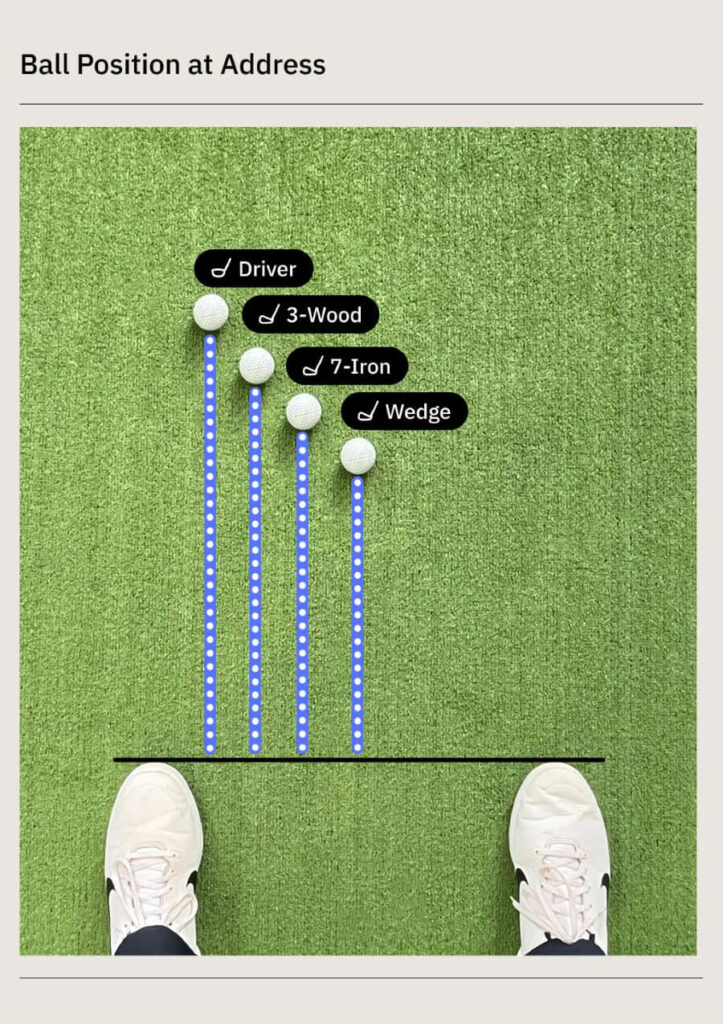
1. Move the Ball Position Forward
Ball position influences the golf swing far more than many may think. If your ball is too far forward or too far back in your setup, it will directly impact how your body sets up to the ball.
If the ball is too far back, you will see shots that will start to the right of your target line. If the face of the club is square to the path, it will cause a push. If your face is open to the path, it will cause a push slice.
To fix a push slice, move the ball slightly forward in your stance. This helps reduce the in-to-out swing path and gives the clubface more time to square at impact.
Keep in mind that the address position changes depending on which club you are using.
2. Close the Clubface Early
One of the easiest methods to fix a push slice with a driver is to work on your wrist action throughout the golf swing.
The wrists control the clubface, yet many golfers focus on the swing path without addressing a key cause of a push slice: poor wrist positioning that leaves the clubface open.
Push slicers often have excessive wrist extension, causing the clubface to stay open relative to their in-to-out swing path.
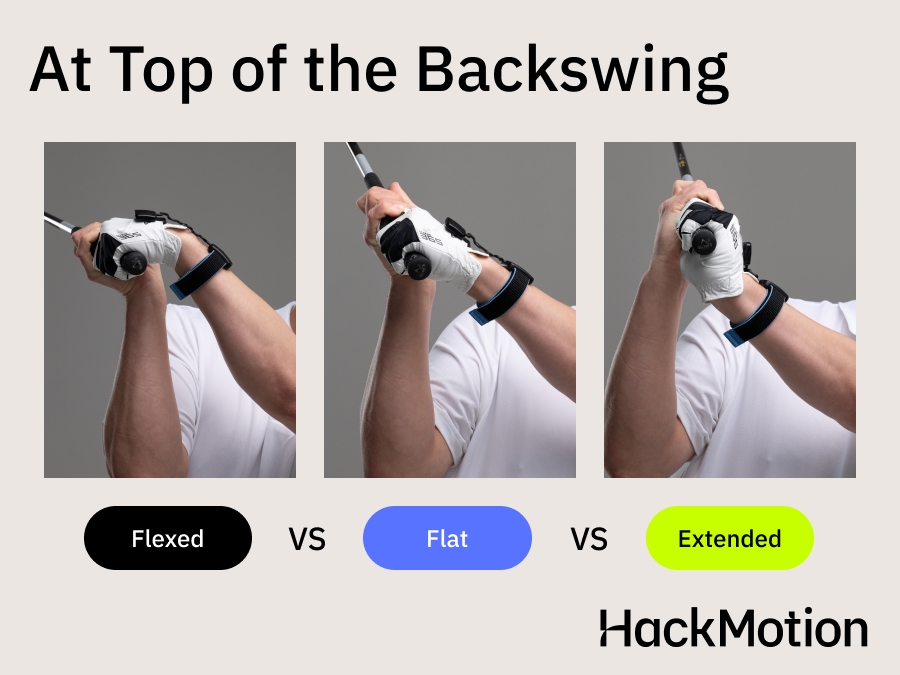
After analyzing over 1,000,000 swings, it’s clear that players who increase wrist extension from setup to the top of the backswing struggle to reduce it in time to square the clubface at impact.
To correct this, maintain a flat or slightly flexed wrist at the top of the backswing. This position minimizes the adjustments needed to achieve a square clubface at impact.
Take a look at this video where coach Danny Malcolm demonstrates how to achieve it!
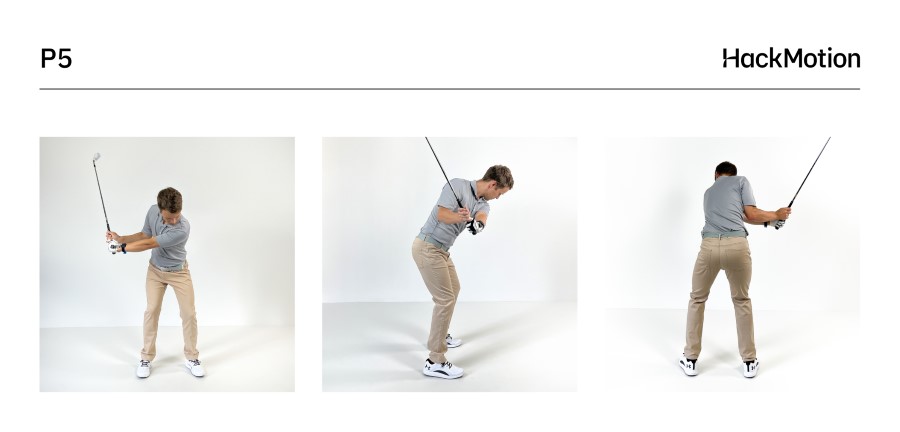
If your lower body initiates the downswing, you are doing the right thing. However, if the lower body does this a bit too quickly or without the arms even being connected, you’ll end up with a push slice.
Take a slight pause at the top of the backswing and let the lower body lead, pulling the arms and hands along. If you get to the top and just fire away with the lower body, you can open the clubface to the path and the target.
3. Don’t Slide Laterally
When the lower body slides laterally during the downswing instead of rotating, it can:
- Disrupt proper weight transfer.
- Prevent the hips from opening fully, leaving the shoulders and arms to overcompensate.
- Leave the clubface open at impact, contributing to slices or pushes
To fix lateral sliding, begin your downswing by shifting your weight slightly to your lead foot, then focus on rotating your lead hip back and your trail hip forward.
Note: Think of this movement as a turning action rather than a sideways push.
To practice this, use the alignment stick drill, where you place a stick near your lead hip and swing without bumping into it.
Aternatively, try the chair drill, where you keep your trail hip close to a chair while rotating, ensuring no lateral slide occurs.
4. Shallow the Club by Letting the Arms Fall
Letting the arms fall naturally during the downswing is crucial for maintaining balance and consistency.
Starting the downswing with a proper hip rotation and weight shift creates space for the arms to drop without being forced.
Keep the shoulders passive and the arms relaxed to let gravity guide their motion, avoiding tension or over-manipulation.
Focus on allowing the trail elbow to move in front of the body while staying close to the side, helping the club shallow naturally without getting stuck too far inside,
5. Try the Motorcyle Drill to Fix the Push Slice
To successfully address a push slice it’s crucial to focus on drills that help you transition smoothly into the downswing while maintaining control over the clubface.
One of the most effective exercises for this is the Motorcycle Drill, which emphasizes early clubface closure and lead wrist control.
To see this drill in action, watch Rob Cheney demonstrate the Motorcycle Drill using HackMotion technology.
At the top of your swing, imagine “revving” the grip like a motorcycle throttle with your lead wrist. This motion helps reduce wrist extension as you move into the downswing.
This is one of the most famous wrist action drills in golf, and you can work on it in real-time using the HackMotion app.
Motorcycle Drill – Master Wrist Flexion in the Downswing
Focus on continuously adding flexion until the club reaches parallel, then smoothly complete your swing.
HackMotion Motorcycle Drill – Step by Step:
- Normal Setup: A slight extension in the lead wrist is normal at address.
- Swing to the Top: Pause at the top position.
- Motorcycle Twist: In transition, it feels like you’re twisting the throttle “off.” This moves the lead wrist into flexion, closing the face.
- HackMotion Feedback: See if your extension data drops into the flexion range.
- Adjust Ball Flight: Too much flexion might cause hooks; not enough keeps the face open.
5. Use HackMotion During Practice
Using HackMotion on the driving range is like having a coach with you during practice.
It provides instant feedback on whether your wrist extension positions at the top of your swing are improving and offers guided drills to help you along the way.
HackMotion’s audio feedback mode allows you to set specific acceptable ranges for wrist angles throughout the swing.
If your wrists move outside these ranges, the device alerts you, ensuring you stay on track with your training.
Final Thoughts
A push slice is when your golf ball starts right and keeps going even more right. It’s usually caused by an open clubface and a swing path that’s going out to the right.
To fix it, try moving the ball a little forward in your stance, keep your lead wrist flatter at the top, and make sure you’re turning your hips instead of sliding. These small setup and swing changes can make a big difference.
Wearing HackMotion while you practice helps a lot. It shows you if your wrists are in the right position so you can learn the right feel and get rid of that push slice.