Reverse Pivot in Golf? Try These 6 Proven Ways & Drills to Fix It
The reverse pivot is a frustrating move in golf. It causes your body to move incorrectly, reducing distance and accuracy.
To get powerful shots that fly straight, your pivot needs to be more intentional, with your weight transferring to the back foot and then to the forward foot.
Things like wrist action, head position and even the angle of your spine are all going to come into play when working to fix the reverse pivot.
After analyzing more than 1,000,000 golf swings we have come up with six simple and effective ways to fix the reverse pivot in golf.
Fix Reverse Pivot in Golf (Key Takeaways)
If you don’t have time to go through all of these fixes and find something that works for you, here are the most important points to take with you:
- Don’t change your spine angle during the swing; as soon as it starts to increase, you could be setting yourself up for a reverse pivot.
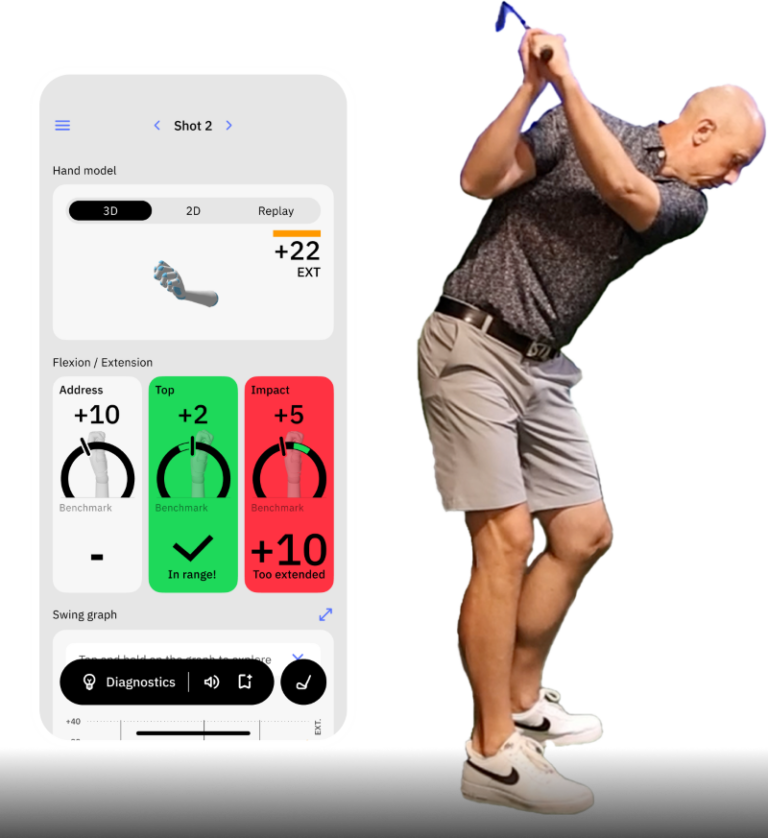
- Sometimes, a reverse pivot can be caused by too much extension and hinging of the wrists in the swing; keeping a flatter lead wrist can set you up for a better position at the top of your swing.
- Weight transfer needs to happen as a result of a pivot and turn, not a slide. Golf alignment sticks in the ground can be used to help ensure this happens efficiently.
Contents
How to Tell If You Have a Reverse Pivot Problem in Your Golf Swing
If you’re having a hard time seeing the actual reverse pivoting issues, here are a few signs that it could be the problem you struggle with:
- You finish falling back on your trail foot instead of balanced on the lead side.
- Thin and fat shots show up together, especially with irons.
- You feel like you have to “help” the ball into the air.
- You lose distance even when contact feels decent.
- On video, your upper body drifts toward the target in the backswing.
6 Proven Ways to Fix Reverse Pivot in Golf
Hip Tilt At Setup
Getting set the right way is the final piece of this reverse pivot puzzle. Start with a balanced stance and posture. Your feet should be shoulder-width apart and your spine tilted forward from your hips.
However, there is one more little trick that can help get you set up to remove the reverse pivot from your swing.
Slightly bump the hips so the lead hip is a bit higher than the trail hip. It’s not a full lean to the trail side, just a slight change of angle so that the hips are not completely parallel.
This position makes all the difference in getting that feeling of leading up the trail side and ensuring more consistency in the strike.
Create Width on the Takeaway
Here’s a great trick for eliminating the reverse pivot, and it’s a unique perspective you may not have considered.
As you take the club back, many players who reverse pivot tend to take the club inside and lose some of the width in their swing. Instead, you’ll want to feel like you push the club back down the line a bit.
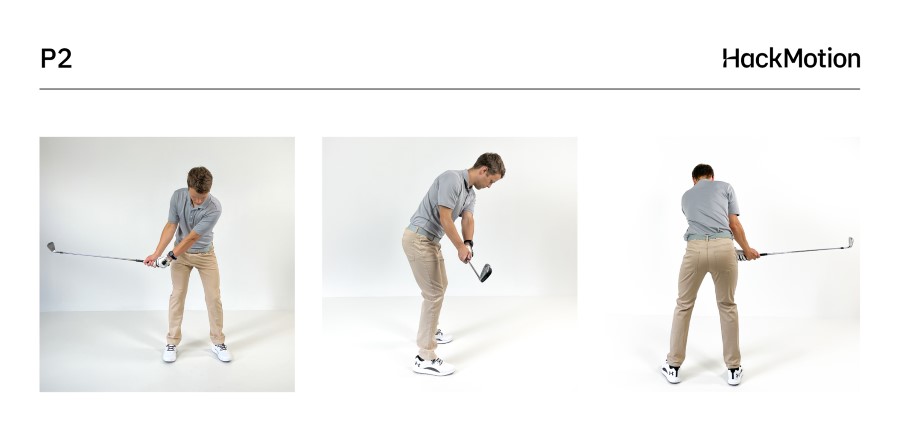
When this happens, your arms have the room they need to swing, and your hips are forced to rotate better. With this space created, you should be able to rotate the hips through impact without swaying them laterally.
It’s amazing how a little push of the club back through the takeaway can set the rest of the swing up for success.
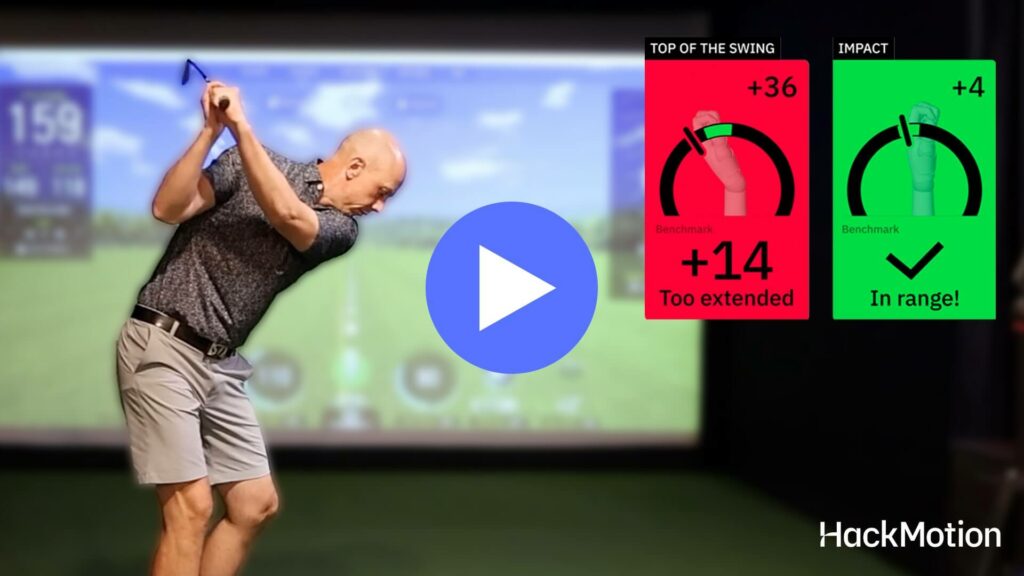
Keep the Chest Pointing Down at the Top
Spine angle is a difficult thing to feel when you are swinging the golf club. When your spine angle changes throughout the swing, you may not even know it’s happening.
However, it’s one of the quickest things you can spot on video. If you know you are reverse pivoting, take a video of your swing and see if your spine angle changes as you reach the top of your swing.
Below is what it should look like.
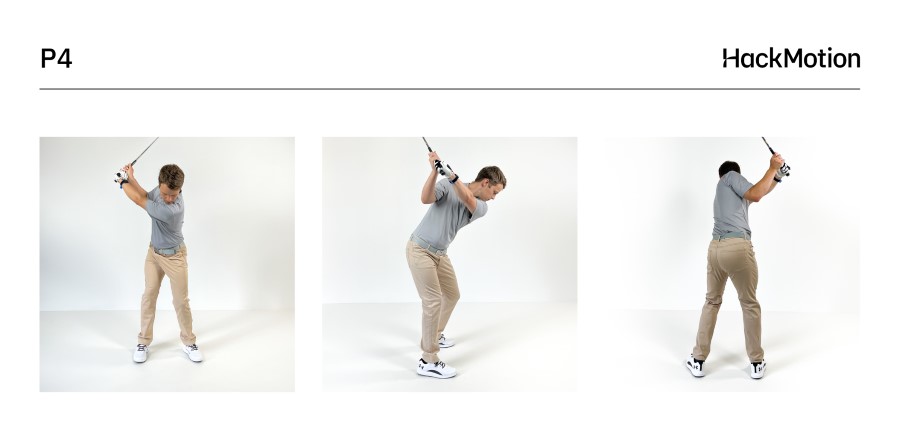
You’ll notice it gets a bit taller, and you may even see a move towards your target.
Since it’s so difficult to think about the spine in the backswing, try thinking about the chest instead.
When you get to the top of your backswing, is your chest pointing higher than it was, or is it aimed down towards the ground?
This video gives you some great insight into this concept and how to get that feeling of the chest pointing more down at the top of the swing.
Proper Weight Transfer
Weight transfer is key to fixing a reverse pivot in golf.
With a reverse pivot, you’ll move your weight onto the lead side on the backswing and the trail side on the downswing. It’s the opposite of what you want to do.
To start learning this concept, below is a step-by-step walkthrough.
Weight Shift & Pivot Drill – Step by Step:
- Cross Your Arms: Set the club down and place your hands on your shoulders.
- Turn Back: Rotate into your backswing while shifting your weight onto your trail leg. Feel it load up and get heavier.
- Check Your Hips: Ensure your hips have pivoted and turned fully.
- Fire Through: Drive your weight forward to the lead side, finishing with full rotation toward the target.
Maintain a Steady Head Position
Sometimes the concept of thinking about your head and its position in the swing can be enough to fix a reverse pivot.
Try to keep your head centered over the ball. Moving your head too much can make it difficult for your body to pivot the right way.
To do this, I like to take an alignment stick and put it down on the ground in line with the golf ball. As I swing back, my head might move just to the other side of the alignment stick, and then it stays behind it on the downswing.
Improper Wrist Action – Extension and Over-hinging
Wrist action on the backswing will create more issues with your reverse pivot. Where we really see trouble is with golfers who overcomplicate the concept of hinging in their backswing.
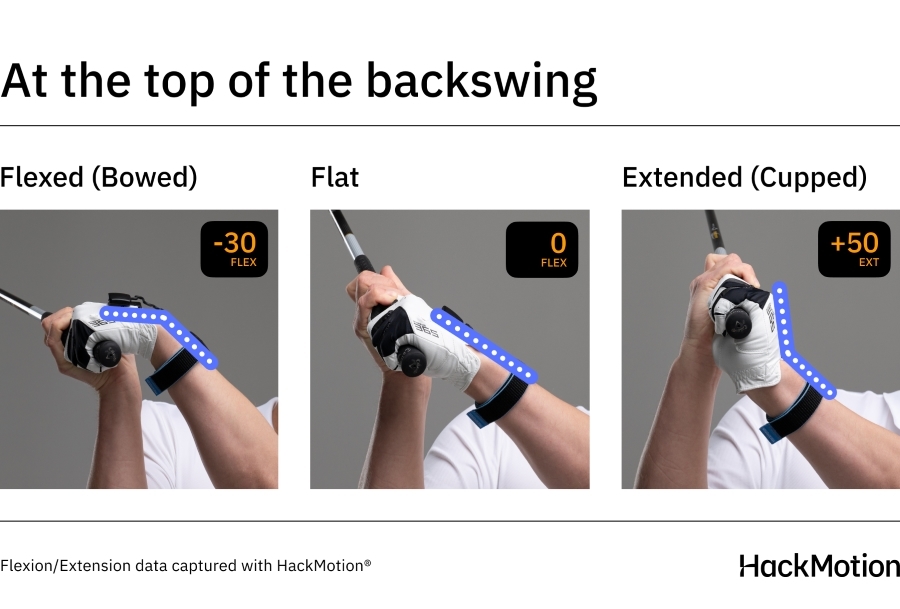
Excessive wrist action causes your club to get out of position.
Here’s a little test you can do to see if you are hinging your wrist too much as you take the club back:
Take a half-backswing and stop the club. Look at your lead wrist position. Is it hinged? Has your lead wrist started to extend or cup because of this hinge?
A proper hinge will help maintain the correct swing plane and prevent a reverse pivot. Take a look at this video where you can see how the hinge should happen more naturally and potentially a little later in the swing.
Drills to Fix a Reverse Pivot in Golf
If the tips above make sense but you still can’t feel the right pivot, these drills will make it click. Start with slow reps, build to half shots, and only go full speed once you can repeat the motion.
Cross-Arms Weight Shift & Pivot Drill (No Club)
This drill helps train the correct sequence. Load into the trail side in the backswing, then get pressure to the lead side and rotate through, without your arms “taking over.”
Cross-Arms Weight Shift & Pivot Drill – Step by Step:
- Set up in your normal stance (iron stance is best). Put the club down.
- Cross your arms over your chest (hands on shoulders).
- Turn to the top and feel pressure load into your trail leg/hip. Your body should turn—no big sway.
- Pause for one second and check your balance. You should feel stable and “coiled,” not leaning toward the target.
- Shift pressure to the lead foot and rotate through to a full finish, chest facing the target.
- Do 8–12 reps, then grab a club and hit 6–8 half shots trying to match the same pressure change.
HackMotion Casting Drill (Train Transition without the “Throw”)
Many reverse pivots show up because the body stalls and the arms “throw” the club.
This drill trains better wrist conditions in transition, so your body can rotate and shift forward without needing a last-second save.
HackMotion Casting Drill – Step by Step:
- Put on your HackMotion and open the Casting Drill in the app.
- Make your backswing to the top and pause when the app prompts you.
- Start down feeling like your hands and club don’t “dump” or widen early—you’re keeping structure as you begin the downswing.
- Keep the swing slow at first until you can consistently get positive feedback.
- Once you’re getting consistent feedback, hit half shots while keeping the same transition feel.
- Do 2 sets of 6–8 swings, then build to 3/4 swings only if you can repeat the pattern.
HackMotion Tip: If you notice your body hanging back or your chest stopping through impact, slow it down and focus on a cleaner transition first, your pivot usually improves automatically.
Head Boundary Drill (Stop Drifting Toward the Target)
A reverse pivot often comes with the upper body moving toward the target in the backswing. This drill gives you a simple “boundary” so your pivot stays centered.
Head Boundary Drill – Step by Step:
- Place an alignment stick on the ground in a straight line near the ball as your reference.
- Address the ball and note where your head sits relative to that reference line.
- Make a backswing feeling like your head stays mostly centered (a tiny move is fine—big movement is the problem).
- In transition and the downswing, your head should stay behind the reference, not drifting toward the target.
- Do 5 slow rehearsal swings, then hit 8–10 half shots focusing only on keeping your head from sliding forward.
Ball Between the Arms Drill (Synchronize Arms + Body)
If your arms move independently, your body tends to stall and that’s where reverse pivot patterns and flipping can sneak in.
Keeping a ball between your arms forces your chest, arms, and rotation to stay connected.
Ball Between the Arms Drill – Step by Step:
- Place a small ball (or headcover) between your forearms/upper arms so you can hold it in place with light pressure.
- Start with half swings and focus on keeping the ball in place through the backswing and into the follow-through.
- If the ball drops in the backswing, your arms are likely outracing your turn.
- If it drops through impact, you’re likely stalling and collapsing (elbows flexing too much, wrists “throwing”).
- Hit 10–12 punch shots at 50–70% speed while keeping the ball in place.
- Progress to 3/4 swings, and only go full when you can keep the ball in place consistently.
HackMotion bonus: Wear HackMotion while you do this. The connection drill helps your body motion, and HackMotion confirms you’re not “saving it” with extra wrist extension at impact.
Final Thoughts
At this point, you have many ways to attack your reverse pivot issue for good.
After many years of studying the reverse pivot, we have determined that there is often a small cause in the hands and wrist position, takeaway, or weight transfer that makes it very difficult to get the club position back where it needs to be.
Wear your HackMotion to the range and pay very close attention to the ulnar and radial deviation as well as the flexion and extension in your lead wrist; you may find the answer to all of your golf swing troubles.
If you’re ready to turn these drills into real on-course results, find a golf coach near you who uses HackMotion to coach the wrist conditions that control the clubface and impact.