Slow Motion Iron Swing (Step-by-Step Breakdown) – Build Compression & Control
When you slow an iron swing down frame by frame, the truth about great ball striking becomes obvious.
Clean contact is all about delivering the club with the right wrist angles, shaft lean, and sequence.
Most golfers lose distance and consistency because they add loft at impact instead of taking it off. Slow-motion footage shows how the best players do the opposite. Instead, they move into a flexed lead wrist, keep the trail wrist bent, and compress the ball between the turf and the clubface.
In this guide, we’ll break down the entire iron swing in slow motion, show you what to look for in each phase, and share drills to help you build the same compression and control using HackMotion.
Proper Iron Swing Sequence (Key Takeaways)
If you don’t have time to work through the slow-motion guide, here are the most important things to take with you right now:
- True compression requires forward shaft lean and a flexed lead wrist at impact.
- Great players shallow the club and square the face before impact not during.
- The trail wrist stays bent back, holding lag and preventing early release.
- Small face control errors early in the downswing cause big misses later.
- Using slow motion and HackMotion feedback helps you feel and measure those movements precisely.
Contents
Slow Motion Iron Swing: Step-by-Step Breakdown
Use the interactive slow-motion player below to see how the iron swing sequence unfolds.
Scroll, pause, and study each position in slow motion to understand how the wrists, shaft lean, and body rotation work together to create compression and control. Then jump into the steps below for a detailed phase-by-phase breakdown.
Step 1: Setup
Most poor iron shots start before the club ever moves. Setup dictates how efficiently you can strike down on the ball and control launch.
What to Know:
Set your posture so you can swing around your body. You won’t want the club getting too vertical.
The hands should be slightly ahead of the ball, creating a natural forward lean that promotes a downward swing and a descending strike.

Slow Motion Swing – Step-by-Step:
- Weight slightly favors the lead side (about 55/45).
- Lead wrist slightly extended, trail wrist slightly flexed.
- Hands just ahead of the ball at address.
- Spine tilted slightly forward, eyes over the ball.
- Avoid excessive shaft lean or tension in the forearms; stay relaxed but structured.
Step 2: Takeaway (P1 – P2)
This first movement away from the ball often decides whether the rest of your swing stays on plane. Slow-motion footage shows the wrists and clubface already working together, even though it may feel quiet at this point in the swing.
At the same time, the chest and shoulders begin to move in unison, creating width and a connection between the arms and body.
The club moves back low and wide, not from the hands, but from the rotation of the upper body, which sets the stage for a consistent, on-plane backswing.
What to Know:
The wrists shouldn’t be static. The lead wrist begins to flatten as the trail wrist hinges slightly, helping the club trace a wide, low arc. The key thought at this point in the swing is stability.
Slow Motion Swing – Step-by-Step:
- Clubhead stays outside the hands for the first foot.
- Lead wrist flattens; trail wrist begins to hinge upward.
- Avoid rolling the clubface open or snatching it inside.
- Keep arms extended, chest turning with the club.
- Check that the clubface matches your spine angle square to the path.
Step 3: Backswing to Top (P2 – P4)
At the top, slow motion reveals whether you’ve built structure or chaos.
Great players look simple here because the club and wrists stop moving independently, the hinge is complete, and the body turn does the rest.
What to Know:
The goal isn’t a huge wrist hinge; it’s a stable one. The lead wrist stays flat or slightly flexed to maintain a square clubface. Over-hinging or cupping adds inconsistency and loft.
Slow Motion Swing – Step-by-Step:
- Trail wrist fully extended, lead wrist flat or slightly bowed.
- Club shaft short of parallel; arms connected to the chest.
- Turn your shoulders until they’re about 90° to the target line.
- Avoid overswinging or adding extra hinge at the top.
- HackMotion cue: trail wrist extension stable within your “green zone.”
Step 4: Transition (P4 – P5) – The Move That Makes the Difference
This is where pros separate themselves from amateurs.
In slow motion, you can see the sequence: the lower body shifts, the lead wrist flexes, and the shaft shallows before the downswing accelerates.
What to Know:
The best players flex the lead wrist as they start down. This squares the face early and builds forward shaft lean. The trail wrist stays bent to preserve lag. The combination creates compression.
Slow Motion Swing – Step-by-Step:
- Hips bump forward before rotation starts.
- Lead wrist moves into flexion (“motorcycle” feel).
- Trail wrist stays extended; elbow moves in front of the body.
- Shaft shallows slightly, staying on plane.
- HackMotion cue: watch lead wrist flexion increase at the start of the downswing.
Step 5: Impact (P6 – Ball Contact)
Impact is where all those movements translate into distance, spin, and control.
Every pro you watch in slow motion shares one thing: their lead wrist is flatter at impact than it was at setup.
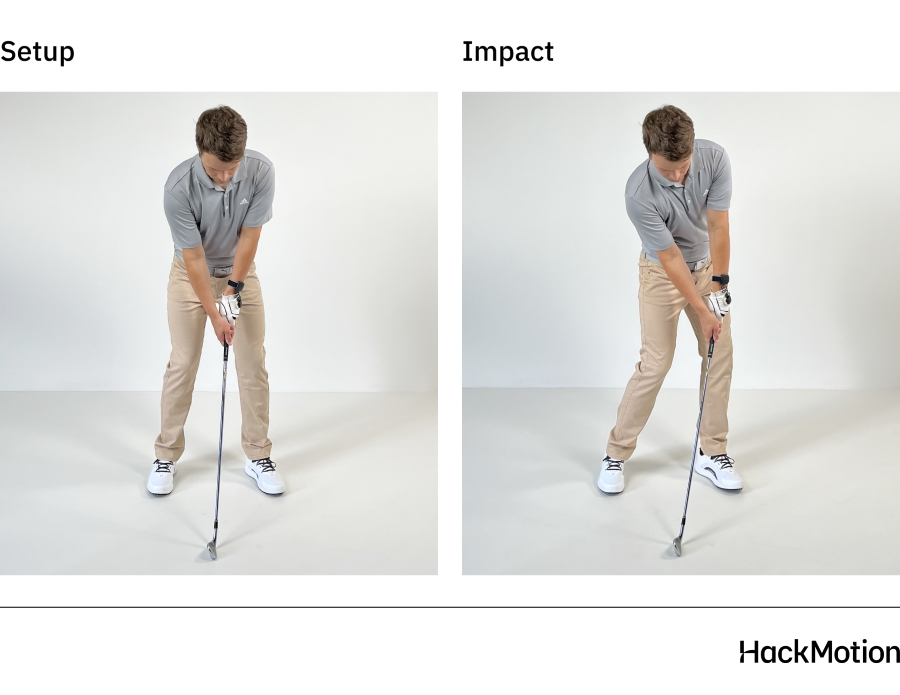
Just as important, the body is rotating through with the hips open, the chest moving toward the target, and the hands leading the clubhead.
All of these things combined create a de-lofted strike that compresses the ball against the turf.
What to Know:
A firm, flexed lead wrist with hands leading the clubhead creates a de-lofted, powerful strike. The trail wrist is still bent back, and the body is rotating, not stalling.
Slow Motion Swing – Step-by-Step:
- Lead wrist flexed, trail wrist extended.
- Handle slightly ahead of the clubhead.
- Weight mostly on the lead side; hips open, shoulders square.
- Divot begins just ahead of the ball.
- HackMotion cue: lead wrist flexion near zero or slightly negative (flat or bowed).
Step 6: Release and Follow-Through
After impact, slow motion shows the wrists finally releasing – but only after the ball is long gone. The lead wrist extends, the trail wrist straightens, and the club exits left with the rotation of the body.
The chest continues to turn through the shot, with weight fully transferred to the lead side, and the arms extend naturally in line with the body’s rotation.
This full release occurs because the swing sequence remained connected, with no forced hand action; instead, momentum carried the club to a balanced finish.
What to Know:
Let the release unfold naturally. Don’t try to “help” the ball up; trust that the loft and your sequence do the work.
Slow Motion Swing – Step-by-Step:
- Wrists unhinge only after impact.
- Trail wrist straightens; lead wrist returns toward neutral.
- Chest and arms rotate together through the shot.
- Finish balanced, weight fully forward.
- HackMotion cue: extension peaks after impact, not before.
Drills to Improve Iron Compression and Control
Drills are a great way to work on improving your iron strike.
Here are a few of the most helpful if you are working on slow-motion iron swings.
Towel Compression Drill
This drill builds proper shaft lean and teaches you to strike the ball before the turf. It trains the delayed release and forward handle position that creates real compression.
Towel Compression Drill – Step by Step:
- Lay a towel on the ground about one grip-length behind the ball.
- Make small to mid-length swings, focusing on missing the towel.
- If you hit the towel, you released too early—reset and shorten the motion.
- Focus on driving your hands forward through impact.
- Use HackMotion to confirm the lead wrist moves from extended to flexed at impact.
Clubface Down Drill
This exercise helps eliminate an open face in the downswing, the main cause of weak, high shots.
Clubface Down Drill – Step by Step:
- Take your backswing to the top and stop.
- Slowly start down until the club is parallel to the ground (P6).
- Pause and look: the clubface should point slightly down toward the ground.
- Rehearse this move three times, then hit a shot keeping that same feeling.
- Use HackMotion to see your lead wrist move into flexion during the downswing.
Half-Swing Compression Drill
This drill simplifies contact by focusing on a short, controlled motion that maintains structure through impact.
Half-Swing Compression Drill – Step by Step:
- Take a narrow stance and make waist-high backswings and through-swings.
- Keep your hands slightly ahead of the ball at impact.
- Focus on a crisp, descending strike—ball first, then turf.
- Repeat 10–15 times, then move to a full swing while maintaining the same feel.
- HackMotion cue: trail wrist remains extended through impact; no early extension spike.
Sequence Pause Drill (Transition Control)
This drill (watch the video above) teaches proper transition timing, hips start first, wrists respond second.
Sequence Pause Drill – Step by Step:
- Swing to the top and pause for one second.
- Shift pressure into your lead side before starting your downswing.
- Feel the trail wrist stay bent as the club shallows.
- Make smooth contact while maintaining balance.
- HackMotion cue: flexion increases slightly at transition, confirming proper sequencing.
Final Thoughts
Slow motion reveals what you can’t see at full speed: the precise chain of movement that leads to compression.
Every great iron striker creates shaft lean, maintains wrist structure, and uses the ground to deliver power efficiently.
By combining slow-motion training with HackMotion feedback, you can see and measure those exact wrist movements that separate a “good” swing from a compressed, Tour-level strike.