How to Stop Pulling the Golf Ball (Causes, Fixes & Drills)
Pulled shots often feel solid but if they’re heading straight left of your target (for right-handers), they can wreck your accuracy and confidence.
The good news? A pull usually means you’re not far off. You’re just matching the wrong clubface angle to your swing path.
We will break down the main causes of pull shots, how to fix them, and the best drills to retrain your swing including HackMotion data-backed wrist work to make sure your clubface and path match up correctly.
Pulling Golf Shots (Key Takeaways)
If you don’t have time to work through this process right now, here are the key steps to stop pulling the golf ball that you can take away with you.
- A pull happens when the clubface is closed to the target at impact.
- Common causes include: strong grip, closed clubface at impact, ball too far forward, or an outside-to-in swing path.
- The lead wrist is often too flexed or rotated early into pronation, shutting the face.
- Fixing the pull involves improving your grip, ball position, alignment, and matching your wrist angles to your swing path.
- Use the Combined Top Drill with HackMotion to build a square clubface at the top while swinging at full speed – this helps sync your downswing path and face angle.
Contents
What is a Pulled Shot in Golf?
A pulled shot starts left of your intended target and stays there, no curve, just a straight miss left (for a right-handed player).
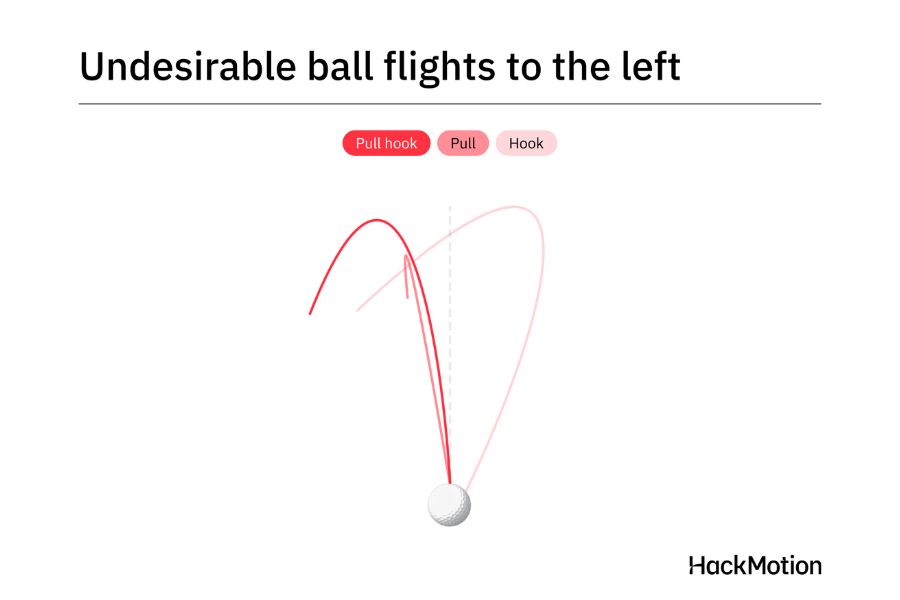
The common variations:
- Pull Straight – Clubface closed to target, path matches.
- Pull Hook – Clubface closed to target and also to an in-to-out path.
- Pull Slice – Clubface closed to target but open to an out-to-in path.
The common factor in all of these: the clubface is closed to the target at impact.
How to Stop Pulling Shots in Golf
Fix #1 – Clean Up Setup and Pre-Swing Fundamentals
Pulled shots often start before the swing even begins. Make sure you take some time to focus on the fundamentals before you jump right into changing your golf swing.
Grip
A grip that’s too strong can shut the clubface early in the swing.
- A neutral grip helps you return the face square at impact.
- Check that the V’s formed by your thumbs and index fingers point to your trail shoulder.
Alignment
If your body is aimed too far left, you’re more likely to swing across the target line and start the ball left.
- Use alignment sticks on the range to make sure your feet, hips, and shoulders are parallel to the target line, not pointing left of it.
Ball Position
A ball positioned too far forward can cause the clubface to close before impact.
- Start with your normal stance, then adjust ball position slightly back, especially with irons to neutralize face angle at contact.
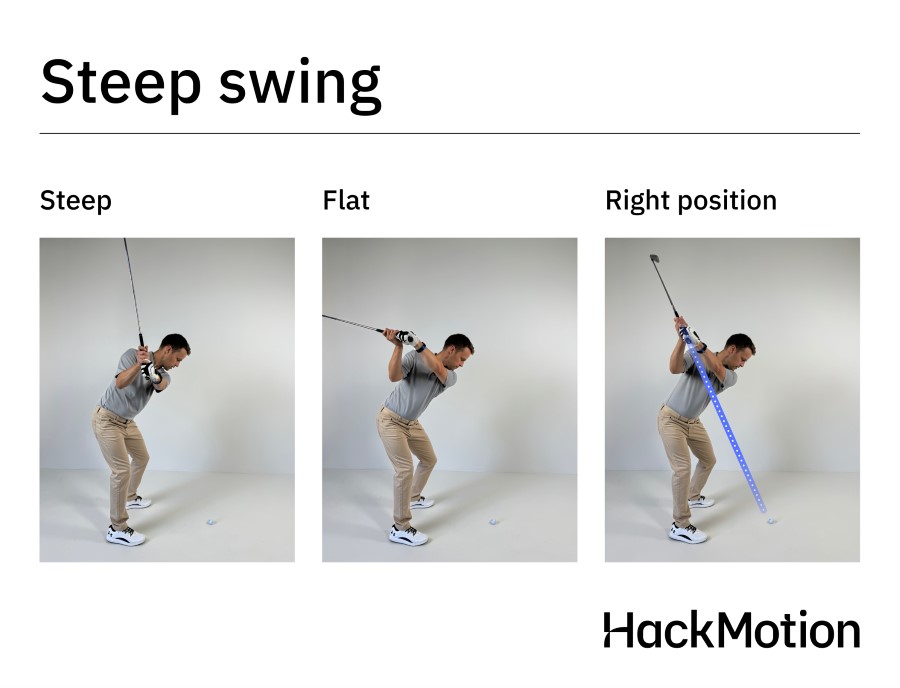
Fix #2 – Improve Wrist Angles at the Top
A closed face at impact often starts with poor wrist mechanics earlier in the swing, especially at the top.
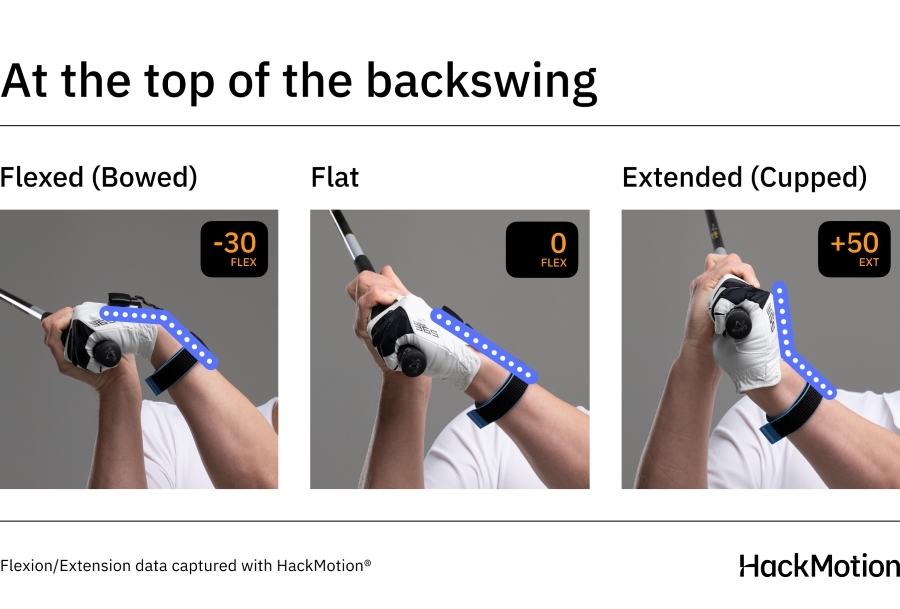
Golfers who flex (bow) the lead wrist too much, or pronate the forearm early, trap the face shut and pull the ball.
The goal is to maintain a flat or slightly flexed wrist at the top, then match that position through transition and into impact.
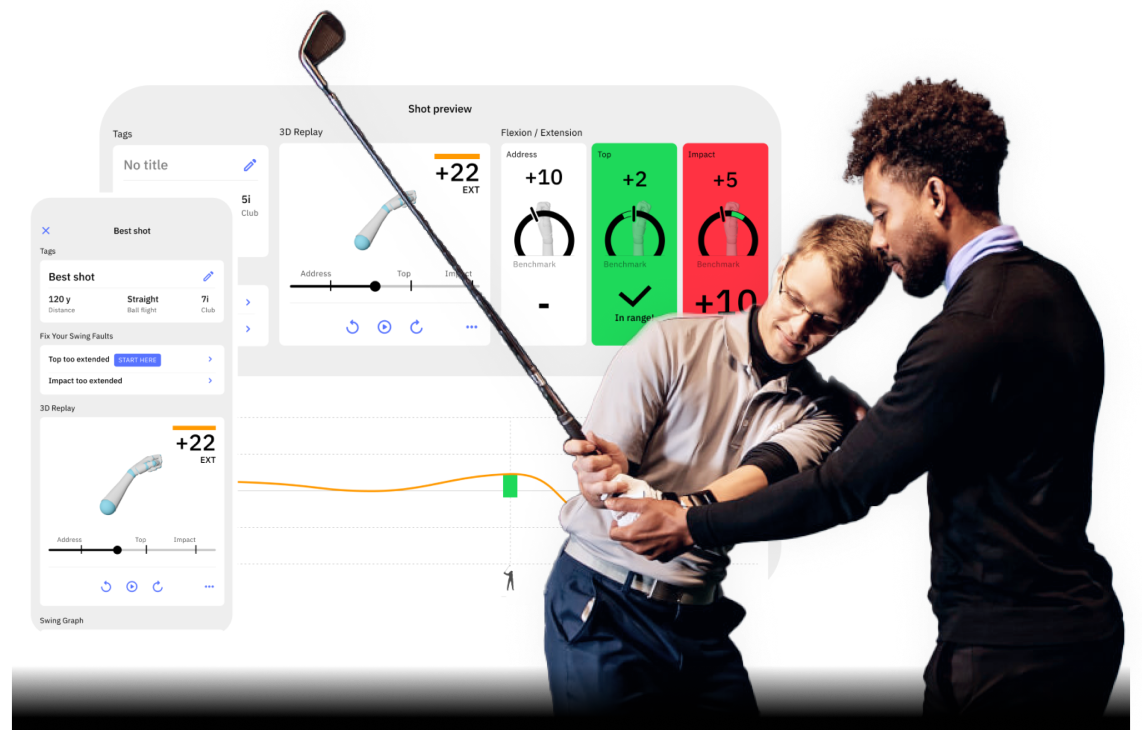
Drill: Combined Top Drill
This drill helps you blend the correct wrist position into a full-speed swing, and that’s key for pull correction. A clean top position makes it easier to sequence the downswing without shutting the face.
Combined Top Drill in HackMotion
Train your top position by mastering optimal wrist angles. Challenge yourself to reach the ideal wrist position during a full-speed backswing.
HackMotion Combined Top Drill – Step by Step
- Set up normally with HackMotion on.
- Take a full-speed backswing without pausing.
- Pause briefly at the top and check your wrist angles in the HackMotion green zone.
- Complete your swing from that top position.
- Use “false starts” if needed: go fast to the top, pause, come back down. Then reduce the pause over time.
Use HackMotion to verify whether your lead wrist is too flexed or extended at the top. This alone can correct many pull issues.
Fix #3 – Fix the Path and Transition Sequence
If your swing path is outside-to-in and your face is closed, you’ll hit a pull. The solution isn’t just “swing more from the inside”, you need to sequence the downswing correctly.
Proper Downswing Order:
- Hips initiate the move
- Chest follows
- Hands drop
- Club releases last
When you pull from the top with your arms or release your wrists early, the club moves left of target and the face shuts down the HackMotion Casting Drill can help.
Drill: HackMotion Casting Drill
This drill helps eliminate the early “throw” from the top, the most common mistake in amateur transitions. It trains your trail wrist to stay extended longer, keeping the club on plane and behind you instead of casting out.
Fix Your Casting with HackMotion
Train to fix casting by generating power with your core and lower body.
HackMotion Casting Drill – Step by Step:
- Take a normal backswing.
- Start your downswing by shifting weight and rotating hips — without pulling with your arms.
- Use HackMotion to monitor trail wrist extension — it should stay bent early in the downswing.
- Let the arms drop naturally and feel the club “lag” behind.
- Gradually increase speed. If your HackMotion graph shows early trail wrist release, you’re casting.
Bonus Drills to Fix Your Pull for Good
If you are still struggling with your pull shots here are a few more drills to help get your clubface square and the path correct.
Drill: Justin Rose Arm Drop Drill
Purpose: Fixes over-the-top swings by training the arms to drop before body rotation, helping the club approach the ball from a more neutral or inside path.
Justin Rose Arm Drop Drill – Step by Step:
- Take your normal backswing and pause at the top.
- Feel like you are performing a reverse bicep curl drop the arms straight down without turning the body.
- Keep your back (and chest) facing the target as your arms lower.
- Once your arms have dropped, begin to rotate your chest and hips.
- Swing through and observe how the ball starts more right of target (for right-handers).
Drill: 4:30 Path Stick Drill
Purpose: Provides a visual and physical reference to build an inside-to-out swing path, ideal for players who pull due to swinging too far left.
4:30 Path Stick Drill – Step by Step:
- Place an alignment stick or spare club on the ground at a 4:30 angle behind the ball (for right-handers).
- Rehearse slow swings, aligning the shaft of your club with the stick during the downswing.
- Use a pump drill approach: one… two… and on the third motion, complete a small swing.
- As confidence builds, move into full swings while maintaining that 4:30 path feel.
- Look for starting lines that are more right of target, a clear sign the swing is now working from the inside.
Drill: Pull Shot Gate Drill
Purpose: Offers real-time feedback to correct club path by forcing the club to travel through a constrained “gate”, eliminating out-to-in paths.
Pull Shot Gate Drill – Step by Step:
- Place your normal ball in position.
- Create a gate using two tees: Tee 1: Behind and just outside the ball. Tee 2: Ahead and just inside the ball.
- Start with slow swings, the goal is to hit the target ball while missing both tees.
- If you’re pulling shots, you’ll likely hit one or both tees on the downswing.
- As you improve, move the tees closer together to tighten the margin and increase difficulty.
- Full swings should travel through the gate with a rightward starting line (for right-handers).
Final Thoughts
Pulling your shots isn’t necessarily as bad as slicing or hooking, with the right adjustments you can straighten things out.
Focus on setting up correctly, fixing wrist angles (especially at the top), and getting your swing path to match your clubface. The Combined Top Drill is a powerful first step and with HackMotion tracking your wrist angles, you’ll finally see and feel the difference between a pull and a pure shot.