How to Stop Topping Fairway Woods: 6 Easy Fixes That Work
The topped fairway wood is a frustrating mistake. You’re standing over the golf ball, a long way between you and the hole, and you end up with a shot that dribbles a few feet in front of you.
Fairway woods feel different. They are lighter and longer than your irons, the head is smaller than your driver, and they aren’t used often, making it hard to practice.
Luckily, the issues that caused the topped shot are relatively easy to fix. With the correct wrist positioning, setup, and swing sequence, you’ll be well on your way to long and accurate fairway wood shots.
Key Takeaways
If you don’t have time to read through our entire guide on how to stop topping fairway woods, here are the most important takeaways:
- Wrist action is everything: Most topped fairway woods are caused by poor wrist mechanics, either flipping or casting. HackMotion helps identify and fix these issues with real-time wrist data.
- Stable posture prevents topping: Losing spine angle or “standing up” through impact pulls the club away from the ball. The Head on the Wall Drill and Casting Drills are a great way to train a consistent tilt.
- Weight must move forward: If your weight hangs back, your low point shifts too far behind the ball. Focus on a forward weight shift early in the downswing for better contact.
- Sync your arms and body: When the arms and body move out of sync, the club’s low point becomes inconsistent. Use coordination drills to keep everything working together through impact.
Why am I Topping my Fairway Woods?
Finding a solution to your topping issue and working through the drills it will take to fix it is more important than overanalyzing the cause.
However, here are the basic causes of the topped fairway wood to help you identify which fix will get you the quickest results.
Early Casting
Casting refers to straightening your wrists too soon from the top of the swing. It feels like throwing the club at the ball instead of maintaining your wrist angles.
In a mirror or slow-motion footage of your swing, check your downswing halfway down. If your wrists have already unhinged significantly, you’re likely casting.
With casting, your shots will feel underpowered. In addition to topped shots, you’ll notice a low and thin trajectory.
Flipping the Wrists
“Flipping” is when the club shaft overtakes the lead arm too early. The clubhead often bottoms out before the ball or is forced upward, catching the top half of the ball.
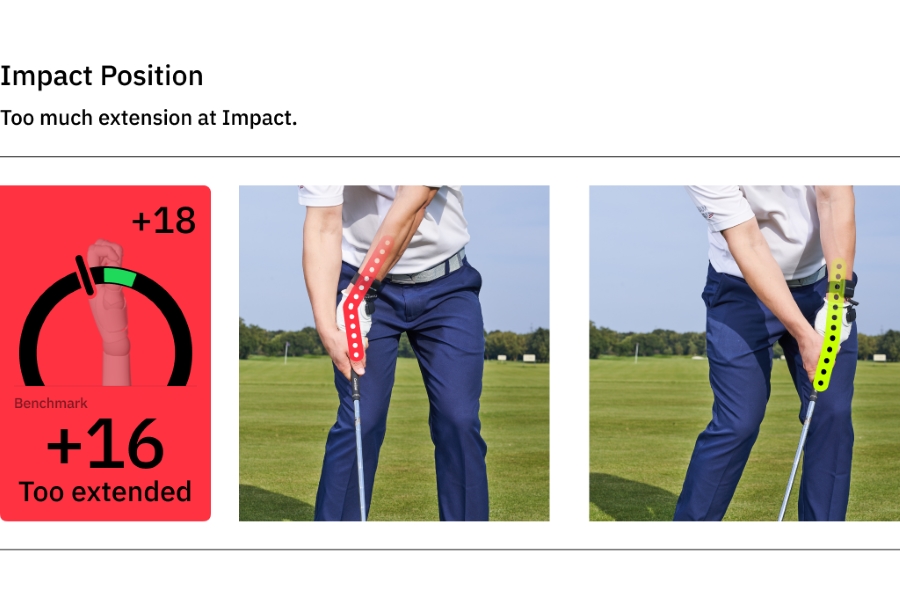
In addition, if your hands are behind the ball at impact, you may feel like you are scooping or lifting the ball.
Using HackMotion you could easily identify an increase in lead wrist extension just before impact and stop flipping your wrists.
Spine Angle Changes
If you stand up or “lose your posture” in the downswing, you’ll lift the club away from the ball’s hitting zone, catch it thin, or top it altogether.
In a video of your swing, you should see your head and upper body rising significantly from address to impact. You’ll also feel off balance or on your toes during the swing.
Ball Position Errors
Placing the ball too far forward or back for your fairway wood swing can lead to inconsistent strikes, including topping if it’s excessively forward.
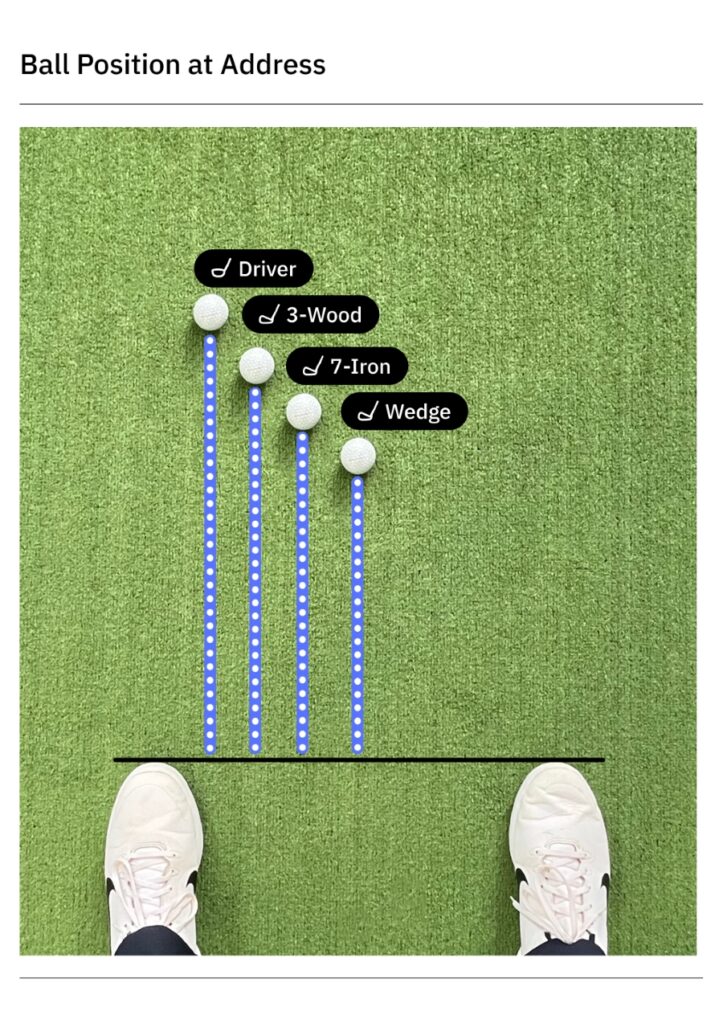
A ball too far forward can cause you to try to “lift” it, sometimes popping it high on the face or topping it.
Arms and Body Out of Sync
Good contact requires coordination of the arms and the body working together. If the arms outpace the torso (or vice versa), the club’s low point becomes erratic, leading to tops or thin strikes.
On video, you might see your arms collapse in front of your body while your torso hasn’t rotated much yet.
Insufficient Weight Shift
Failing to move your weight to your lead side means the swing’s low point stays behind the ball. The club hits the turf early (leading to a thin/topped shot), or you subconsciously “flip” to try to save the strike.
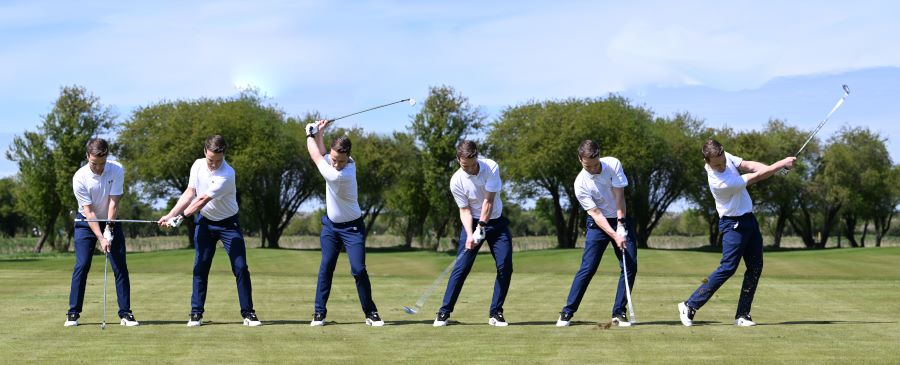
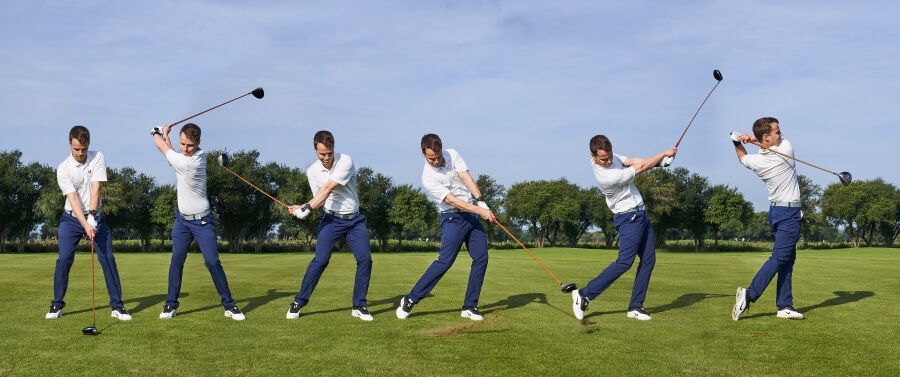
You’ll feel your weight staying on the back foot through impact, often leaning away from the target in your finish. Bellow you can see what a proper finish should look like.
Tips and Drills to Fix Topping
With the cause of your topped shot correctly identified, let’s explore some of the best actionable tips and drills for fixing topping.
Casting Drill
Early casting is a power (and contact) killer. This drill helps you retain lag and correct the kinematic sequence. The drill is in the HackMotion app, so you can work on it in real time and identify if you are progressing.
Fix Your Casting with HackMotion
Train to fix casting by generating power with your core and lower body.
HackMotion Casting Drill – Step by Step:
- Slow Rehearsals: Make a normal backswing, then begin the downswing by shifting weight left and rotating hips. Don’t pull down with your arms.
- Maintain Trail Wrist Bend: Check HackMotion data on your trail wrist. Keep it extended (bent) as you initiate the downswing.
- Arms Follow: Allow the arms to drop naturally, letting the club “lag” behind.
- Progressive Speed: Start slowly, building up speed while retaining your wrist angles.
Why does this fix topped fairway woods:
By delaying the release of the club and encouraging the lower body to move, you maintain more stored power and a better angle of attack, improving strike quality on fairway woods and producing a more consistent low point.
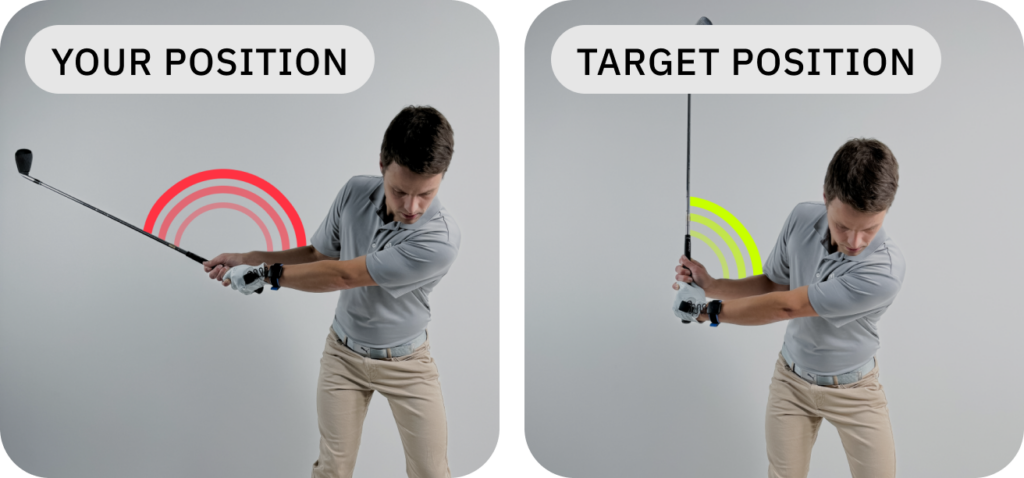
Anti-Flip Drill
Flipping your fairway wood at impact is actually a good instinct. You instinctively know your clubface is wide open and your flipping action is there to square or close the face through impact.
However, the problem is it’s inconsistent, unreliable, and won’t give you the same power and control through the ball.
Anti-Flip Drill – Step by Step:
- Set Up with Slight Shaft Lean: Position the ball under your lead-side chest and press your hands slightly forward. This pre-sets forward shaft lean at address.
- Use an Alignment Stick for Feedback: Place an alignment stick along your grip, extending past your lead side. As you swing, keep the stick and lead arm moving together. If you flip, the stick will bump your side early — that’s your cue.
- Monitor Lead Wrist Flexion: During the backswing, focus on reducing lead wrist extension toward flexion. The goal is to arrive at impact with some degree of flexion for better control and compression.
- Start with Short Punch Shots: Make half-swings while maintaining shaft lean and a flexed lead wrist. Feel like you’re “stopping” the clubhead just past impact to train proper structure.
- Repeat for Consistency: Continue this pattern with slow, deliberate reps. As it becomes natural, gradually increase speed without losing wrist control.
Why does this fix topped fairway woods:
When you train the wrists to stay stable and flexed through impact, the clubface naturally squares. You won’t need the last-second flip to get better compression and more consistent contact.
Maintain Spine Angle
Standing up or “losing your posture” is a major cause of topped fairway woods. The Head on the Wall Drill gives you a powerful way to groove a stable spine angle throughout the backswing and early follow-through. The great thing about this drill is it can be practiced indoors.
Head on Wall Drill – Step by Step:
- Set Your Head Against a “Wall”: Rest your forehead lightly against a wall or create a barrier using an alignment stick or foam roller. This helps monitor head movement throughout the swing.
- Make a Controlled Backswing: Turn your shoulders while keeping your head gently in contact with the wall. Avoid lifting or pulling away — this trains your spine to stay inclined to the ground.
- Shift the Pelvis Forward: As you begin the downswing, move your hips toward the target while keeping your head in place. Most golfers don’t shift the pelvis forward enough — exaggerate it if needed.
- Stop at Arms Parallel: Swing through until your arms are parallel to the ground in the follow-through, keeping your head on the wall the entire time.
- Release Naturally: After arms-parallel, allow your head to come off the wall as part of a natural, balanced finish.
Why does this fix topped fairway woods:
By keeping your spine angle stable, you eliminate the common “stand-up” move that pulls the club away from the ball. This ensures a consistent low point, making it far less likely to strike the ball’s upper half.
Ball Position and Setup Adjustments
Use alignment sticks and golf tees on the range to map out your setup and find the proper ball position for a fairway wood. The perfect position is forward of center, yet not as far forward as the driver.
Many players have to experiment to find that sweet spot.
Fairway Wood Ball Positioning – Step by Step:
- Set Up with Alignment Sticks: Place one stick down your target line and another perpendicular to it across your feet to mark ball position and stance alignment.
- Start with Ball One Ball Forward of Center: Position the ball slightly forward of center — this is a great starting point for most fairway woods.
- Pick a Target and Hit 4–5 Shots: Choose a target and hit a small batch of shots from this position. Focus on contact quality and ball flight.
- Adjust Ball Position Gradually: Move the ball slightly farther forward and repeat the same process, noting if contact improves or worsens.
- Compare Clubs: Test with different woods (3-wood, 5-wood, 7-wood, etc.). You may notice that lower-lofted woods perform better with the ball a bit more forward.
- Dial In Your Ideal Position: Once you find the ball position that produces consistent, solid shots for each club, mark it and make it your go-to setup.
Coordinate Arms and Body
When your arms and body are out of sync, you might “outrace” or “stall,” ruining your low-point control. These drills blend upper-body turn with proper wrist action for more consistent fairway wood contact.
Body Coordination Drill – Step by Step:
- Set Up an Alignment Stick Extension: Place an alignment stick down the back of your grip so it extends past your lead hip. This helps provide instant feedback during the swing.
- Make Small Punch Shots: Hit short shots while rotating your body through impact. The goal is to keep the stick from hitting your side — any flipping or stalling will cause contact.
- Add a Ball Between Forearms: Use an inflatable ball or similar training aid between your forearms. This forces your arms and torso to stay connected through the swing.
- Rotate Through Impact: Focus on turning your chest through the shot. If your body stalls and your arms collapse, the ball will drop — instant feedback.
- Progress to Longer Swings: Start with half-wedges and gradually move to fuller swings, maintaining connection and body rotation throughout.
Why does this fix topped fairway woods:
A synchronized swing ensures a more predictable arc through impact, helping you reach the ball with a descending blow instead of “pulling up” or flipping late.
Weight Transfer and Forward Momentum
Falling back on your trail foot is a surefire way to catch the top of the ball. Ensuring your weight moves forward as you swing through is crucial for crisp fairway wood strikes.
Weight Transfer & Rotation Drill – Step by Step:
- Start with 60% Weight on Front Foot: At setup, shift slightly more weight to your lead foot (left foot for right-handed golfers) to promote proper sequencing.
- Make a Centered Backswing: Turn your shoulders without swaying off the ball. Keep your weight stable to maintain balance and coil.
- Initiate with a Hip Bump: Begin the downswing by shifting your pelvis toward the target before rotating your hips. Feel the weight transfer into your front side.
- Use Half-Swings First: Rehearse the movement with small swings. Feel the “bump” to the front foot, then rotate through impact.
- Build to Full Speed: As the motion becomes natural, increase the length and speed of your swings while maintaining the same weight shift pattern.
Why does this fix topped fairway woods:
If your weight stays behind the ball, the club bottoms out too soon, causing thin or topped shots. Shifting your weight onto the lead side ensures you hit the ball first, then the turf.
Final Thoughts
Topping your fairway woods can often feel humiliating, but it’s usually an easy fix once you understand the root causes.
Flips, casts, spine angle changes, poor ball position, and weak weight transfer all work against you to lead to the topped shot.
Use the drills above to correct each issue, and incorporate HackMotion data to ensure your wrists are set correctly from backswing to impact.