Mastering Wrist Position at the Top of the Backswing (The Secret to a Square Clubface)
If you struggle with inconsistency in your golf shots, one of the first things to check is your clubface position at the top of your backswing.
More specifically, it makes sense to look at your wrist position at the top of the backswing.
After analyzing over 1,000,000 golf swings, we’ve proved that if you get to the right position at the top of the swing, you dramatically increase your chances of squaring the clubface at impact.
This guide will explain why your wrists at the top matter, how to measure them accurately using HackMotion, and the best drills to help you master this essential position.
Wrists at the Top of the Backswing (Key Takeaways)
If you don’t have time to read our entire guide, here are some of the most important takeaways about mastering the wrist position at the top of the backswing:
- Grip affects wrist position. A weaker grip often leads to a more bowed top-of-backswing, while a stronger grip creates more extension (cupping).
- Flat to slightly bowed at the top helps square the clubface at impact, preventing last-second manipulations.
- Some extension is okay, as long as you can manage it on the downswing.
- Too much extension can complicate timing and make the clubface harder to control.
- HackMotion provides real-time wrist-angle data, helping you find and maintain the right position throughout your swing.
If you prefer to watch instead of read, here’s a video recap on the importance of proper wrist position at the top of the backswing and its impact on your game.
Contents
Wrists in the Golf Swing Explained
Before fixing your wrist position at the top, it’s essential to understand the fundamental movements:
- Extension/flexion (cupping/bowing),
- Radial/ulnar deviation (cocking/uncocking),
- Pronation/supination (forearm rotation).
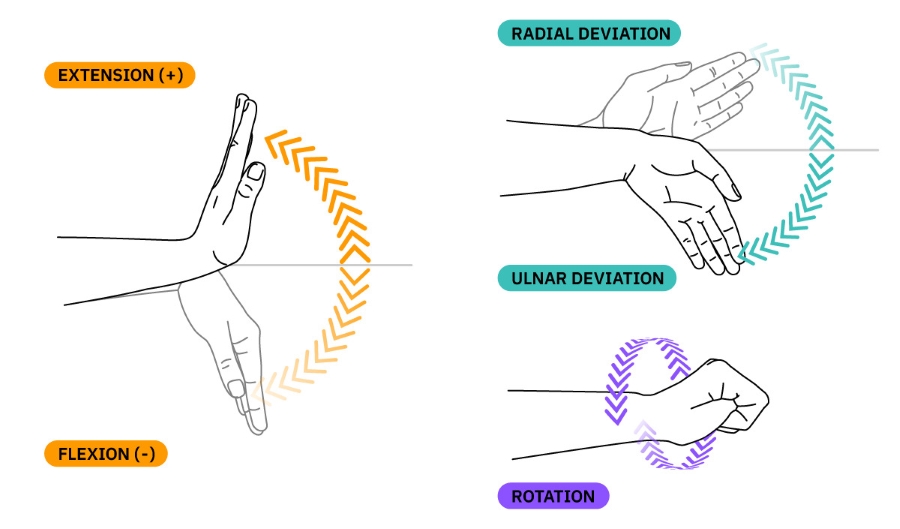
- Extension/Flexion: Pulling your hand back toward you (seeing the back of your hand) is extension (cupping). Pushing your hand down (knuckles toward the ground) is flexion (bowing). Extension opens the clubface; flexion closes it.
- Radial/Ulnar Deviation: Radial deviation is “cocking” the wrist; ulnar deviation is “uncocking.” More radial deviation in the backswing generally increases wrist cock.
- Pronation/Supination (Rotation): Pronation moves your thumb downward; supination moves it upward. This rotation primarily involves the forearm, influencing face angle and swing plane.
If you want more information on the wrist positions in the game of golf, check out our complete guide.
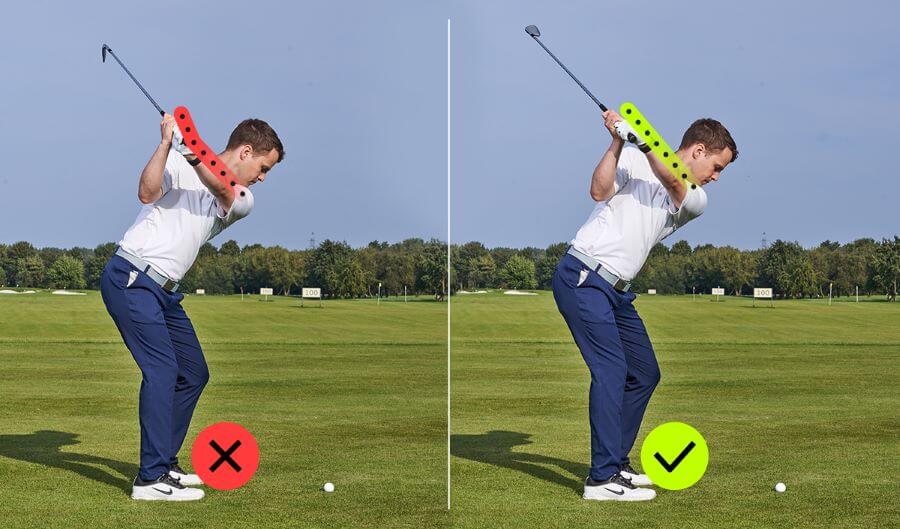
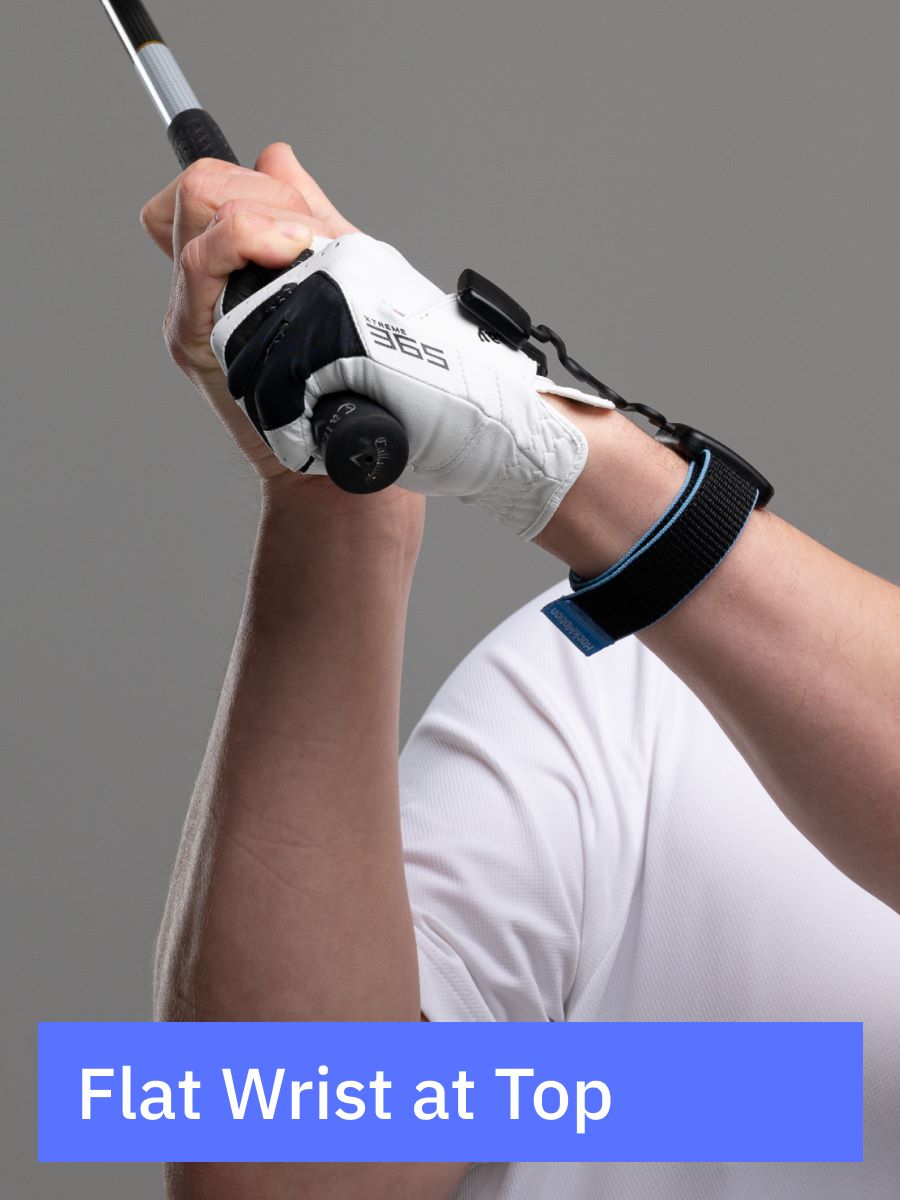
What Is the Correct Wrist Position at the Top?
We wish there was a one-size-fits-all number. Every golfer’s body, grip style, and swing plane are unique.
We do know, however, that controlling extension and aiming for a position closer to flat or slightly bowed leads to easier consistency.
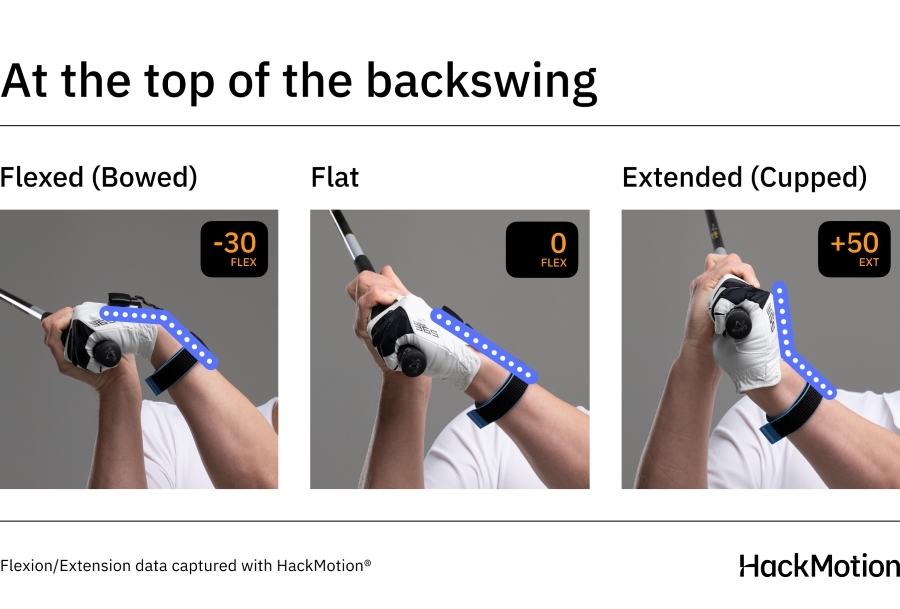
- Cupped (Extended): Adds loft and opens the face. Manageable for some, but requires precise timing to square at impact.
- Bowed (Flexed): Dustin Johnson and Collin Morikawa famously use a bowed position, helping them produce power and forward shaft lean. But be sure your body rotation supports this move, or you’ll have a clubface that is too closed to the target.
- Flat: Considered ideal for many players. It’s simple to replicate and keeps the face alignment more stable.
Starting with a flat lead wrist at the top is desirable, and then you can adjust based on your ball flight.
How to Get the Proper Wrist Position at the Top (Step by Step)
If you want to get your wrists into the perfect position at the top, here is the way to get it done.
Most importantly, you’ll need to work on drills that help you consistently find this position.
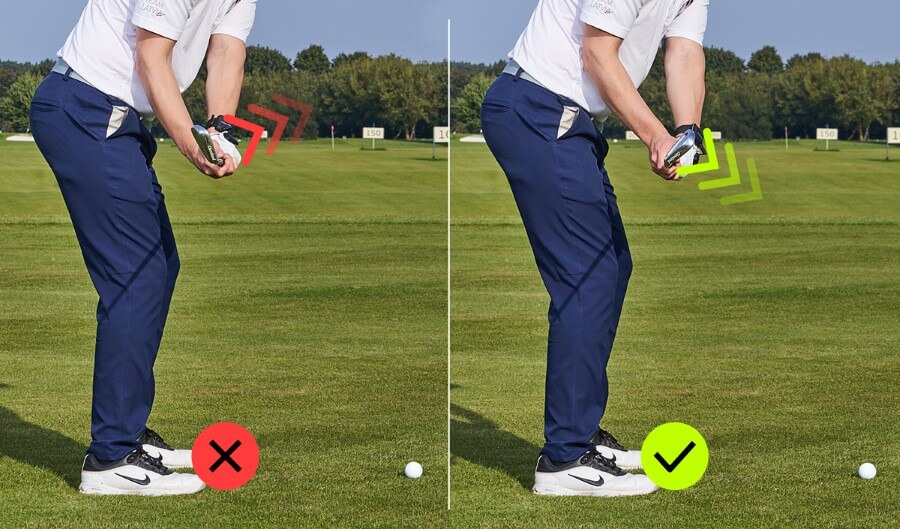
Check Your Grip
Your grip is the foundation of wrist position.
A neutral grip (with the lead hand not turned excessively right or left) makes it easier to maintain a flat or slightly bowed wrist.
If you have a very strong grip (hands turned too far to the right), you might fight extra extension. If your grip is weak, expect more ease in bowing, but watch out for hooks.
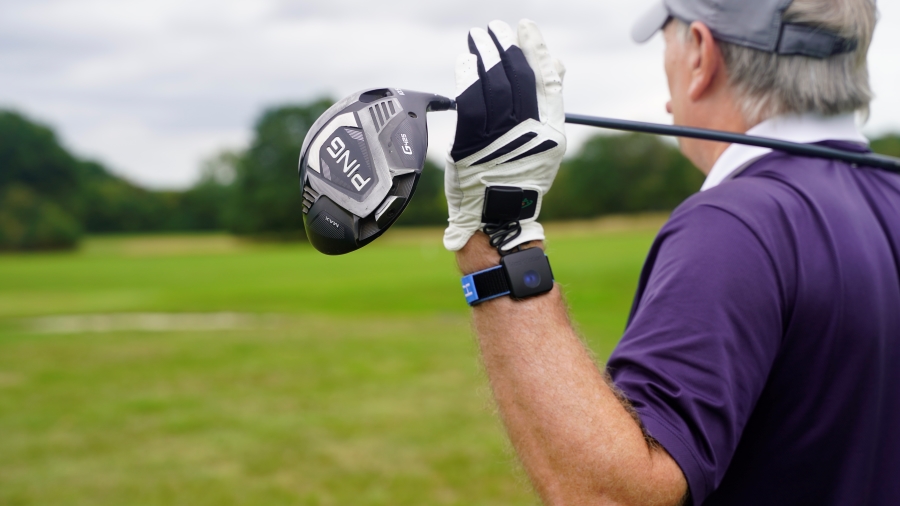
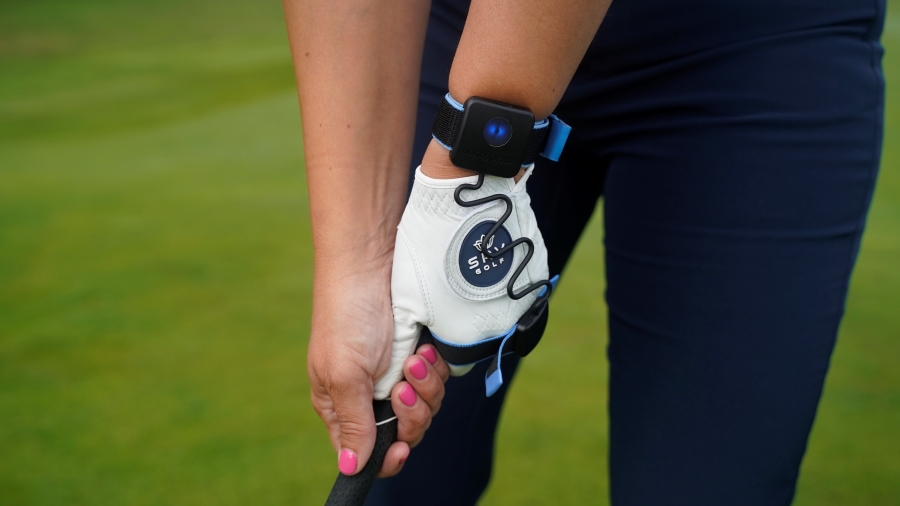
Use HackMotion for Real-Time Feedback
One of the most efficient ways to monitor, measure, and improve your wrist position is by using HackMotion. With the sensor, you’ll receive instant data on whether your lead wrist is cupping, bowing, or staying flat.
Plus, the interactive inbuilt drills will help you achieve the correct wrist position at the top relative to your setup.
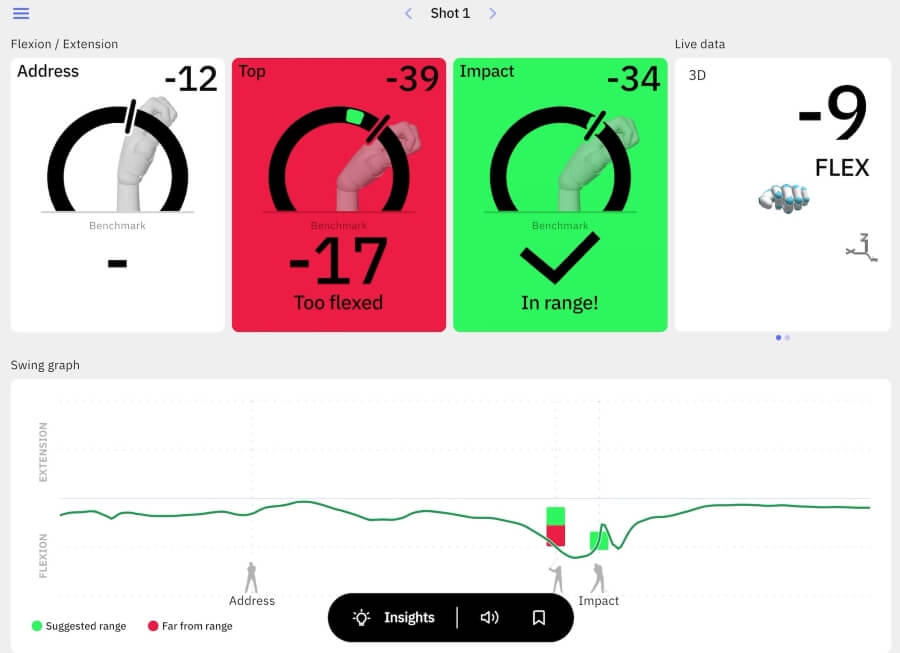
- Calibrate & Swing: Strap on HackMotion and calibrate your address position. Take a few normal swings to see how much extension/flexion you add at the top. You can also use the swing diagnostics tool to help you see what areas of your golf swing need the most help.
- Set a Target Range: If you see 25° of extension at the top, but want to get to 15° or less, set that as your goal in the app.
- Practice & Adjust: Begin with half swings, checking feedback in real time. Listen for the HackMotion alert if you move outside your target range.
- Gradually Increase Speed: Once you can hold the correct wrist angle in slow motion, move up to full swings—and then to hitting golf balls.
If you don’t have a HackMotion device yet, the best way to find the correct position at the top of the swing is to swing to the top, stop and check. Look for those key wrist positions to see if you are moving closer to a flat lead wrist.
You’ll want to do this in slow motion before you start increasing speed. Getting this movement down requires you to first master it slowly.
Drills to Master the Top of the Backswing
Below are three drills that progress from slow-motion (Static) to full-speed (Dynamic), and finally to hitting shots (Top Full Swing Challenge).
Each is designed to help you feel, ingrain, and trust the correct wrist position at the top.
1. Static Top Drill (Slow-Motion)
The Static Top Drill will help you build awareness of a flat or slightly bowed wrist at the top.
This is the best place to start because it will help you do it without worrying about the downswing.
Static Top Drill in HackMotion
By working on the Static Top Drill, you can create muscle memory and achieve a flat lead wrist at the top of the backswing.
Static Top Drill – Step by Step
- Address the ball with HackMotion calibrated.
- Slowly swing to the top and stop.
- Check your HackMotion readout. Is your extension within the target range?
- If you’re outside the range, flatten or bow your wrist until HackMotion signals that you’re correct and in the green.
- Repeat 10 times, focusing on that “frozen” top position.
2. Dynamic Top Drill (Full Speed to the Top, Then Pause)
Once you master the Static Top Drill, you can start working on the Dynamic Top Drill.
This is where you move from slow-motion to a more realistic swing tempo but still pause to check your wrist.
Dynamic Top Drill in HackMotion
Dynamically train your wrist position at the top of your swing and see if you can achieve the optimal wrist position with a full-speed backswing.
Dynamic Top Drill – Step by Step
- Start as normal, then swing to the top at full speed.
- Pause momentarily once you reach the top.
- Observe your HackMotion data. If you’re cupped too much, adjust until you see the right angle.
- Return to address and repeat, reinforcing the correct motion while still controlling the top position.
- Do this at least ten times.
3. Top Full Swing Challenge (Hit the Ball)
Once you complete the Dynamic Top Drill, it’s time to move to the full-swing challenge.
In this drill, you will start hitting golf balls while your HackMotion checks your position at the top of the backswing.
HackMotion Top Full Swing Challenge Drill
Train your top position with a maximum power swing and check if your backswing holds up when trying to hit the ball.
The HackMotion Top Full Swing Challenge
- From address, make a full swing through impact—no pause.
- After each shot, glance at HackMotion to see if you maintained the proper extension/flexion.
- If you drift back into excessive extension, repeat the drill until you find that correct top position again.
- Practice hitting various clubs, gradually building confidence and consistency.
If you don’t have HackMotion, you can try Rob Cheney’s credit-card trick. You’ll place a credit card under the back of your glove, and if you extend too much at the top, the card digs into your forearm, letting you know you need to adjust.
Professional vs. Amateur Data
Tour players typically reduce extension or maintain minimal extension from the address to the top of the backswing.
At setup, a tour player may have 20° of extension, but they’ll often arrive at the top with far less.
By contrast, higher handicappers often add extension as they swing up, unintentionally opening the face. This can lead to weak shots, slices, and a steeper downswing path.
The table below highlights this trend:
| Handicap | Extension at Address | Extension at Top | Extension at Impact | Change Address to Top | Change Address to Impact |
|---|---|---|---|---|---|
| Less than 10 | 19.3° | 14.5° | 3.6° | -4.8° | -15.6° |
| Between 10 and 25 | 19.6° | 17.0° | 9.0° | -2.5° | -10.5° |
| More than 25 | 18.8° | 24.3° | 10.7° | 5.5° | -8.1° |
The main takeaway is clear: minimizing extra extension from address to the top generally correlates with a better chance of creating a square or slightly closed clubface at impact.
Final Thoughts
At this point, you should know how the wrists at the top of your backswing should be positioned, how to fix errors in your game, and why wrist position matters.
Don’t expect to fix your wrists overnight. The process will take some practice on the range. When you work with HackMotion, you will see quicker results.
Golfers with a square clubface at the top of their swing have so much more confidence in their ability to hit straight golf shots. Time invested in perfecting the wrist position is worth it!