Wrists in the Downswing: The Secret to Controlling the Clubface from the Top to Impact
If your swing looks good at the top but falls apart at impact, the answer lies in the downswing.
The downswing determines things like where the clubface points at impact, how much loft you deliver, and whether you compress the ball or flip it.
Your wrists are the key to controlling that entire chain of motion.
When they move in the correct pattern, the face squares naturally, the club shallows without thought, and your hands lead the way through impact. When they move out of sequence, you’ll see the game’s most common faults: early release, weak contact, and inconsistent start lines.
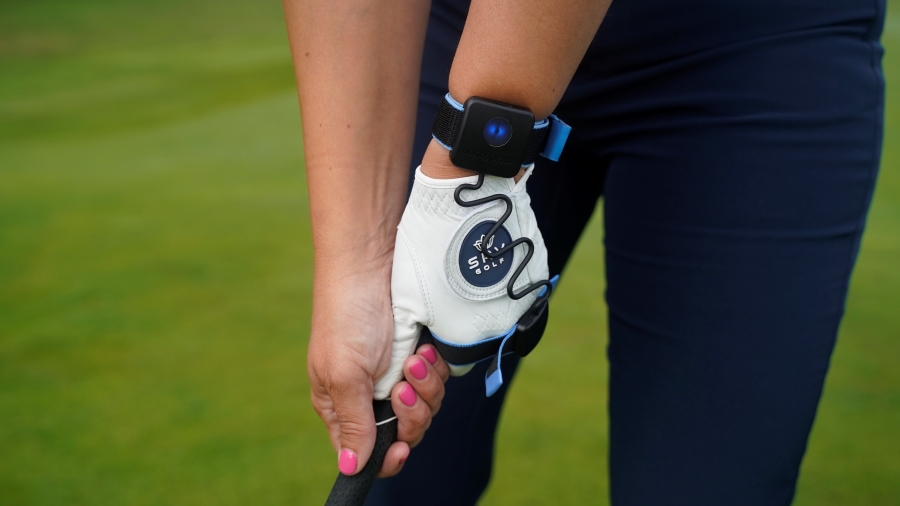
In this guide, we’ll break down how both wrists move in the downswing, how grip and setup influence that motion, and the exact drills you can use with HackMotion to measure and train a more powerful, repeatable impact position.
Wrists in the Downswing (Key Takeaways)
- Lead wrist: moves from flat at the top toward flexion (bowed) as the downswing begins, staying flexed through impact.
- Trail wrist: remains extended (bent back) from the top through impact, releasing naturally after contact.
- Grip and setup determine your starting angles, but the pattern with lead wrist flexing, trail staying extended remains the same for consistent players.
- Too steep? You’re likely extending the lead wrist or losing trail-wrist bend too early.
- Too shallow? You may be over-retaining trail-wrist extension or under-flexing the lead wrist.
- Training these moves with HackMotion removes guesswork, letting you visualize and feel proper sequencing in real time.
Contents
See the wrists in action — use the interactive slow-motion player below to understand how they move through the swing, and check out Wrists & Hands in the Golf Swing (Slow Motion Breakdown) for a full sequence view before continuing to the downswing section.
The Lead Wrist in the Downswing
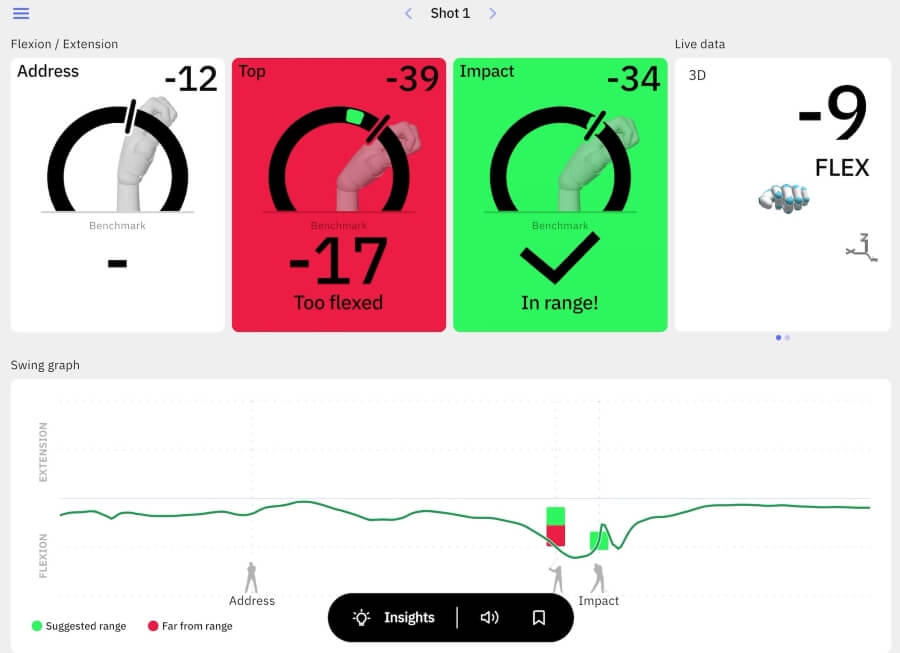
The lead wrist controls face angle, loft, and impact consistency. At address, most players start with about 15–20° of extension, a slight “cup.” That’s fine, but the key is how that angle changes throughout the swing.
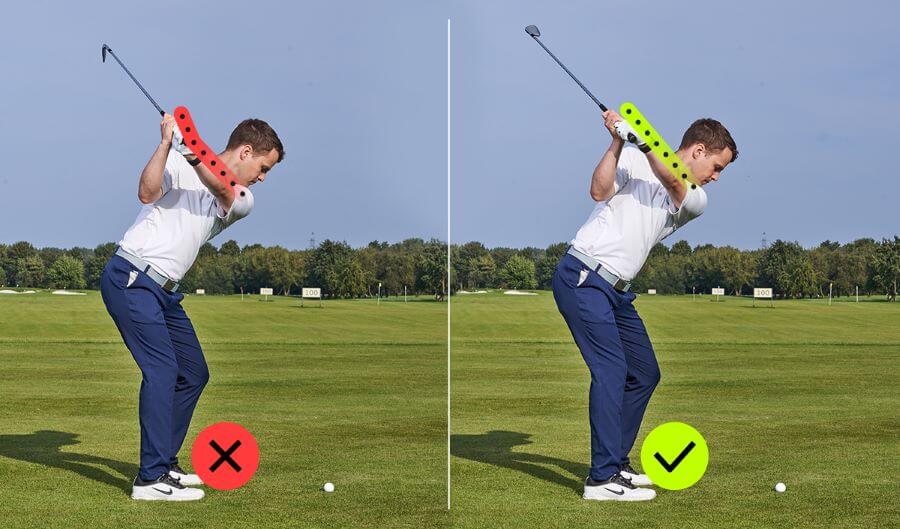
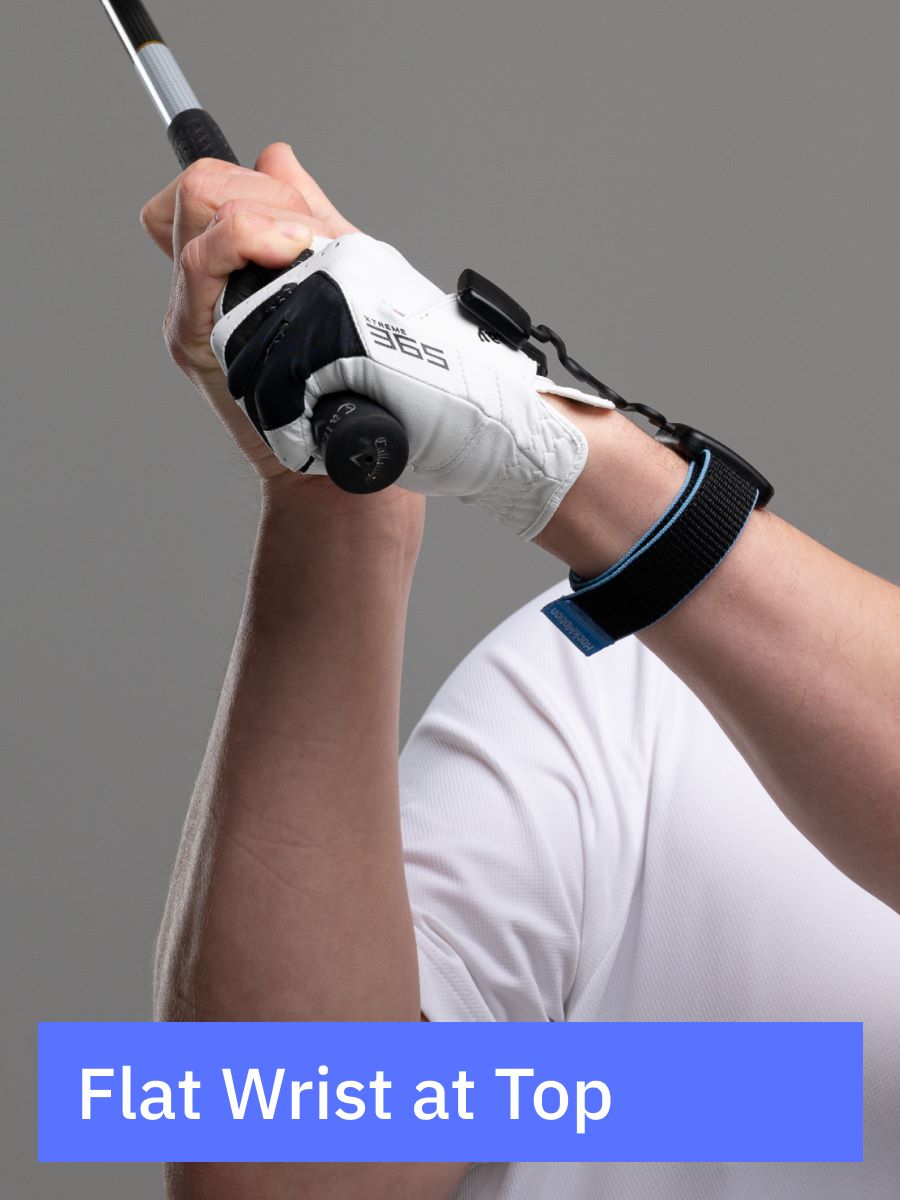
As you take the club back, that extension gradually flattens. By the time the shaft is parallel to the ground (P2), your lead wrist should be close to neutral. It stays flat at the top, then flexes (bows) as you start down.
This subtle “motorcycle” motion, rotating the lead wrist so the knuckles face the ground, sets the clubface, delofts the club, and positions your hands ahead of the ball at impact.
Elite players consistently show more flexion at impact than they have extension at setup.
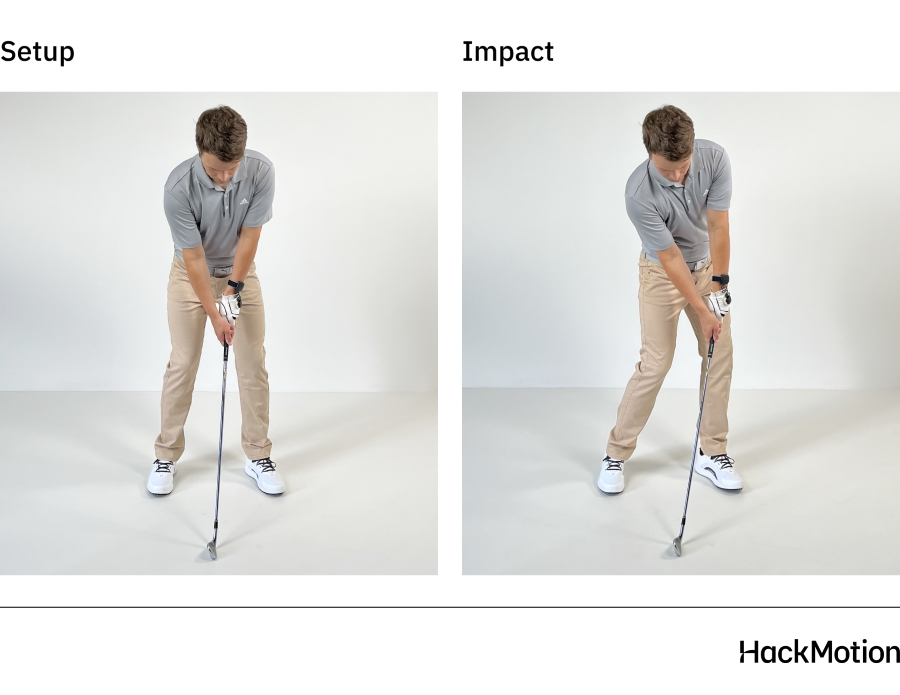
That’s the difference between trapping a ball and scooping it. When the lead wrist stays cupped (extended) through transition, the face opens and dynamic loft increases.
You’ll hit higher, weaker shots and need perfect timing just to square the face.
Lead Wrist: Downswing Checkpoints
| Position | Typical Wrist Angle | Feel / Motion | What It Produces |
|---|---|---|---|
| Start of Downswing (Transition / P4–P5) | Moves from flat to ~5–10° flexion | Begin “motorcycle” move, knuckles rotate down | Clubface stabilizes, shaft shallows naturally |
| Club Parallel in Downswing (P6) | ~8–12° flexion | Maintain the bow with lead wrist firm, trail wrist extended | Hands stay ahead, compression building |
| Impact (P7) | ~10–15° flexion | Lead wrist still bowed, shaft leaning forward | Lower dynamic loft, solid compression |
| Post-Impact (P8) | Moves gradually back toward flat | The wrist begins to release after contact | Natural release; no early flip or scoop |
The Trail Wrist in the Downswing
While the lead wrist sets the face, the trail wrist supports it. Its job is to keep the clubhead behind the hands through impact and prevent the release from happening too soon.
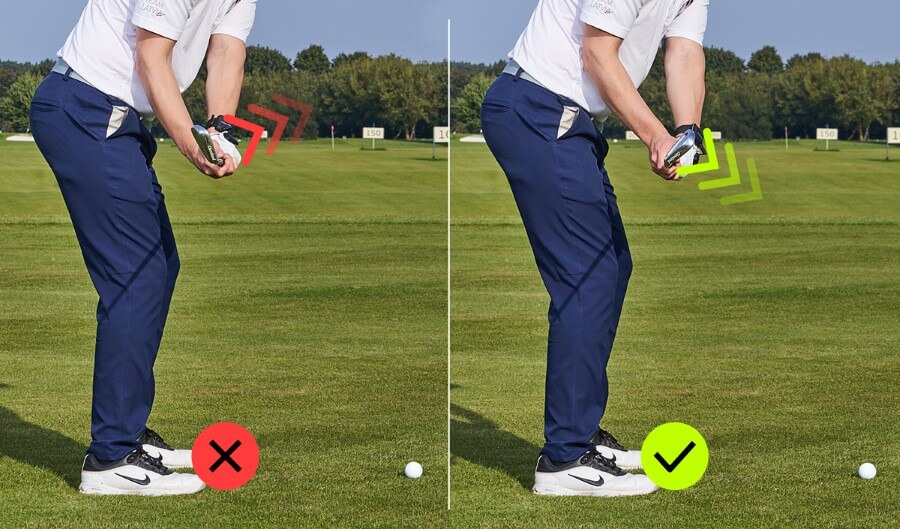
At setup, the trail wrist naturally has a small amount of extension. During the backswing, it bends back progressively until it reaches maximum extension at the top—usually around 40–50°. In transition, the wrist adds slightly more extension, helping shallow the shaft and maintain lag.
From there, it simply retains that bend until after the ball is struck. Players who maintain trail-wrist extension longer see stable, consistent contact. Players who “throw” it away early lose compression, spin, and accuracy.
Trail Wrist: Downswing Checkpoints
| Position | Typical Wrist Angle | Feel / Motion | What It Produces |
|---|---|---|---|
| Start of Downswing (Transition / P4–P5) | Moves from ~45–50° to slightly more extension | Trail wrist “bends back” a touch more feels like holding lag | Shallows the club, supports lead-wrist flexion |
| Club Parallel in Downswing (P6) | Maintains 40–50° extension | Keep the back of the trail hand bent “hold the angle” | Prevents early release, adds shaft lean |
| Impact (P7) | Still 20–30° extended | Trail wrist still bent, palm slightly facing sky | Delivers compression and consistent dynamic loft |
| Post-Impact (P8) | Moves quickly toward flat | Wrist releases naturally as the club exits low and left | Smooth energy release; any earlier = “throwing” the club |
How Grip and Setup Influence Wrist Motion
Your starting position defines how your wrists can move. A neutral-to-strong lead-hand grip naturally begins with some extension, which is fine, as long as you remove it early in the backswing.
A trail hand that sits too far underneath the handle often causes an early “throw” in the downswing, while a more neutral or on-top position makes it easier to hold extension through impact.
Posture also matters. If you are too upright, flexing the wrist feels difficult. Too bent over, and you may overuse your arms instead of letting the wrists work naturally.
Take note of your starting angles with HackMotion before making changes – you’ll learn whether you’re training from a realistic setup or creating compensations.
Drills to Train Wrist Movement in the Downswing
Once you understand how the wrists should move, the next step is training those movements in sequence.
The goal is simple: lead wrist flexing, trail wrist staying extended, both stable through impact. Each of these drills builds on that foundation.
The Motorcycle Drill (Lead Wrist Flexion)
The motorcycle drill teaches the correct motion of the lead wrist from the top, flattening and bowing to stabilize the face.
HackMotion Motorcycle Drill – Step by Step:
- Swing to the top and pause.
- As you start down, “rev the throttle” and rotate your lead hand so your knuckles face the ground.
- Watch HackMotion’s live data: your lead wrist should move toward flexion.
- Rehearse the motion without a ball, then hit short half swings while maintaining the same feel.
This motion prevents the over-the-top move, helps shallow the club naturally, and allows you to deliver a square face with hands ahead of the ball.
Hold-the-Angle Drill (Trail Wrist Extension)
The Hold the Angle drill trains you to keep the trail wrist bent back through impact for more compression and lag retention.
Hold-the-Angle Drill – Step by Step:
- From the top, feel your trail wrist bend slightly farther back.
- Begin the downswing while holding that angle, and avoid letting the wrist flatten before contact.
- Swing through waist-high and check your HackMotion graph: If your trail wrist reads close to zero, you released early. Aim to retain positive extension through impact.
Holding trail wrist extension keeps the clubhead from flipping, delivering forward shaft lean and consistent, penetrating ball flight.
Release Drill
The Release Drill in the HackMotion app simplifies impact training by isolating the bottom of the swing and helping you perfect the strike first.
Perfect Your Release with HackMotion
Fine-tune your release for consistent contact. Start with a short swing to master control before adding power.
HackMotion Release Drill – Step by Step
- Address the ball with a shorter swing in mind.
- Start with the shaft parallel to the ground in the downswing and swing through to impact.
- Keep your hands slightly ahead of the ball as you strike it.
- Use HackMotion to confirm: lead wrist flexed, trail wrist extended.
- Perform 10–15 reps before moving to the next drill.
If your shots float high or leak right, you’re likely adding lead-wrist extension too soon. Rehearse slower and exaggerate the bow through impact.
Dynamic Transition Drill
The Dynamic Transition Drill is great if you are working on that transition from backswing to downswing.
It integrates wrist mechanics with body movement and rotation to create a realistic, dynamic motion.
Dynamic Transition Drill – Step by Step
- Begin with the same setup as the Release Drill, but take a slightly longer backswing.
- At the top, feel your lead wrist flatten and your trail wrist bend back.
- Start the downswing with a small bump toward the target, maintaining both angles.
- Swing through to a controlled, punch-style finish.
- Check your HackMotion data: lead wrist flexed (negative), trail wrist extended (positive).
Troubleshooting the Downswing
Most players can grasp that the lead wrist should flex and the trail wrist should stay extended during the downswing, but the challenge is managing how much and for how long.
Too much of either move, or a mistimed release, can throw off your entire impact sequence.
A golfer who over-flexes the lead wrist may trap the ball too hard or shut the face, while one who extends it too early will flip and lose compression. The same goes for the trail wrist.
Here’s how to recognize which side of the spectrum you’re on, and how to get back to neutral.
If You’re Too Steep
If you’re too steep on your downswing, you’ll notice low pull-cuts, heavy contact, or a swing path too far left (for right-handers).
The problem comes from the lead wrist remaining extended through transition and the trail wrist losing its bend too early.
Fix It:
- Revisit the Motorcycle Drill to feel earlier lead-wrist flexion.
- In Dynamic Transition, make sure your HackMotion graph shows a clear dip into flexion for the lead wrist as you start down.
- Focus on rotating through impact instead of pulling the handle down.
If You’re Too Shallow
If you’re too shallow, you’ll notice high push-draws, thin strikes, or early extension. This is typically caused by the trail wrist staying too extended for too long, with insufficient lead-wrist flexion to square the face.
Fix It:
- Blend more lead-wrist flexion into your transition.
- Use the Release Drill to feel your hands leading the clubhead through impact.
- Keep your chest rotating so the club exits low and left after the strike.
Final Thoughts
The downswing happens too fast to think your way through it. With the proper feedback, you can train the wrist position in the downswing to be more effective.
Every great ball-striker shares one key pattern: the lead wrist flexes as the trail wrist stays extended, and both maintain their angles through impact.
With HackMotion, you can see those movements in real time, rehearse them with precision, and finally build a downswing that holds up under pressure. Get the wrists right, and the rest of the swing starts taking care of itself.