

7 Best Impact Drills That Will Transform Your Golf Game
Impact is all that matters in golf. If you get impact right, you’ll hit a good shot.
Seems simple, right?
It’s not.
The best way to improve your impact position is through practice and drills focusing on your wrist position.
We have put together the best impact drills for golfers. Each is simple to start today and can help you make big changes in your game.
If You Struggle With… Try This Drill
- If you’re flipping at impact – Stop the Flip Drill
- If you have inconsistent contact – Punch/Chip Shot Drill
- If you’re slicing – Toe Down Checkpoint Drill
- If you’re hooking – Flatten the Lead Wrist Drill
- If your short game shots are scoopy – Chip and Run Drill
- If you want a more powerful swing – Hit Hard, Stop Quick Drill
- If you need better wrist angles – Impact Release Drill with HackMotion
7 Golf Impact Position Drills That Always Get Results
“Stop the Flip” with an Alignment Stick
Flipping at impact hurts your consistency and can decrease your power and even the control of your ball flight. Flipping happens when the clubhead passes your hands at impact, which essentially creates the flip.
The Stop the Flip drill trains proper forward shaft lean and helps you feel the position the lead arm and hands should be in at impact.
With the Stop the Flip drill, you won’t be able to let the clubhead overtake the hands.
Click here to access our Stop Flipping Wrists at Impact video course. This free 8-lesson course will teach you how to stop flipping, square the face, and strike with precision every time.
- Video Timestamp: 7:10-8:40
Stop the Flip Drill – Step by Step:
- Place an alignment stick to rest along your lead side, roughly parallel to your club’s shaft at address.
- Set up with a slight forward shaft lean (hands a bit ahead of the ball).
- Make small half-swings, feeling the club shaft never “catches up” to or passes the stick/lead arm.
- Keep the stick and lead arm in line through impact and into a short follow-through.
- Progress to longer swings once you can maintain the alignment.
Punch/Chip Shot Drill for Forward Shaft Lean
If your impact position is unstable and you feel like you aren’t compressing your golf shots, practicing punch shots is a great way to fix it.
When you work on punch shots or punch chips, you will have your hands forward of the clubhead at impact, the shaft leaning, and a square clubface.
For clean, ball-first contact, the Punch Shot Drill is a perfect drill.
- Video Timestamp: 9:10-10:35
Punch/Chip Shot Drill – Step by Step:
- Take a mid-iron and address the ball with a slight forward shaft lean.
- Make a short backswing (waist high or less).
- Focus on leading with your hands as you strike the ball, stopping the clubhead very soon after impact (like a firm “punch”).
- The flight should be relatively low, with a crisp, compressed feel.
- Once consistent, lengthen the backswing but keep the same firm, hands-forward position at impact.
- A bonus here is that you can use this shot on the course in certain situations.
“Toe Down” Checkpoint at Waist High
At impact, the clubface should be square. The Toe Down Checkpoint drill will help ensure the clubface isn’t too open or shut as you are taking the club back.
We know from analyzing over 1,000,000 swings that golfers with consistent and stable wrist extension/flexion in their backswing have a much easier time achieving the ideal impact position.
If you are a golfer who likes checkpoints and knowing the proper position of the club, the Toe Down Checkpoint drill is a great place to start.
- Video Timestamp: 2:00-3:00
Toe Down Checkpoint Drill – Step by Step:
- Set up normally and begin your takeaway.
- At the point where the club shaft is parallel to the ground (waist-high backswing), check that the leading edge (“toe”) of the club is angled slightly downward (about 15–20 degrees).
- If the face points straight up, you are too open/extended in the lead wrist (slicer tendency). If it’s facing the ground dramatically, you’re too closed/flexed (hooker tendency).
- Work small half-swings at a slow speed, pausing waist-high to confirm the correct “toe down” look.
- Gradually blend this into a normal backswing. Feel free to use it as part of a pre-shot routine if it helps get your club in the right place.
Flat Lead Wrist at the Top
While it’s important to train the impact position, sometimes mistakes at the top of your backswing leave you unable to reach a perfect impact.
The Flat Lead Wrist at the top drill is easiest if you have the HackMotion, but you can still train the position without it.
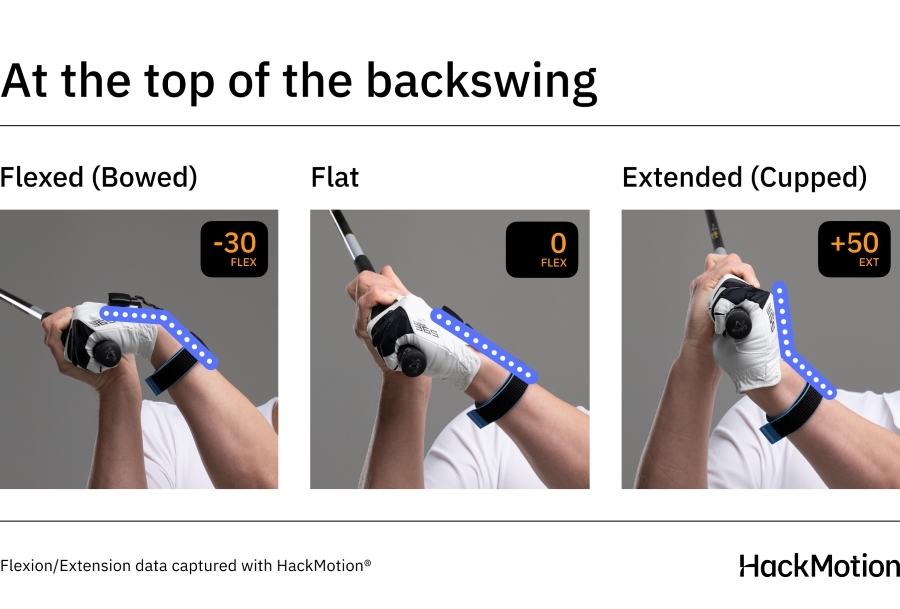
This drill will help prevent excessive cupping or bowing and give you a neutral clubface position at impact. (Watch the video above: timestamp 3:45 – 4:30).
Flat Lead Wrist at the Top Drill – Step by Step:
- Take your normal setup and note your lead wrist angle (many players have a little extension at address).
- Swing to the top and check (with video or feel) that the back of your lead wrist aligns roughly with your forearm (flat or very slightly flexed).
- Practice slow, deliberate backswings, pausing at the top to confirm the flat lead wrist.
- If your lead wrist is cupped (extended), feel extra “bow” (flexion). If it’s overly bowed, feel a bit more extension until it’s flat.
- Continue into your downswing, keeping that stable, mostly flat lead wrist.
Chip and Run for Correct Impact
The Chip and Run drill is similar to the Punch Shot Drill, but it simplifies the motion further.
If you need a clear picture of what impact looks like, one of the easiest things to do is shorten the golf swing. That’s exactly what this drill does.
You’ll have to create forward shaft lean, keep the lead wrist stable and slightly flexed, and you’ll have to avoid the flip of the wrists to be successful with the Chip and Run Drill.
This drill should build confidence and it’s also a shot you can use on the course if the situation allows for it.
- Video Timestamp: 1:53
Chip and Run Drill – Step by Step:
- Start by setting the ball back slightly, with a little extra weight on your lead side.
- Take a chipping stance (narrow, slightly open if comfortable) and keep your hands ahead.
- Make a short, low backswing—just enough to strike a small, running shot.
- Hold the handle in front at impact, feeling the lead wrist remain flat or slightly flexed and the trail wrist bent back.
- Clip the ball first, then the turf, letting the shot roll out low.
Hit Hard, Stop Quick Drill for Body–Arms Synchronization
The interesting thing about the Hit Hard, Stop Quick drill is that it teaches you so many things about the impact position, but you won’t even realize you are learning them.
The drill is designed to help sequence your body turn with your arm swing to increase speed at impact.
If you are a player who has been known to slow down the club through impact, the Hit Hard, Stop Quick drill will help you start transferring the energy in your clubhead where it is needed the most.
- Video Timestamp: 7:20–10:30
Hit Hard, Stop Quick Drill – Step by Step:
- (Optional) Place a small inflatable ball (or “smart ball”) between your forearms to maintain connection.
- Make a full backswing.
- Swing down aggressively through the ball, but focus on stopping as soon as possible right after impact (the club barely passes hip-high in the follow-through).
- Gradually increase speed. The harder you swing, the more you must feel a “hard stop” in the follow-through.
- Monitor ball flight: you want a powerful, stable strike rather than a wild finish.
HackMotion Impact Release Drill
If you need more guidance in your impact position practice, consider using the Impact Release Drill built into the HackMotion App.
The drill helps you achieve the correct wrist angles from waist-high to waist height.
If you’ve noticed the theme throughout these impact drills, one of the key things to work on is shortening the golf swing while you work on impact. If you can get impact correct on a chip shot, then a half swing, then a ¾ swing, you can do it on the full swing.
The Impact Release Drill trains a stable low point in your swing arc and makes it possible to transfer the knowledge to the full swing.
Perfect Your Release with HackMotion
Fine-tune your release for consistent contact. Start with a short swing to master control before adding power.
HackMotion Release Drill – Step by Step
- Put on your HackMotion sensor (or just be mindful of wrist angles if you don’t have one).
- Take the club back only to the waist high, feeling the lead wrist in a slightly flatter or flexed position to keep the face squared.
- Swing through to the opposite waist-high position, monitoring that your lead wrist remains flat (or slightly flexed) and the shaft still “trails” the lead arm.
- Keep speed moderate at first—focus on crisp ball-first contact.
- Once you master stable wrist angles in this shorter swing, gradually increase speed or length. The sensor (or your own feel) should confirm no flipping occurs through impact.
Final Thoughts
Having a perfect wrist position at impact will improve ball striking, total distance, and distance control.
You can wear your HackMotion while completing any of these impact drills. While doing impact drills, you often have issues with your takeaway or backswing that need to be addressed before you can improve impact.
Take a look at all of our best golf drills to work on any area of your game.


