From a 20 to a 10 Handicap: An 8-Week Golf Practice Plan
Getting to a 20 handicap usually happens faster than golfers expect. You learn how to get around the course, limit disaster holes, and occasionally string together a solid stretch of bogeys or pars.
But the jump from 20 to 10 is different.
This is where most golfers hit a plateau. It’s not for lack of trying. Many times, the issue comes from practicing the wrong things in the wrong way. The difference between a 20 and a 10 handicap isn’t just ten shots on the scorecard. It’s how often certain mistakes show up, how predictable contact becomes, and how well big numbers are avoided.
At this stage, improvement doesn’t come from hitting more balls. It comes from:
- Knowing which parts of your game matter most
- Structuring practice around those areas
- Using feedback to make sure your work is actually translating to the course
We’ll start by showing you what statistically separates a 20 handicap from a 10. Then we’ll walk you through a clear 8-week practice plan, built around specific focuses, drills, and realistic practice time so you know exactly what to work on and why.
Contents
What’s the Real Difference Between a 20 and a 10 Handicap?
When golfers think about handicaps, they usually think in terms of scores. But scores are just the result. The real differences show up in a few key performance areas.
Across multiple published datasets from Shot Scope, Arccos, and aggregated amateur tracking data, the gap between a 20 and a 10 handicap consistently shows up in four places: tee shots, iron contact, short-game efficiency, and putting consistency.
Here’s a simplified look at how those differences typically show up on the course:
| Performance Area | 20 Handicap | 10 Handicap | Why It Matters |
|---|---|---|---|
| Fairways Hit | ~40–43% | ~48–50% | More balls in play means fewer recovery shots and penalty strokes |
| Greens in Regulation | ~22–25% | ~35–40% | Roughly 2–3 more greens per round for a 10 handicap |
| Up & Down Rate | ~20–22% | ~30–32% | Fewer missed greens turn into doubles |
| Putts per Round | ~36 | ~34 | Fewer three-putts and better lag putting |
| Double Bogeys or Worse | Frequent | Significantly fewer | Big numbers are the fastest way to stall progress |
The Four Areas This Practice Plan Focuses On
Instead of trying to “fix everything,” this plan focuses on the four areas that actually separate a 20 from a 10 handicap.
You’ll notice that we start with tee shot control but that’s not because the driver is the most important club in the bag.
However, if you’re tee shot is out of bounds on every tee box even if you’re an amazing putter you’re going to struggle to make your way to a 10 handicap.
1. Tee Shot Control
While distance is important to move from a 20 to a 10 handicap the goal of this practice is going to be hitting more fairways, keeping the ball in play. It’s about start line, clubface control, and setting yourself up for a green in regulation.
2. Iron Low Point Control
Better players control where the club bottoms out. This leads to more solid contact, better distance control, and more greens hit.
3. Short Game Contact & Launch Control
Inside 50 yards, the difference isn’t creativity. It’s predictable contact and knowing how the ball will launch and roll. This is how bogeys replace doubles.
4. Putting Consistency
It’s great to sink a couple of long putts, but the goal here is more about creating a simple repeatable stroke. You’ll learn speed control, starting the ball on line, and eliminating three-putts.
8-Week Practice Plan: From 20 Handicap to 10 Handicap
This 20 to 10 handicap practice plan is structured so you always have:
- One primary focus
- One featured drill that reinforces it
- Enough repetition to actually see change
There is enough material here to cover eight total weeks of practice, with two 45-minute sessions per week. You’ll lightly maintain other skills while keeping one clear primary focus each week.
Below is a basic overview of the entire plan and what you’ll work on while going from a 20 handicap to a 10 handicap. Each phase has a different focus so your skills develop across your entire game.
| Weeks | Primary Focus | Key Skill Being Trained | Drill of the Week |
|---|---|---|---|
| 1–2 | Driver Control | Keeping tee shots in play | Transition Speed Drill / Swing Path Barrier Drill |
| 3–4 | Iron Play | Low point control & compression | Towel Drill / Line Drill |
| 5–6 | Wedges & Short Game | Distance control & shot selection | 3-Shot Wedge System / Low–Mid–High Short Game Shots |
| 7–8 | Putting | Face control & speed control | Forearm Connection Drill / Ladder Drill |
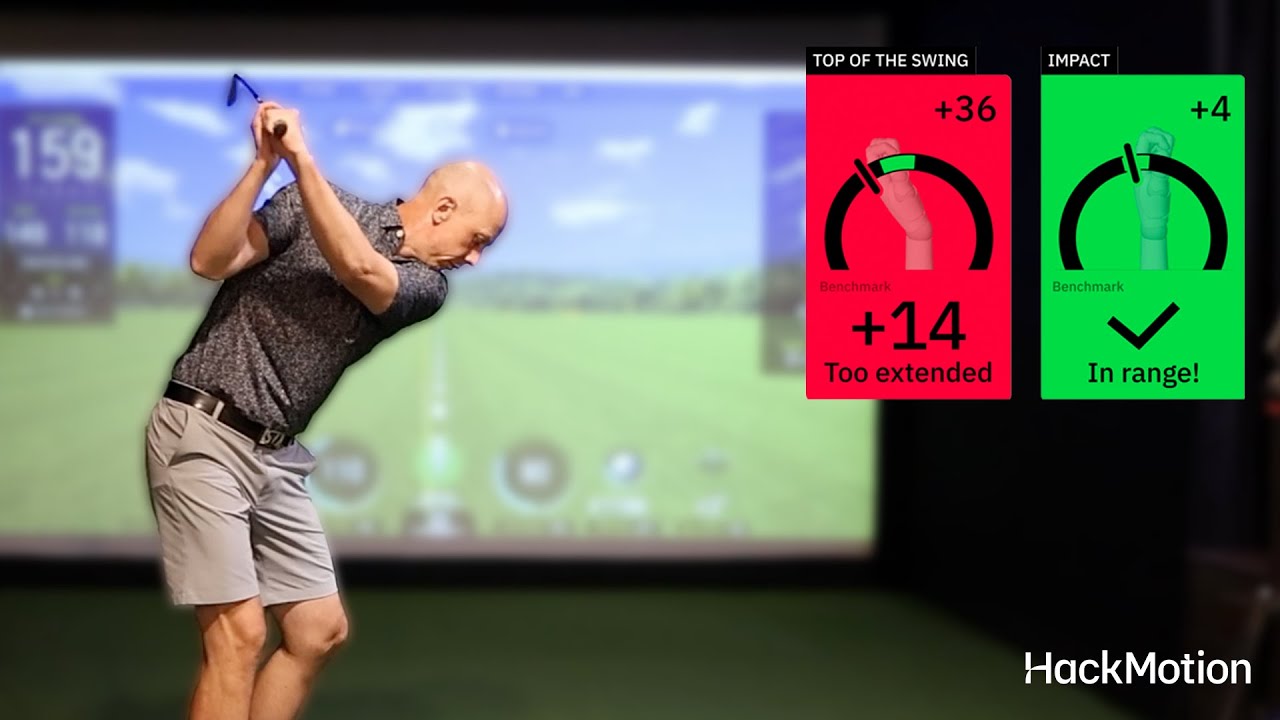
Having a HackMotion to work with during the process will make things a bit easier. You’ll be able to see if you are staying on track and watch progress along the way. It’s like having a coach with you throughout the process.
Weeks 1–2: Driver Control (Keep the Ball in Play)
Before you can worry about distance, the ball has to stay in play.
As a 20 handicap, most of your lost strokes off the tee come from penalties, punch-outs, and recovery shots. A 10 handicap still misses fairways, but those misses stay playable. These first two weeks are about learning how to deliver the driver with control so you can actually play the hole the way it was designed.
Week 1 Focus: Faster, More Controlled Transitions
You’re not trying to swing harder everywhere. You’re training your hands to move faster at the start of the downswing, then letting the club release naturally.
Drill of the Week: Split-Hand Transition Speed Drill
This drill trains you to apply speed in the correct part of the swing instead of forcing it late.
Using a light alignment stick allows you to move fast and stop fast, which naturally improves sequencing and weight shift without overthinking mechanics. When you pair this with HackMotion, you can also make sure increased speed doesn’t come with excess flipping or loss of wrist control.
Split-Hand Transition Speed Drill – Step by Step:
- Take a split grip with an alignment stick and hold it horizontally.
- Make a backswing to the top.
- Pull the stick down as fast as possible to shaft-parallel.
- Stop it abruptly, then reset and repeat.
- Once comfortable, carefully transfer the feel to the driver if desired.
- It should feel like you have to put some effort in to this that’s how you know you are doing it right.
Practice Session 1 (45 minutes)
- 10 minutes – Warm up with a wedge alternating shots between 50 and 100 yards
- 10 minutes – Split-hand transition speed drill using an alignment stick
- 10 minutes – Driver swings at 70–80 percent effort aiming at a specific target
- 10 minutes – Mid-iron swings focusing on balance and solid contact
- 5 minutes – Make 10 putts from 3 feet in a row before leaving
Practice Session 2 (45 minutes)
- 10 minutes – Warm up with wedge shots between 50 and 100 yards changing targets often
- 8 minutes – Split-hand transition drill with fewer reps and higher intent
- 12 minutes – Driver swings to a fairway target using a full pre-shot routine
- 10 minutes – Easy iron swings prioritizing clean contact
- 5 minutes – Finish by making 10 straight putts from 3 feet
Looking for more drills to reinforce driver control during this phase of the plan?
The Driver Blueprint includes additional driver drills and checkpoints to help you build consistency off the tee.
Week 2 Focus: Driver Swing Path and Start Line Control
Once you can create speed more efficiently, the next step is delivering the club on a predictable path. If your swing path changes day to day, face control becomes guesswork.
Drill of the Week: Swing Path Barrier Drill
This drill gives you instant feedback on whether your swing path matches the geometry of the driver swing.
By setting up a simple barrier, you’re forced to move the club on a more functional path instead of swinging steep and out-to-in or excessively shallow. HackMotion helps reinforce this by pairing path awareness with consistent wrist and clubface delivery.
Swing Path Barrier Drill – Step by Step:
- Place a pool noodle or alignment stick in the ground angled to match your club shaft.
- Position it just close enough that you must miss it during the swing.
- Make slow practice swings first.
- Hit driver shots only when you can consistently avoid the barrier.
- Adjust the barrier depending on whether you typically slice or hook the ball.
Practice Session 1 (45 minutes)
- 10 minutes – Warm up by hitting half swing 8 – iron shots
- 12 minutes – Swing path barrier drill starting with slow swings
- 10 minutes – Driver swings at 70–80 percent effort to the same target
- 8 minutes – Smooth iron swings focusing on tempo and transition
- 5 minutes – Make 10 putts in a row from 4 feet
Practice Session 2 (45 minutes)
- 10 minutes – Wedge warm up hitting short iron shots with your feet together
- 8 minutes – Barrier drill refresher with fewer reps
- 12 minutes – Driver swings observing start line and curve without overcorrecting
- 10 minutes – Iron swings emphasizing balance and strike quality
- 5 minutes – Finish with putts from 30 feet that end up within 3 feet of the hole
Optional Third Session (If You Have Extra Time)
- 10 minutes – Wedge distance control with random targets
- 10 minutes – Easy driver swings at 60–70 percent focusing on balance
- 5 minutes – Short or mid-iron contact work
- Finish with putting before leaving
Looking for more drills to reinforce driver control during this phase of the plan?
The Driver Blueprint includes additional driver drills and checkpoints to help you build consistency off the tee.
Weeks 3–4: Iron Contact (Low Point Control + Compression)
With irons, the biggest separator between a 20 handicap and a 10 handicap is simple: your strike becomes predictable.
When you consistently hit ball first (and the ground after), your distances stabilize, your misses get smaller, and you hit more greens without needing a “perfect” swing.
These two weeks train the skills that make that happen.
Week 3 Focus: Compression (Better Strike + Forward Shaft Lean)
If you tend to hit thin, hit it high on the face, or feel like your irons randomly fly short, this is where you start fixing it.
Compression isn’t a magic trick it’s just delivering the club with the handle slightly forward so you strike the ball more solidly.
Drill of the Week: Towel Compression Drill
This drill gives you immediate feedback if you release too early or “flip” into the ball. The towel acts like a barrier behind the ball if you hit the towel first, you’re losing shaft lean and bottoming out too early.
HackMotion fits perfectly here because it helps you train the wrist conditions that support compression (without you guessing what you did).
Towel Compression Drill – Step by Step:
- Place a towel just behind the ball (start farther back if you’re struggling).
- Make normal swings, but your intent is to miss the towel and strike the ball first.
- If you keep hitting the towel, move it slightly back and build up success.
- Use HackMotion for feedback so you’re not relying on feel alone.
Practice Session 1 (45 minutes)
- 8 minutes – Warm up with half-swings using a short iron focusing on solid contact
- 12 minutes – Towel compression drill working toward clean ball-first contact
- 10 minutes – Full iron shots to a target with the same “miss the towel” intent
- 10 minutes – Driver maintenance swings at 70 percent focusing on balance and start line
- 5 minutes – Finish by making 10 putts from 3 feet, in a row
Practice Session 2 (45 minutes)
- 10 minutes – Warm up with a wedge ladder at 40, 60, 80, and 100 yards
- 12 minutes – Towel compression drill with small adjustments to towel distance as needed
- 10 minutes – Iron shots alternating targets every ball to train adaptability
- 8 minutes – Short game contact reps (simple chip shots with one club)
- 5 minutes – Finish by two putting only from 20 feet, 5 times in a row
Week 4 Focus: Low Point Control (Divot After the Ball)
Compression gets much easier when your low point is consistent. If you hit fat shots, thin shots, or feel like you “guess” where the ground is, this week is for you.
Drill of the Week: Line Drill (Low Point Control)
This is one of the best drills in golf because it’s simple and brutally honest. Your job is to strike the ground on or just after the line.
HackMotion helps here because low point isn’t just weight shift it’s also how your wrists manage the radius of the swing. If your lead wrist adds extension early, your arc widens too soon and the low point shifts back.
Line Drill – Step by Step:
- Spray or draw a straight line on the ground (or use a piece of tape or a golf tee if needed).
- Start without a ball and practice clipping the turf just after the line.
- Add a ball on the line and try to strike ball first and turf just ahead.
- If you’re on a mat, you can use a folded towel behind the ball as a stand-in barrier.
Practice Session 1 (45 minutes)
- 8 minutes – Warm up with feet-together iron swings to groove balance and center contact
- 12 minutes – Line drill reps starting without a ball then adding a ball on the line
- 10 minutes – Iron shots focusing on divot position or strike point after the ball
- 10 minutes – Wedge shots alternating a low punch and a normal flight to a target
- 5 minutes – Finish by getting up and down three times from a different area on the green
Practice Session 2 (45 minutes)
- 10 minutes – Warm up with three-quarter swings using a mid-iron focusing on tempo
- 12 minutes – Line drill with clear “after the line” intent on every rep
- 10 minutes – Iron shots to two targets alternating every ball
- 8 minutes – Driver maintenance swings at 70 percent focusing on playable misses
- 5 minutes – Finish with 10 putts in a row from 3 feet
Optional Third Session (If You Have Extra Time)
- 10 minutes – Short iron half-swings focusing on ball-first contact
- 10 minutes – Line drill reps or towel barrier reps depending on your miss
- 5 minutes – Wedge distance control to one target
- Finish with putting before leaving
Weeks 5–6: Wedge Distance Control & Short-Game Scoring
By this stage of the plan, you’ve improved tee shot control and iron contact. Now we shift attention to where scores are actually saved: wedges and short game.
These two weeks are about:
- Predictable wedge distances
- Fewer wasted shots inside 100 yards
- Turning missed greens into routine pars
Week 5 Focus: Wedge Distance Control
Drill of the Week: 3-Shot Wedge System
Instead of guessing yardages, you’ll build three repeatable wedge shots that cover most scoring distances.
- Shot 1 (Short): Stand closer, minimal wrist hinge, torso-driven motion
- Shot 2 (Medium): Slightly farther from the ball, connected arms, moderate hinge
- Shot 3 (Long): Full backswing and follow-through at a slower overall tempo
Practice Session 1 (45 minutes)
- 8 minutes – Warm up by hitting short chips and pitches to one landing spot
- 15 minutes – Practice Shot 1, Shot 2, and Shot 3 rotating every ball
- 10 minutes – Random wedge practice by changing targets every shot
- 7 minutes – Iron maintenance with smooth swings focused on clean contact
- 5 minutes – Finish with a 10-ball wedge proximity test to one target
Practice Session 2 (45 minutes)
- 10 minutes – Warm up with a wedge ladder moving targets slightly farther each set
- 12 minutes – Rehearse the 3-shot system using only your sand wedge
- 10 minutes – Distance control challenge alternating between two targets
- 8 minutes – Driver maintenance at 70 percent focusing on start line
- 5 minutes – Finish with worst-ball wedge practice hitting two balls to the same target
Optional Third Session (If You Have Extra Time)
- Practice your three wedge shots and write down carry distances
- Play a wedge-only game aiming to finish inside a small target area
- Finish with a short putting challenge from mixed distances
Looking for more drills to sharpen your short game during this phase of the plan?
The Short Game Formula includes additional drills and clear checkpoints to help you control contact, trajectory, and distance around the green.
Week 6 Focus: Short-Game Shot Selection (Low, Mid, High)
Drill of the Week: 3 Short-Game Shots
This week is about choosing the right shot, not the fanciest one.
- Low Shot: Stand closer, shaft more upright, wrists stable and “down”.
- Mid Shot: Neutral setup, small hinge early, turn through with the body.
- High Shot: Slightly wider stance, open face, maintain lead wrist extension.
The priority is learning when to use each shot and committing to it. This video explains exactly how to complete each of these shots so you have more selection in your shots.
Practice Session 1 (45 minutes)
- 8 minutes – Warm up with short putts focusing on start line
- 15 minutes – Rotate between low, mid, and high shots around the green
- 10 minutes – Up-and-down practice from one location trying to get down in two
- 7 minutes – Wedge maintenance using your most reliable stock shot
- 5 minutes – Finish with a putting ladder from increasing distances
Practice Session 2 (45 minutes)
- 10 minutes – Warm up with basic chips using one club to one target
- 12 minutes – Emphasize the mid-flight shot as your default scoring option
- 10 minutes – Practice trouble shots including tight lies and soft landings
- 8 minutes – Iron maintenance with easy swings focusing on low point
- 5 minutes – Finish with an around-the-world putting drill from 4 feet
Optional Third Session (If You Have Extra Time)
- Play short-game shots based on different lies and slopes
- Alternate between low and mid shots to different pins
- Finish with a must-make putting challenge before leaving
Want more short-game drills to support your practice?
The Short Game Formula provides simple drills to improve contact, launch, and scoring around the greens.
Weeks 7–8: Putting Consistency & Speed Control
At this point in the plan, the biggest scoring gains come from eliminating three-putts and turning makeable chances into routine conversions.
Better putters are not necessarily better green readers. They control face angle, strike, and speed more consistently.
These two weeks focus on building that reliability.
Week 7 Focus: Wrist Stability & Face Control
Drill of the Week: Forearm Connection Putting Drill
This drill trains your arms, body, and putter to move together, reducing excess wrist motion that causes inconsistent starts and poor speed.
By placing a soft object between your forearms:
- Excess wrist breakdown is immediately exposed
- The stroke becomes more connected
- Speed is controlled by body motion instead of hands
This is a foundational drill for building a repeatable stroke under pressure. Wear your HackMotion while working on this drill to check for imperfections in wrist angle through impact.
Practice Session 1 (45 minutes)
- 8 minutes – Warm up with short putts focusing on starting the ball on line
- 15 minutes – Forearm connection drill from 6–10 feet
- 10 minutes – Mid-length putts emphasizing solid contact and pace
- 7 minutes – Iron maintenance with smooth half swings
- 5 minutes – Finish with a pressure putting challenge from mixed distances
Practice Session 2 (45 minutes)
- 10 minutes – Warm up by rolling putts to the fringe without a hole
- 12 minutes – Forearm connection drill alternating short and mid-length putts
- 10 minutes – Random distance putting focusing on feel rather than mechanics
- 8 minutes – Wedge maintenance hitting stock shots to one target
- 5 minutes – Finish with a must-make putting drill before leaving
Optional Third Session (If You Have Extra Time)
- Perform the forearm connection drill for feel only, no score
- Roll long putts focusing purely on distance control
- Finish with a confidence-building short putt routine
Looking for more drills to build putting consistency during this phase of the plan?
The Putting Consistency System includes structured drills and checkpoints to help eliminate three-putts and make your stroke more repeatable under pressure.
Week 8 Focus: Speed Control & Distance Awareness
Drill of the Week: Putting Ladder Drill
This drill develops elite speed control, which is one of the biggest separators between a 20 and a 10 handicap.
You’ll train your ability to:
- Roll the ball progressively farther
- Make small, controlled changes in stroke length
- Avoid big distance misses that lead to three-putts
This is a skill-based drill, not a technical one.
Practice Session 1 (45 minutes)
- 8 minutes – Warm up rolling putts to a defined zone without a hole
- 15 minutes – Ladder drill moving progressively farther each putt
- 10 minutes – Reverse ladder drill starting long and moving closer
- 7 minutes – Short game maintenance with basic chips
- 5 minutes – Finish with a 5-putt speed challenge from different distances
Practice Session 2 (45 minutes)
- 10 minutes – Warm up by rolling long putts across slopes
- 12 minutes – Ladder drill using different start points
- 10 minutes – Distance control competition against yourself
- 8 minutes – Driver maintenance at 70 percent focusing on start line
- 5 minutes – Finish with a one-ball, one-chance putting test
Optional Third Session (If You Have Extra Time)
- Combine ladder drill with green reading practice
- Putt to zones instead of holes to improve feel
- Finish by recreating on-course putting situations
Want more putting drills to support this phase of the plan?
The Putting Consistency System helps you train face control and speed so three-putts become far less common.
10 Tips for Succeeding with This Practice Plan
Editing this practice plan to work for your individual needs is fine. However, it moves at this pace and in this order for a reason.
Here are ten tips for succeeding and seeing the results you’re looking for.
- Stick to the weekly focus instead of jumping ahead: Each week builds on the last. Trust the order rather than chasing the skill you like most. If it feels slow it’s because you are trying to develop mastery not just awareness of the individual skills.
- Use HackMotion during drills, not during every swing: Measure wrist motion while training a specific skill, then remove it and blend the feel into full swings as you would on the course.
- Match your intent to the drill of the week: If the week is about low point control or wrist stability, judge success by strike quality, not ball flight or distance.
- Resist the urge to hit full shots all the time: Partial swings, slow rehearsals, and exaggerated feels are what actually change wrist patterns.
- Let wrist mechanics guide contact, not added effort: Better compression and control come from wrist position and sequencing, not swinging harder.
- Use the maintenance sections exactly as written: They preserve earlier gains without overwhelming your main focus for the week.
- Track small wins, not perfect outcomes: Fewer fat shots, tighter wedge dispersion, or fewer three-putts are signs the plan is working. Try not to focus too much on scoring while you are working through the practice plan.
- Use HackMotion to verify consistency across sessions: The goal is repeating the same wrist behavior week to week, not chasing new numbers.
- Avoid over-practicing one skill in a single session: When fatigue sets in, wrist control usually breaks down first. If you’re tired pick up the rest of the session another day.
- Treat the optional third session as skill reinforcement, not grind time: Light reps, slow swings, and feel-based work are more valuable than volume. If you have a few extra minutes go for it but don’t push.
Additional Short Game Drills
When you start getting your tee shots in play and your irons are more consistently hitting greens, the short game is where you’ll want to focus the majority of your time.
You can and should add additional practice sessions focusing specifically on becoming more efficient around the greens.
To make those practice sessions more dynamic, here are three additional short game drills to help you.
Plane Chipping Drill
This drill trains you to move the club on a neutral plane during chipping, which is essential for consistent contact and predictable launch.
By giving you immediate feedback when the club moves too far inside or outside, it helps eliminate glancing strikes and inconsistent lows around the green.
Plane Chipping Drill – Step by Step:
- Set up four water bottles to create a narrow swing path around the ball.
- Make small chipping swings without hitting the bottles back or through.
- Focus on moving the club up and down on plane, not inside or outside.
- Start slow and widen the spacing if needed, then narrow it as control improves.
Bunker Wrist Extension Rehearsal
This drill teaches the correct wrist conditions for greenside bunker shots, where maintaining loft is critical for getting the ball out cleanly.
By training lead-wrist extension at setup and through the swing, you improve your ability to use the club’s bounce and produce consistent height and carry from the sand.
Bunker Wrist Extension Rehearsal – Step by Step:
- Take a wide bunker stance with weight favoring the lead side.
- Open the clubface first, then grip the club so the face stays open.
- Preset lead-wrist extension and maintain it throughout the swing.
- Make rehearsal swings focusing on striking the sand with speed, not the ball.
- With HackMotion, monitor consistent lead-wrist extension from setup through follow-through.
Trail Arm Only Chipping Drill
This drill isolates the trail arm and wrist to improve club control, radius management, and strike quality in the short game.
It helps prevent the club from dropping behind you in the backswing and encourages a more stable, connected delivery through impact.
Trail Arm Only Chipping Drill – Step by Step:
- Take your normal chipping setup, then remove the lead hand from the club.
- Place the lead hand on the trail bicep to maintain body–arm connection.
- Make short swings using only the trail arm and wrist.
- Focus on keeping the club moving on plane and striking the ground consistently.
- Start without a ball, then introduce one (a small tee can help at first).
- With HackMotion Pro, use trail-wrist feedback to avoid excessive ulnar deviation.
Final Thoughts
This practice plan to go from a 20 to a 10 handicap works because it focuses on the skills that actually separate a 20 handicap from a 10: control off the tee, predictable contact, reliable wedges, and consistent putting. The structure keeps your practice intentional, and the drills give you clear purpose every session.
If you want confidence that your work is translating into real change, HackMotion gives you feedback on the wrist mechanics that control the clubface and strike. Follow the plan, train with intention, and let the process do the work.