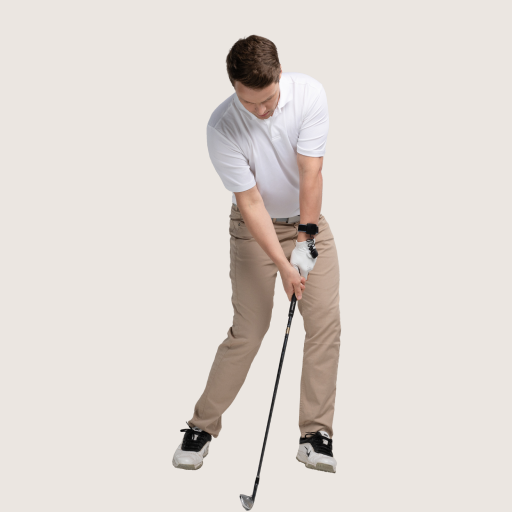
Wrist Action in Golf Swing: Practical Guide with Drills to Help You Master It
Could you analyze a golf swing and tell whether or not the wrist action was correct? If you answered no, you are not alone.
Even many professionals struggle to fully understand how wrist positions affect ball flight.
Wrist action in the golf swing can be confusing – but it’s also one of the most important factors in controlling the clubface and hitting consistent shots.
With the right tools, knowledge, and practice, you can optimize your wrist mechanics and take control of your game.
Ever heard the phrase, “It’s all in the wrists”? In golf, that couldn’t be more true.
Wrist Action in Golf Swing (Key Takeaways)
After analyzing more than 1,000,000 golf swings, we’ve poured a lot of detail and discovery into the information here.
However, if you’re short on time, here are a few of the most essential facts to take with you right now:
- The wrists move in three ways: extension/flexion, radial deviation/ulnar deviation, and pronation/supination.
- Flexion and extension in the wrists are most critical for learning to control the clubface and hit straighter shots.
- The wrist position changes throughout the swing, so it must be correct at setup and at the top of the backswing to have the best chance for a square and solid impact.
- The best way to measure and analyze wrist action in golf is to use the HackMotion wrist sensor and record data at setup, top of the backswing, and impact.
- A quick way to fix slices, hooks, pushes and pulls is to get the proper wrist action in your golf game; wear your HackMotion as you practice. It’s like having a coach with you on the range.
If you prefer to watch instead of read, here’s a recap of all the basics of wrist action. This video will help you understand the role of the wrists and how wrist action impacts your golf game.
Contents
- What Should the Wrists Do in The Golf Swing?
- Wrist Positions in Golf (How do the Wrists Move)
- How do the Wrists Work Throughout the Golf Swing?
- Lead Wrist vs Trail Wrist Position in the Golf Swing
- How to Troubleshoot Bad Wrist Action in the Golf Swing?
- How Do You Measure Wrist Movement?
- How Do I Know if My Wrist Angle is Correct?
- Can Improving Wrist Angles Make You a Better Golfer?
- How Wrist Action Changes Depending on the Shot
- Drills to Improve Wrist Movement in Golf Swing
- Final Thoughts
What Should the Wrists Do in The Golf Swing?
It helps to have a basic understanding of what the wrists do in the golf swing.
Your wrists control the clubface.
Why does that matter?
The angle of the clubface controls where the golf ball goes!
That should motivate you to stick around and fully understand how you can improve your wrist action in your golf game.
Wrist Positions in Golf (How do the Wrists Move)
Wrist action in golf is best understood when you know how the wrist can move.
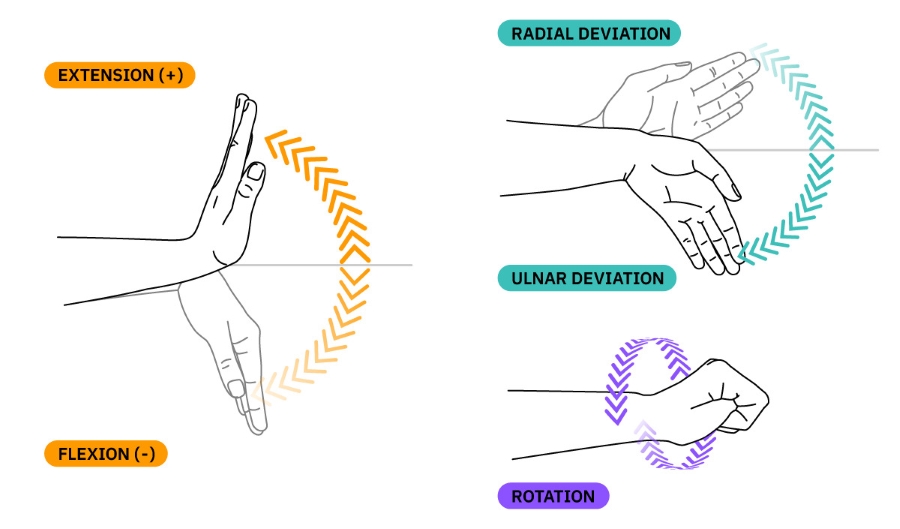
Extension/Flexion
Extension and flexion are more commonly referred to as bowing and cupping or arching and bending the wrist.
This is the wrist action that will open and close the clubface. Extension will open the face of your golf club; flexion will close it.
As you swing the golf club, if you can control the extension and flexion in your wrist, you will have more control over the direction of your golf shot.
Common Issues Seen in Golf
- An open clubface at impact is caused by too much wrist extension in the lead wrist.
- Flipping at impact because of a poor position at the top of the backswing.
- Adding too much extension to the lead wrist during the backswing from the setup to the top.

More extension (cupping) opens the clubface and delays squaring it to the target. More flexion (bowing) closes the clubface earlier and helps to square it to the target.
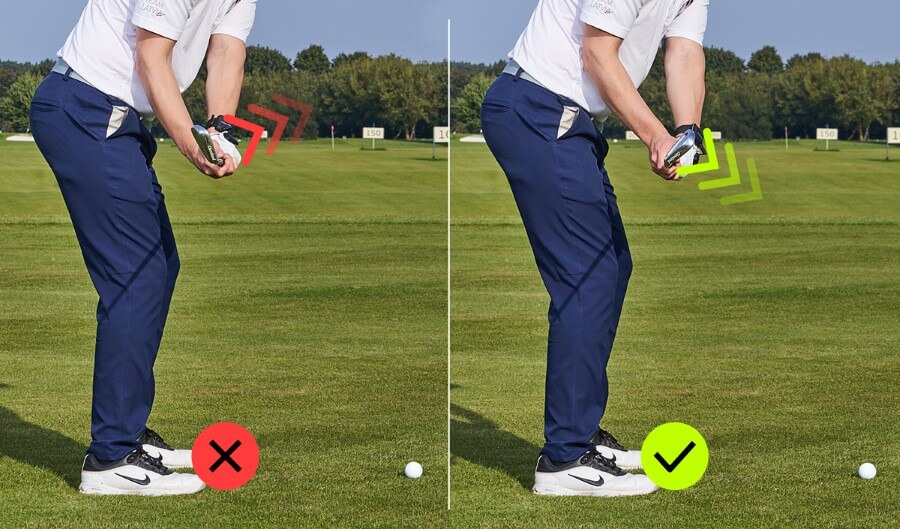
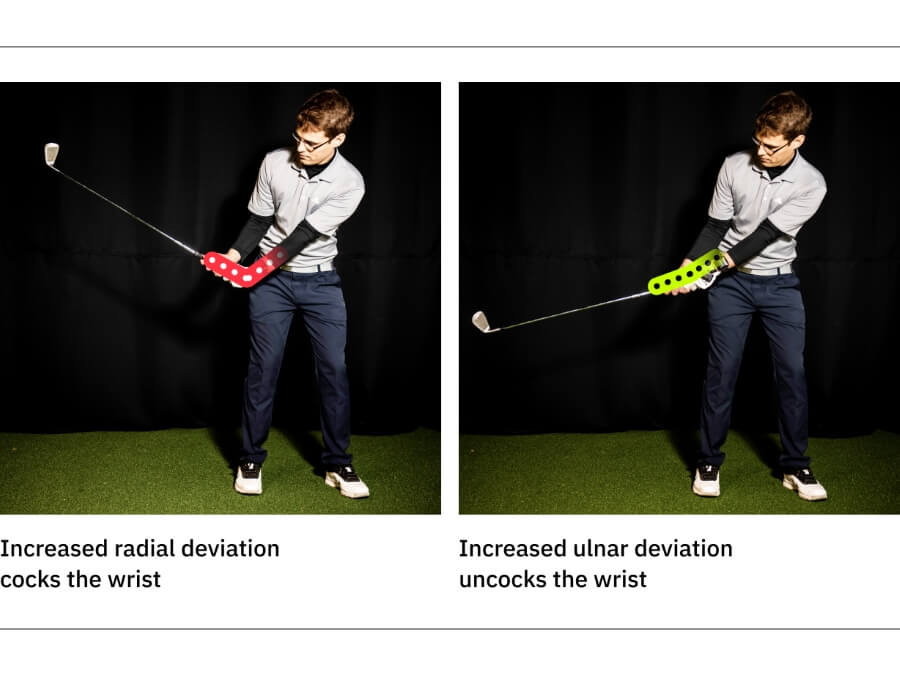
Radial Deviation/Ulnar Deviation
It’s easiest to think about radial and ulnar deviation as cocking or uncocking of the wrist.
The movement here is more side to side. When you cock your wrist, the thumb gets closer to your forearm; when you uncock, the pinky finger moves closer to your forearm.
Radial deviation increases the wrist cock, whereas ulnar deviation decreases it. This is where the power comes from.
Common Issues Seen in Golfers
- Increasing radial deviation too much and extended the wrist.
- Early wrist hinge opening the clubface, making it difficult to recover.
Rotation (Pronation/Supination)
The third of the key wrist movements in golf is wrist rotation.
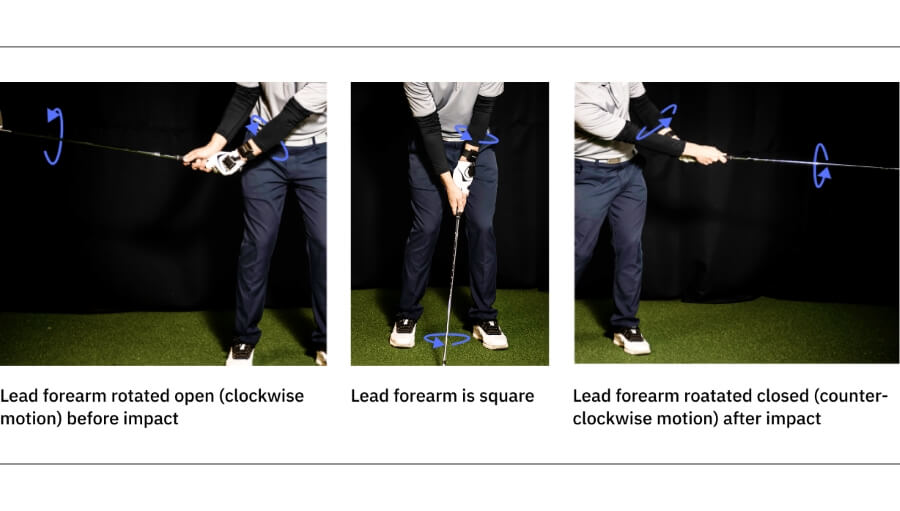
Pronation and supination mean more of a turning of the entire wrist.
In fact, the rotation almost feels more in the forearm than in the wrists.
Take your hand and hold it out before you so that your thumb points up to the sky. Now, turn your hand so that your thumb is facing the ground; that is wrist rotation. With this movement, you will feel more like your entire forearm rotates, not just the wrist.
Common Issues Seen in Golfers
- Lack of proper rotation through impact leaving the clubface open.
- Too much rotation right before impact causing the shot to pull.
How do the Wrists Work Throughout the Golf Swing?
Wrist action in golf will change as you move from setup to backswing to impact.
Understanding these motions will make it a little easier for you to repeat them.
Setup
The grip is one of the most important things to focus on at setup.
If the hands are not on the club properly from the start, the chance of getting your wrists into the right position throughout the swing is significantly reduced.
Grip the club in the fingers of your hand.
If the club is too much in the palms, wrist action is challenging to feel and keeps you from getting the wrist angles that could generate the most power.
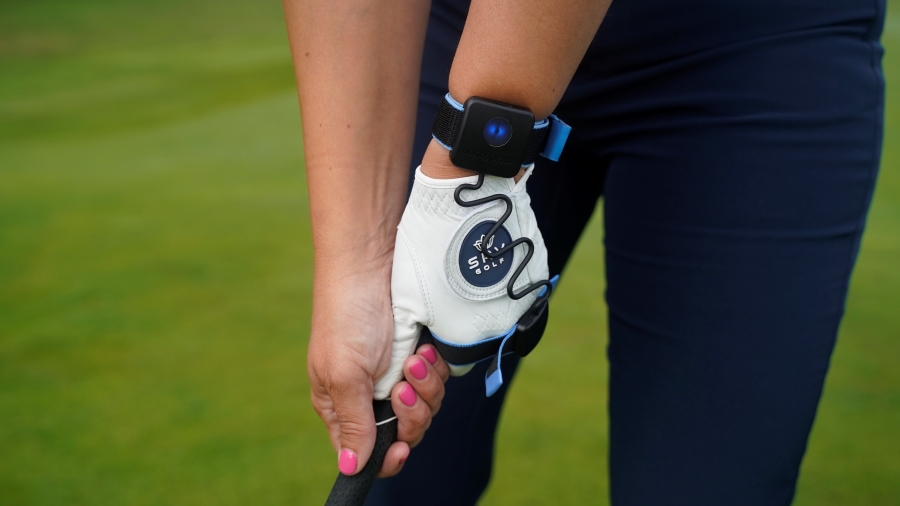
Use HackMotion to check on the consistency of your grip position.
Backswing
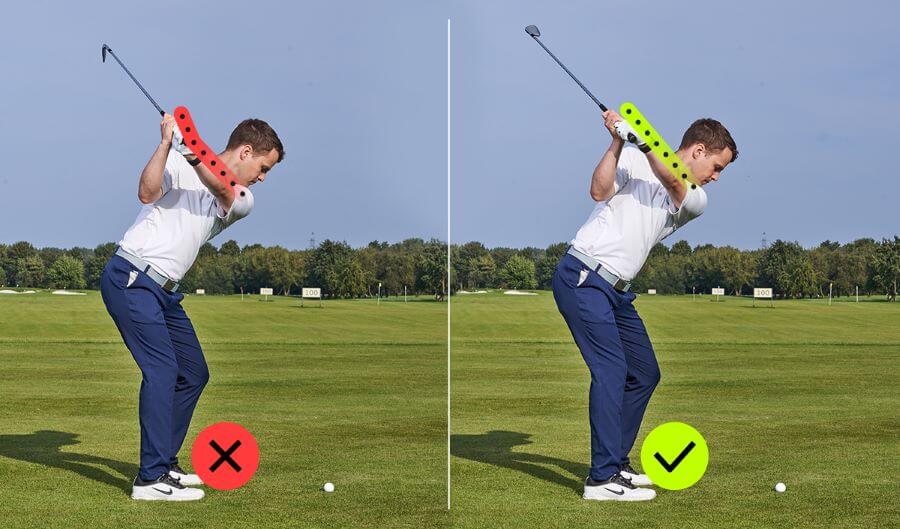
The tricky part about the top of the backswing is that more than one position can be considered correct.
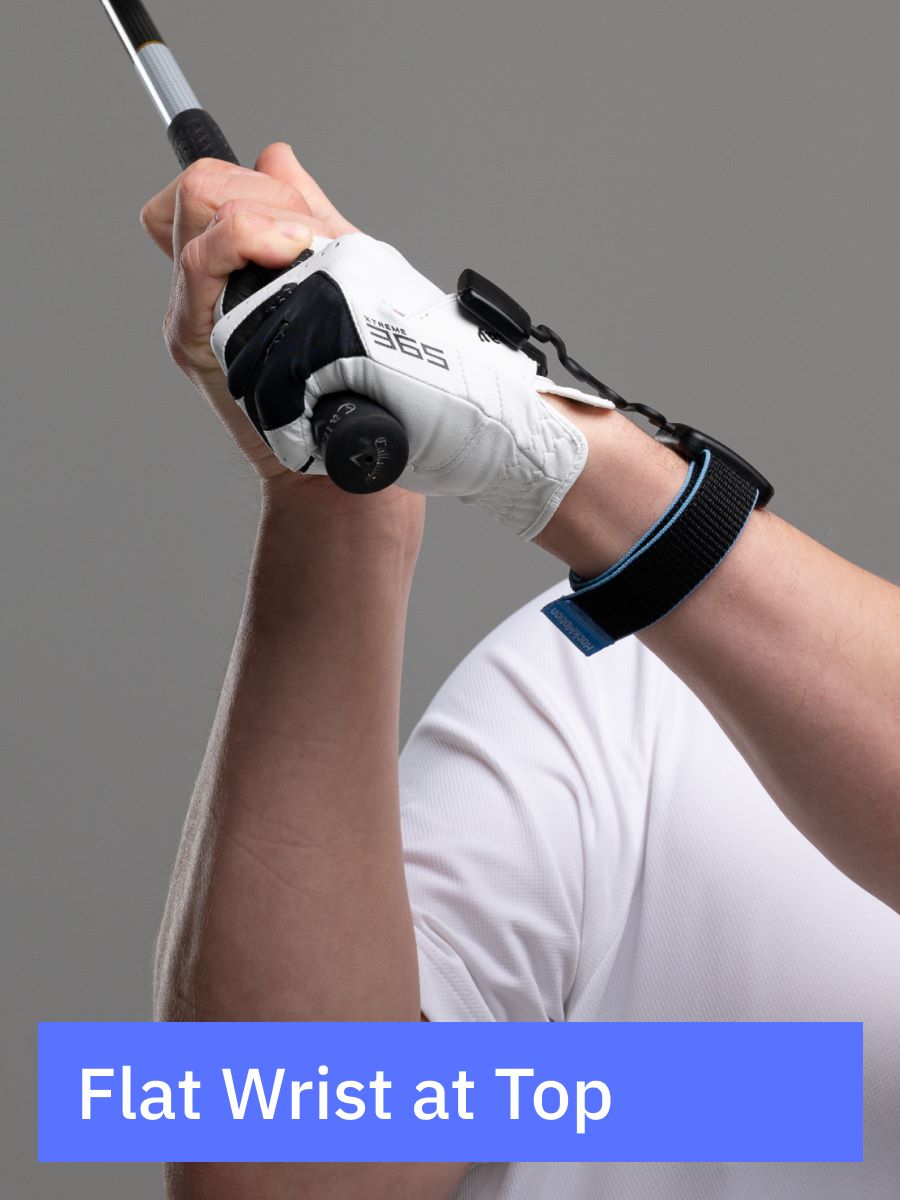
A neutral or flat lead wrist position will give you the easiest route back to the ball, but many great players are flexed with their wrists at the top.
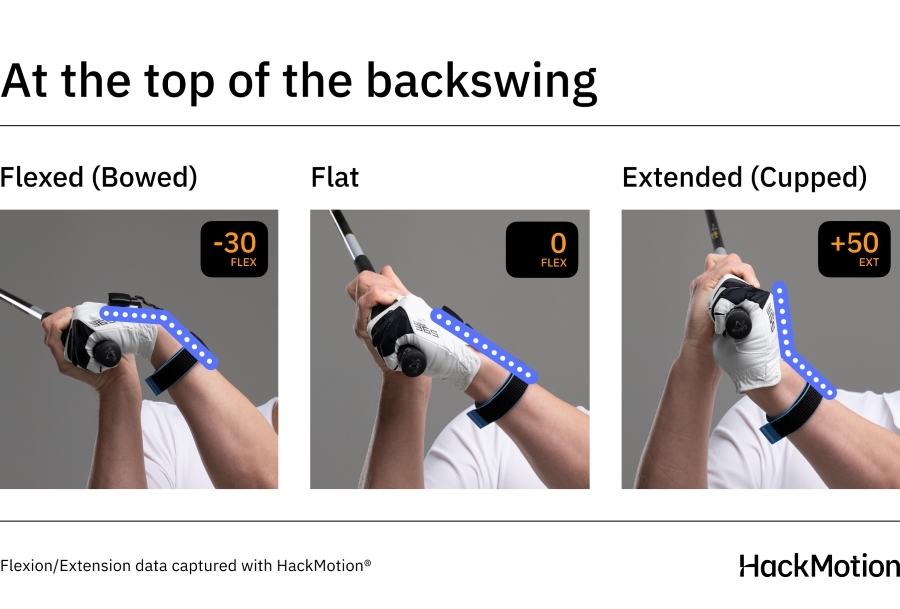
With backswing positions in the golf swing, there is no perfect amount of flexion.
You will notice more of a range of what is acceptable instead of one specific number or angle you should be attempting to reach.
Great ball strikers have consistency in the positions they reach at the top of their backswing.
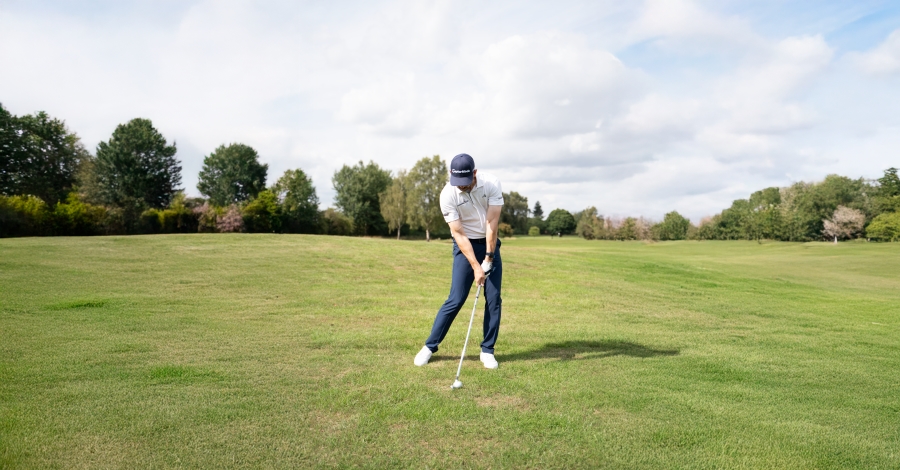
Downswing and Impact with the Ball
The downswing and the area just behind the ball before impact are where most amateur golfers need help with their wrist position.
With the proper wrist mechanics in the downswing and at impact, you will see a better swing path, more consistent strike, higher clubhead speeds, and the desired ball flight that you are looking for.
To get to impact with a square or closed clubface, you need to get your lead wrist to a flexed position before you get to the ball.
Here are a couple of key things to keep in mind here:
- Experiment with more flexion in your lead wrist and see if it helps you hit more consistent shots.
- More radial deviation through impact is best for golfers looking to increase club head speed.
- Additional wrist supination will lead to a more out-to-in path; the opposite would create an in-to-out swing path.
The golf swing has too many moving parts for us to find an exact number for flexion/extension or rotation through the ball.
Instead, maintaining consistency and learning what that square clubface feels like will get your game to the next level.
Lead Wrist vs Trail Wrist Position in the Golf Swing
When working with HackMotion, you can focus on either the trail or lead wrist. The lead wrist is the most common, but the trail wrist is the dominant hand for many golfers.
The wrists work opposite of each other. For instance, if you want more flexion in the lead wrist at impact, you’ll need more extension in the trail wrist.
Since golf is such a feel-based game, it’s worth experimenting with both the trail and lead wrist to see which one helps you achieve quicker results. HackMotion can be worn on either wrist.
To learn more about the trail wrist in golf swing, follow that link.
How to Troubleshoot Bad Wrist Action in the Golf Swing?
The best way to troubleshoot bad wrist action in the golf swing is to look at your struggle and then decide if you have an extension/flexion, radial/ulnar deviation, or rotation problem.
Once you have that narrowed down, using HackMotion and drills will help you figure things out.
Slices and Hooks (From Slightly to Severely Offline)
Most amateur golfers struggle with slices and hooks due to improper wrist movement—specifically, too much extension in the backswing and not enough flexion in the downswing. This prevents the clubface from squaring at impact.
To fix this:
- Maintain a flat wrist at the top of your backswing.
- Focus on flexing your lead wrist as you start your downswing to help square the clubface.
Drill to Try: The Motorcycle Drill
Grip the club as if holding motorcycle handlebars and “rev the engine” by rotating your lead wrist down through impact. This helps train the proper wrist action for a square clubface and straighter shots.
Pulling and Pushing Shots
When you have the right drills, a pull or a push can be much easier to fix than a hook or a slice.
Many golfers who struggle with pulling or pushing their golf shots have trouble with forearm rotation and ball position.
In this video from Rob Cheney, you can learn how to adjust your wrist angles, ball position, and forearm rotation to hit straighter shots. One of the best drills that Cheney uses is a simple headcover drill, in which the headcover is placed just on the inside of the golf ball.
You’ll learn how to attack the ball with the correct angle and hit straighter shots.
Loss of Power and Proper Golf Ball Compression
Professional golfers do an excellent job of maintaining wrist extension on the backswing.
The amount of extension at the start is not as important as it is to maintain that throughout the backswing. The average amateur player adds unnecessary extension in the backswing.
From the top of the swing and towards the ball, professional golfers move from extension to the point of flexion in their wrists to close the clubface. This video from Rob Cheney will help you work out the proper wrist action for a variety of shots.
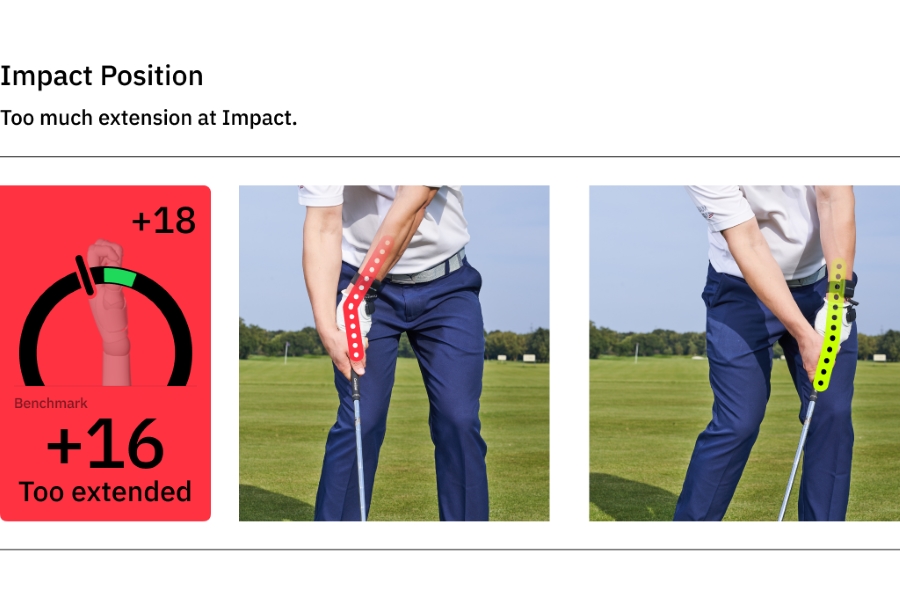
Inconsistent Impact Position
While all areas of a golf swing are important (setup, takeaway, backswing, transition, etc.) the most important is impact.
If you can produce a square clubface consistently you’ll see better shots and lower scores.
The impact position will change slightly depending on what club you have in your hand, but there are some basics that all professionals and amateurs need to have in place to square the face at impact.
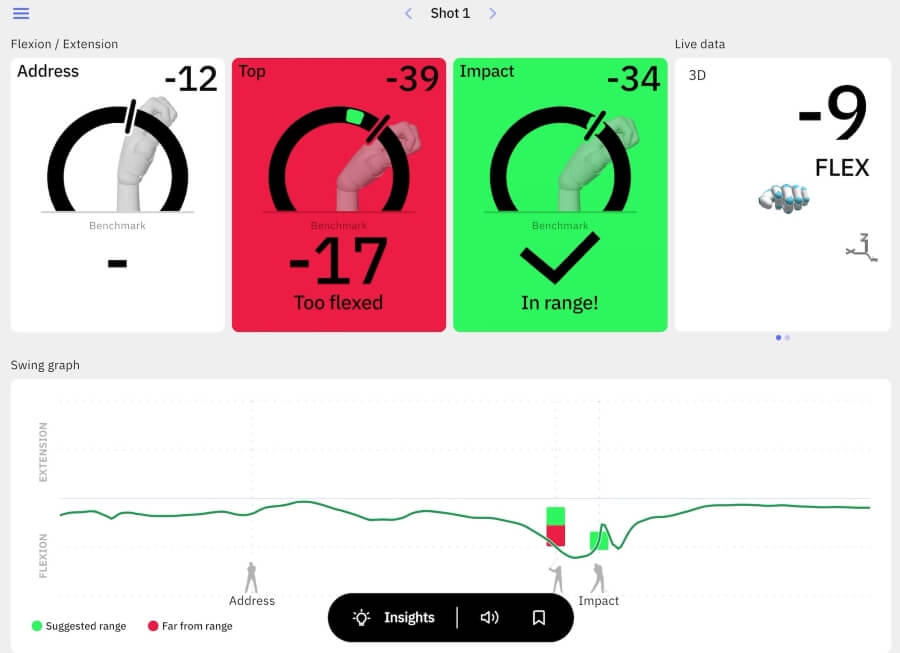
How Do You Measure Wrist Movement?
Before the release of the HackMotion wrist sensor, measuring wrist movement was very difficult.
What a wrist angle looks like and feels like can be different than what it actually measures. That’s where HackMotion comes in.
With the HackMotion wrist sensor, you can hit golf balls as usual and have your wrist angles and positions measured throughout the swing.
The most valuable information here is the ability to see if your wrist motion compares to that of the best ball strikers in the game.
In addition, you can track your progress from one practice session to the next and use biofeedback and real time drills to get better.
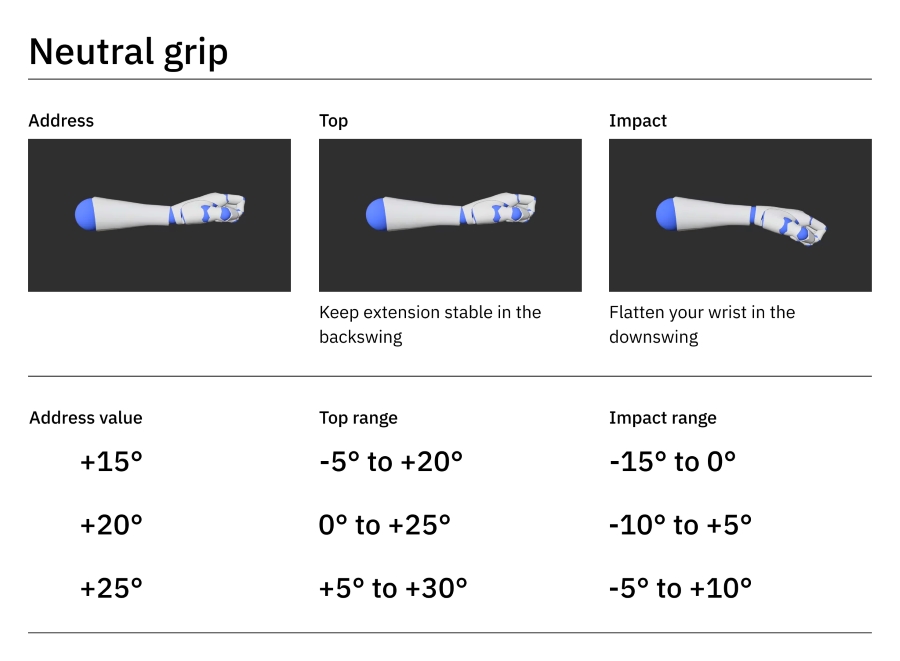
How Do I Know if My Wrist Angle is Correct?
There is no single “perfect” wrist angle for every golfer.
HackMotion uses your address position as a baseline, then guides you to be more or less extended/flexed at the top and impact, relative to that starting point.
- Individual Baseline: Your initial setup (e.g., +15°, +20°, or +25° of extension) is unique to you.
- Customized Adjustments: HackMotion suggests a range of change from your address angle for the top and impact positions.
- Different Grips, Different Ranges: If you start at +20° extension, your recommended impact range will be different from someone who starts at +25°.
Example Ranges for a Neutral Grip
Here’s what your wrist angles might look like if you have a fairly neutral grip at address. (Exact values vary based on your own setup).
- Top of Swing: Aim to keep your wrist within about -20° to +5° of your address angle.
- Impact: Target 15° to 30° less extended than you were at address to promote forward shaft lean.
Can Improving Wrist Angles Make You a Better Golfer?
Many amateur golfers shy away from learning about wrist angles in golf simply because the topic is so complicated.
Improving wrist angle in the golf swing can help you return the clubface of your golf clubs to square each time you swing.
When your clubface is square, and you have control over it, expect:
- Straighter shots.
- More distance.
- Easier workability.
- Less dispersion.
- Better compression and spin.
- Lower scores.
How Wrist Action Changes Depending on the Shot
Wrist mechanics don’t stay the same across all shots. While the full swing requires powerful movements to square the clubface and deliver speed, the short game and putting demand more subtle adjustments.
Understanding these differences helps you avoid treating every shot like a mini full swing, one of the most common mistakes among amateurs.
| Shot Type | Wrist Action Pattern |
|---|---|
| Full Swing | Lead wrist starts slightly extended, flattens by takeaway, stays stable to the top, adds flexion in transition, and arrives more flexed than at setup at impact. |
| Chipping | Flat to slightly flexed, minimal hinge, thumbs “down” (ulnar deviation) through strike. Read more about wrist action in chipping. |
| Pitching | Radial hinge added; slight lead-wrist extension through impact for loft and stopping power. Read more about wrist mechanics in short game. |
| Lobs / Bunkers | Maintain lead-wrist extension, full hinge, and open face throughout. Read more about wrist action in bunker shots. |
| Putting | Almost no hinge; flexion/extension and deviation held within ~2° for stability. Read more about the role of wrist action in putting. |
Why This Matters
- Consistency: Each shot type has its own “wrist setting.” Matching the right action to the right shot reduces fat, thin, or bladed contact.
- Shot Variety: By mastering these variations, you’ll be able to flight shots lower, stop pitches faster, and land lobs softer.
- Feedback: With HackMotion, you can measure these small differences in real-time and compare your feelings vs. actual movement.
Drills to Improve Wrist Movement in Golf Swing
In addition to the drills shown above in our troubleshooting section, you can also do these drills to help improve your wrist action.
HackMotion Motorcycle Drill
Working with the HackMotion wrist sensor is like having a coach with you at the driving range.
While wearing HackMotion, collect data on where your wrist angles are and how they compare to those of professionals.
The Motorcycle Drill is built into the HackMotion app and it allows you to work on adding flexion in the transition between backswing and downswing.
Motorcycle Drill – Master Wrist Flexion in the Downswing
Focus on continuously adding flexion until the club reaches parallel, then smoothly complete your swing.
HackMotion Motorcycle Drill – Step by Step:
- Set Up: Address the ball as usual.
- Downswing Flexion: As you begin your downswing, gradually add wrist flexion so that by the time the club is parallel to the ground (P6), you’ve achieved your desired wrist bend.
- Continue to Impact: Maintain that flexion into impact, then release naturally through the finish.
- Experiment with Speed: Start slowly, then increase speed while retaining proper angles.
- Practice while hitting golf balls but also work on this drill by completing the motion and not hitting shots.
- Find your “just right” amount of flexion—too little or too much can cause mishits.
HackMotion Release Drill
The release drill is a great practice drill for golfers who struggle with their wrist position at impact.
With this drill, you train your release on a short swing before adding more power and length to the golf swing.
The drill is located in the HackMotion app, so you can practice it in real-time. If your release from club parallel to club parallel is perfect, the results at impact will be more consistent.
Perfect Your Release with HackMotion
Fine-tune your release for consistent contact. Start with a short swing to master control before adding power.
HackMotion Release Drill – Step by Step:
- Set Up: Address the ball with a shorter swing in mind.
- Club Parallel to Ground (P7) to Impact: Swing from club parallel in the downswing into impact.
- Hands Forward: Aim to keep your hands slightly ahead of the ball at impact.
- Check Wrist Angles: Use HackMotion to confirm that your wrist angle is in the correct “in range” zone.
- Perform at least 10 reps before you pick up speed a little with the Dynamic Transition Drill.
Top of the Backswing Drill
Whether you are working on wrist action at the top of the backswing or you want to try and groove some wrist consistency in your swing, the Top of the Backswing drill is a great place to start.
Your goal for this drill is to have roughly the same wrist flexion/extension at the top of the backswing that you do at address. This drill is included in the HackMotion app so you can practice it in real time.
Top of the Backswing Drill in HackMotion
By working on this drill, you can create muscle memory and achieve a flat lead wrist at the top of the backswing.
HackMotion Top of the Backswing Drill – Step by Step:
- Set Up: Stand still at address with your HackMotion sensor on.
- Move to Top: Slowly rotate into your backswing until you reach the top (stop here).
- Adjust Wrist Angles: Use real-time feedback to get your wrists into the green zone.
- Reset & Repeat: Return to address, then repeat.
- Perform at least 10 repetition and aim for at least 50% of reps in range.
Golf Driver Hold the Finish Drill
When working on wrist action, iron, and wedge shots are most often discussed. However, the wrist position in the driver’s swing greatly impacts the results of your drive.
With this drill, you’ll learn to hold your finish with the driver to make sure it’s headed in the right direction toward your target with the proper wrist action.
Driver Hold the Finish Drill – Step by Step:
- Set Up: Take your normal driver stance with the ball positioned under your lead shoulder. Slightly flare both feet outward for better rotation.
- Swing Path Awareness: Maintain a connected arm structure to avoid excessive lifting or steepening of the club path.
- Follow-Through Position: After impact, extend your arms fully and hold the finish when the club is parallel to the ground.
- Wrist Stability: At the follow-through checkpoint, your lead wrist should be neutral (0° flexion/extension)—not excessively bowed or cupped.
- Experiment with Speed: Start with controlled, slow swings, ensuring stability before increasing speed.
- Practice Variations: Work on this drill both with and without hitting golf balls, focusing on holding the correct finish position each time.
Final Thoughts
There is a lot of information here about the proper wrist action in the golf swing.
When you consider golf concepts, wrist action is undoubtedly one of the most complex.
Now that you understand better, it’s time to get out there with your HackMotion and see what kind of progress you can make.