Driver Swing vs Iron Swing – Key Differences & Adjustments for Solid Contact
Golf is not a simple game; we know this.
One of the things that makes it a little more difficult is the fact that the swing for your golf irons and golf driver is not exactly the same. Some of the differences in the driver vs. iron swing are subtle.
However, you have to know them in order to master all areas of the golf game.
The good news is that HackMotion data shows us that while the wrists follow a consistent pattern between both clubs, the way you set up and move your body determines whether the swing produces a slice, a hook, or a straight shot.
Driver Swing vs. Iron Swing (Key Takeaways)
If you are short on time and want just a quick rundown of the driver vs. iron swing, here are the things you should know:
- The most important difference between the driver and iron swing is the setup; if you don’t have the setup correct, don’t bother swinging the club back.
- The angle of attack for a driver is ascending, while the iron requires a descending strike.
- Body rotation on an iron swing is more centered; the driver swing is wider and longer.
- Wrist action in the driver swing may feel subtler, but extension / flexion patterns are consistent with irons.
- Shoulder tilt at setup is more exaggerated with the driver to promote proper launch and impact.
Contents
Driver vs Iron Swing – Key Differences Explained
Setup Differences Between Driver and Iron
The bottom line here is that as the club gets longer, the ball has to move closer to the front of your golf stance.
| Setup Element | Driver | Iron |
|---|---|---|
| Ball Position | Inside lead heel (forward in stance) | Mid-irons in the middle; long irons between center and lead heel |
| Shoulder Tilt | Trail shoulder slightly lower to create launch and upward strike | Shoulders level/square for a more neutral, descending strike |
| Weight Distribution | Slightly more on the trail side at setup (helps upward angle of attack) | Balanced, slightly favoring lead side to promote compression |
| Wrist Position | Small amount of extension (~10–12°) — normal with a driver grip | Same: slight extension (~10–12°), setting up to move into flexion |
| Club Shaft | Slight shaft lean forward, but head set up to strike on the upswing | Shaft lean forward to ensure a descending blow |
HackMotion shows that at setup, both swings start in a slight amount of extension (about 10–12°). That’s normal.
The difference is how you position the ball and shoulders to prepare the wrists to move correctly through impact.
Body Movement and Rotation
When using a driver, the swing is typically longer with a more significant body rotation, as the driver is designed to generate more speed and distance.
A longer swing with a full body rotation can create the necessary force to maximize the speed of the clubhead at impact.
In contrast, the swing is typically shorter and more controlled when using an iron, with a more balanced weight distribution at setup.
For the driver, you also need a stronger hip slide toward the target by impact. This is what creates the side-bend/tilt that allows the wrists to stay stable.
Many golfers make the mistake of trying to create tilt by leaning their upper body back. Instead, the tilt is created by moving the lower body forward.
HackMotion confirms that when the hips don’t slide enough, the wrists “break down” through impact. But when the hips shift forward correctly, the wrist pattern stays the same as it does with irons.
Why You Slice the Driver (But Not Irons)
One of the most significant differences between an iron swing and a driver swing is the angle of attack.
In an iron swing, you will need a descending angle of attack to hit down on the back of the ball. A driver swing requires an upward angle of attack to give the ball maximum air time.
Here’s where most golfers get in trouble: with the driver, the backswing is longer, and the club has less loft. That combination often causes the lead wrist to move into too much extension at the top of the swing, leaving the face wide open.
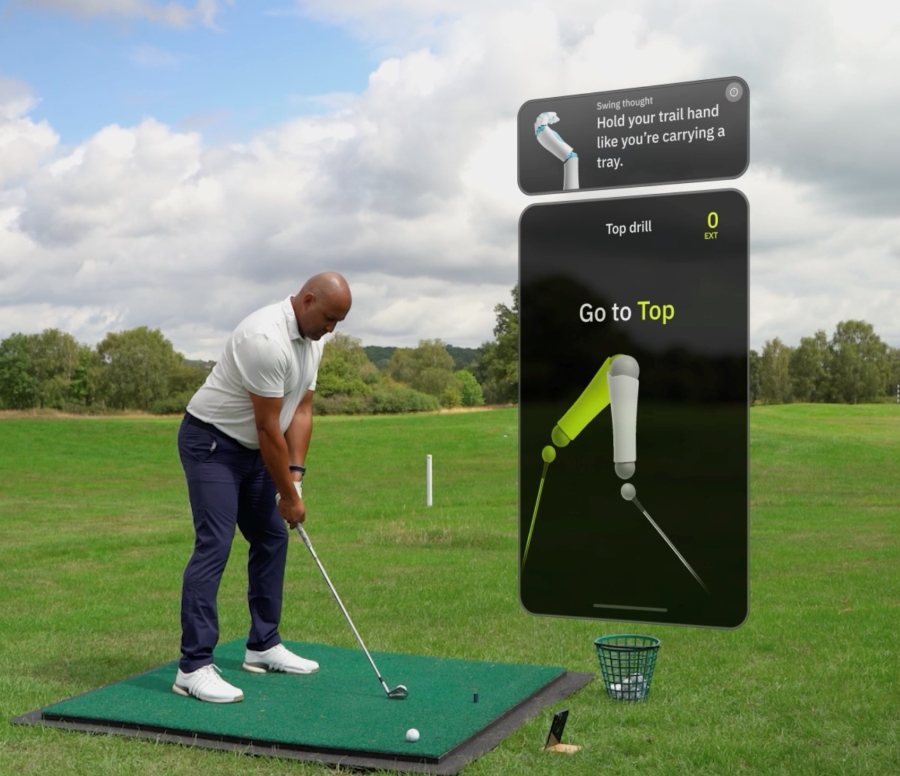
- Typical numbers HackMotion shows: setup ~20° extension –> top of swing should flatten to ~0°.
- When golfers over-swing, extension can balloon to 50° –> wide open face –> out-to-in path –> slice.
HackMotion’s biofeedback feature makes this easier: set the beep for the top of the swing. If the beep disappears, you’ve gone too far and extended too much.
Why You Hook the Driver (But Not Irons)
Hooks usually come from the opposite wrist condition: too much flexion (bowing) in the lead wrist, which slams the face closed.
- At P2 (shaft parallel takeaway), the clubface should look vertical. HackMotion will show a neutral lead wrist (~0–5°). If the face points down, you’ve flexed too much.
- At P4 (top of swing), aim for a flat lead wrist. Chronic hookers of the golf ball can even feel slight extension to neutralize the over-flexed pattern.
Many golfers who once sliced the ball compensate by setting up with a closed face or strong grip. Over time, that creates the opposite problem, a driver that always turns left. Neutralizing grip, face, and wrist angles with HackMotion checkpoints at P2 and P4 solves this.
Wrist Motion: More Similar Than Different
Another important factor with the iron swing vs. driver swing is wrist hinge and motion.
With the driver swing being longer and wider, there is a little less hinge for most players. The iron swing is more compact and condensed, and that wrist hinge is important for both power and turf interaction.
What HackMotion data proves is that the pattern is the same for both clubs:
| Club | Setup (Lead Wrist) | Impact (Lead Wrist) | Movement |
|---|---|---|---|
| Iron | ~10–12° extension | ~+10° flexion | ~20° move toward flexion |
| Driver | ~10–12° extension | ~+5–7° flexion | ~17° move toward flexion |
The difference is not that the driver asks for new wrist angles; it’s that the body needs to move more (hip slide and tilt) to let the wrists do the same job at a higher speed.
Remember that wrist angles aren’t set in stone; they will be different from one golfer to the next, but still follow these general patterns.
Drills to Master Driver vs. Iron Swing
Here are two HackMotion-backed drills to help you improve setup, body motion, and wrist control so your driver swing can match the confidence you feel with your irons.
HackMotion Biofeedback Drill (Slice Fix)
This drill teaches you how to control lead-wrist extension at the top so the face stays square.
HackMotion Biofeedback Drill – Step by Step
- Strap on HackMotion and set biofeedback for the top of the backswing.
- Swing until you hear the beep (flat wrist ~0°).
- Stop if it disappears (too much extension).
- Hit a few shots starting from the “beep” position.
- Place a headcover just outside the ball to encourage an in-to-out path as you fix the face.
Door-Frame Hip Slide Drill (Driver Tilt)
This drill trains the correct body motion so the wrists can stay stable through impact.
Door-Frame Hip Slide Drill – Step by Step
- Stand with the lead ear a few cm from a doorframe.
- Take setup (no club at first).
- Practice sliding hips forward into impact while keeping your head stable on the frame.
- Add an alignment stick on the ground; drag it through impact using hip slide, not wrist breakdown.
- Progress to real shots, keeping the same feel of tilt created from the hips.
Final Thoughts
Educating yourself about the key differences between a driver’s swing and an iron swing is crucial to lowering your score.
Awareness of these general concepts will allow you to adjust your swing on the course immediately.
Take some time to practice these different positions and features, learn about the positions using your HackMotion, and you will be well on the way to better consistency and performance.