Flat Left Wrist in Golf Swing: Consistency Starts with Your Lead Wrist
After analyzing more than 1,000,000 golf swings, there is one pattern we see again and again: golfers who strike the ball consistently tend to control their lead wrist better – especially at the top of the backswing and at impact.
A flat left wrist is often part of that pattern because it helps golfers square the clubface and deliver the club more efficiently through impact.
That said, a “flat” wrist does not look exactly the same for every player. Grip strength, swing pattern, and release style all influence what an effective wrist position looks like.
In this article, we’ll explain why lead wrist position matters, how it affects clubface control, and how you can train better wrist mechanics using simple drills and real-time feedback.
Flat Lead Wrist in Golf (Key Takeaways)
Here are the basics of the flat lead wrist and why lead wrist control is critical for squaring up your clubface:
- Golfers who struggle with a cupped lead wrist often experience open clubfaces, ballooning ball flights, and inconsistent contact.
- Your wrist position at setup influences your ability to control the lead wrist during the swing. A neutral grip generally makes it easier to stay within a functional range.
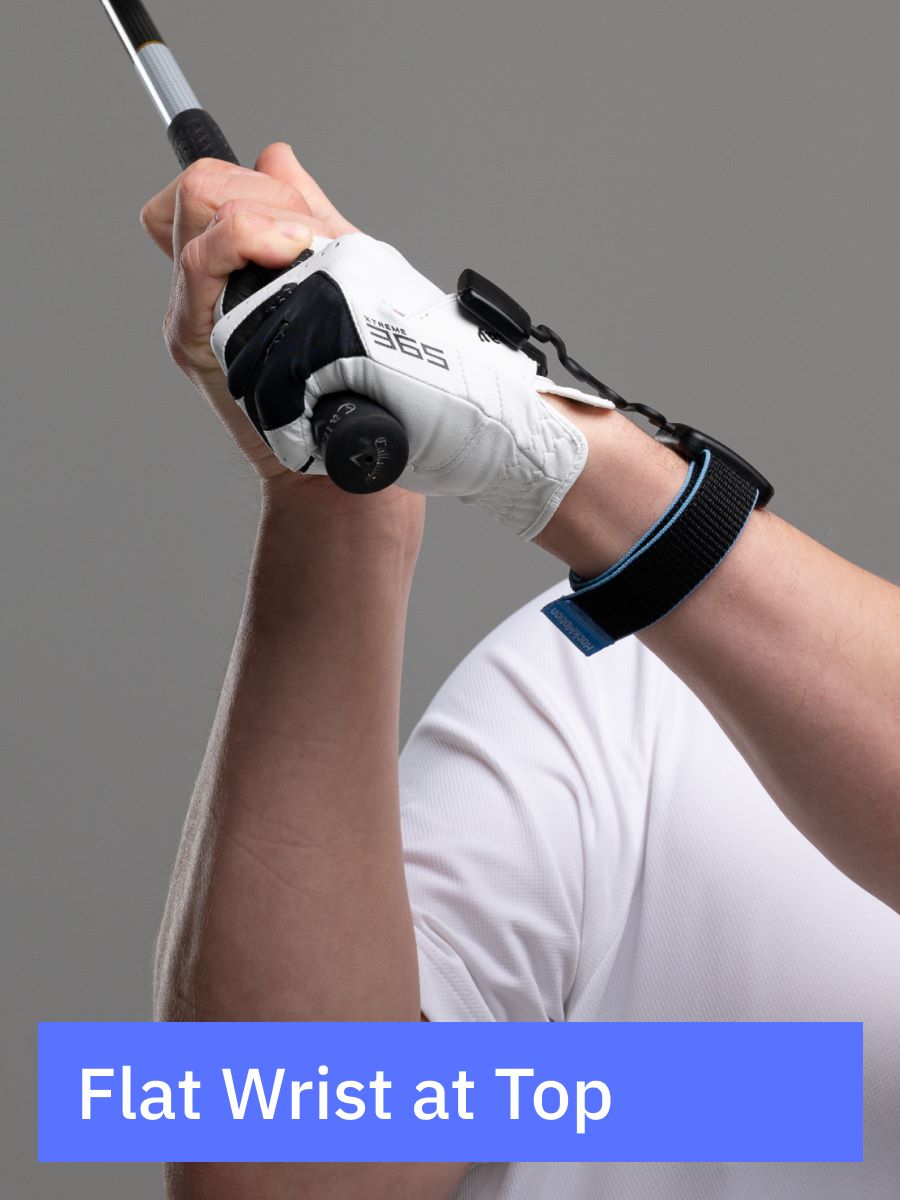
- A flatter lead wrist at the top of the backswing often leads to better wrist control and an easier path to a square clubface at impact.
- At impact, most strong ball strikers deliver the club with a flat or slightly flexed lead wrist, promoting solid contact and predictable ball flight.
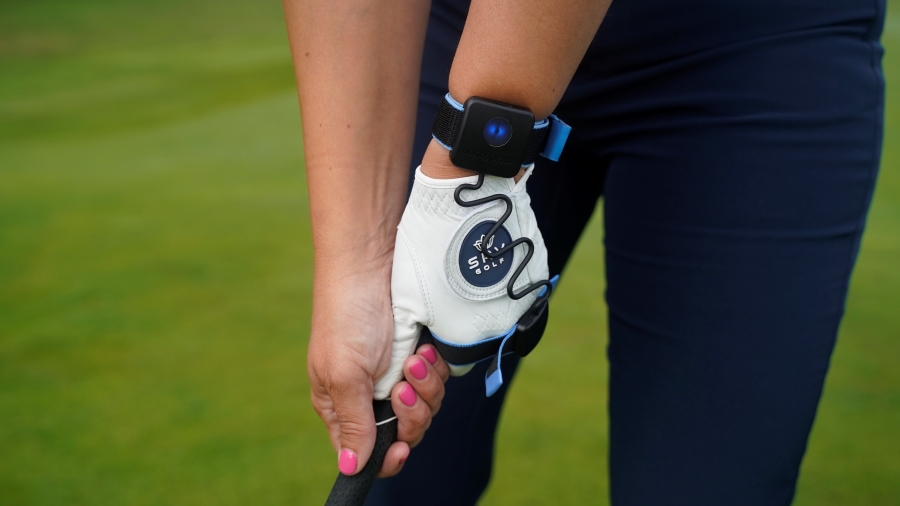
- HackMotion provides real-time feedback, drills, and data to help you measure, train, and refine your lead wrist position like a coach on your wrist.
Contents
Wrist Positions in Golf Swing: Quick Overview
Before fixing your flat lead wrist, it’s important to review how the wrists work in the golf swing.
You must know three wrist motions: extension/flexion, radial deviation/ulnar deviation, and rotation.
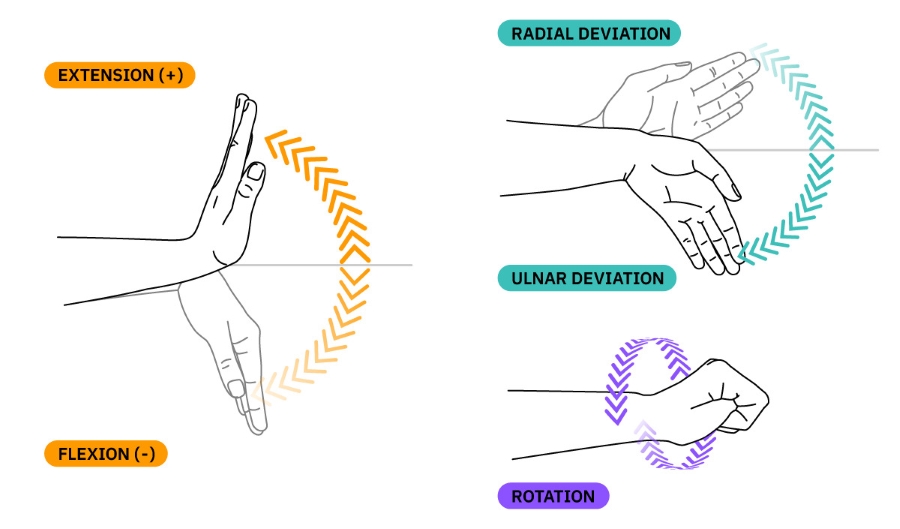
Wrist flexion and extension are the most important things to know, feel, and understand to achieve a flat left wrist.
If you want to learn more, check out our complete guide on wrist action in the golf swing.
| Wrist Motion | Description | Impact |
|---|---|---|
| Extension/Flexion | Bowing and cupping of the wrist. | Controls opening/closing of the clubface. Affects ball flight and spin. |
| Radial/Ulnar Deviation | Cocking and uncocking of the wrist. | Impacts power and control. |
| Rotation | Pronation/supination of the wrist. | Impacts clubface alignment and swing path. |
Is a Flat Left Wrist Always Better?
There is no single “perfect” lead wrist position for every golfer.
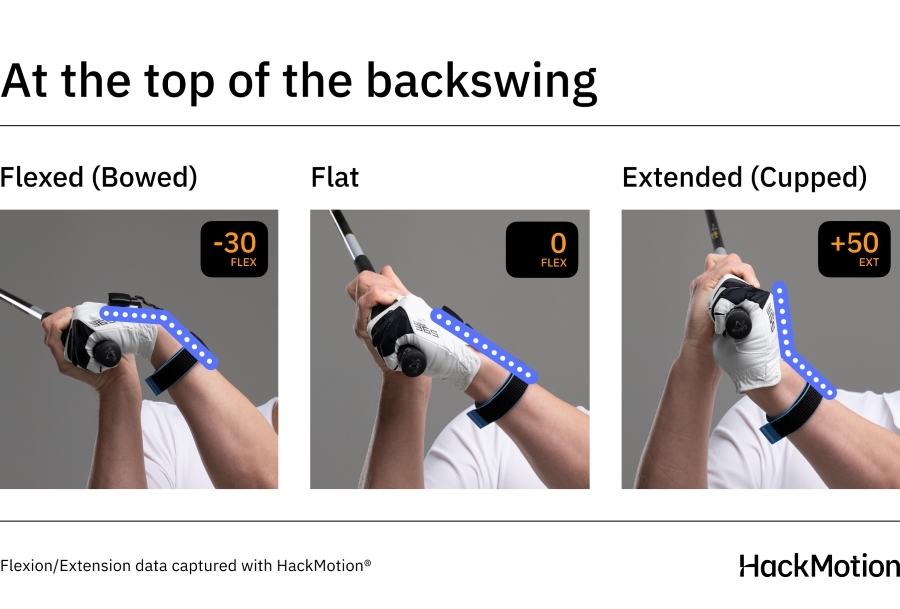
While many consistent ball strikers use a flatter lead wrist at the top of the backswing, that position can vary based on grip strength, swing pattern, and release style. Some players arrive at the top with more flexion, others closer to flat, and both can be effective.
What matters most is impact.
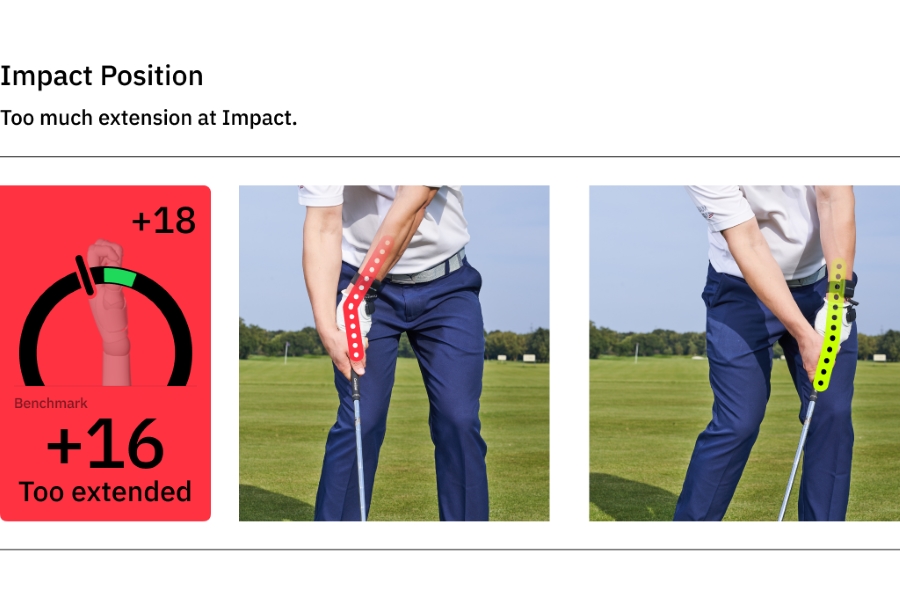
Nearly all strong ball strikers deliver the club with a flat or slightly flexed lead wrist at impact, which helps stabilize the clubface and produce predictable contact.
An extended (cupped) lead wrist at impact, on the other hand, almost always leads to inconsistency.
The goal isn’t to copy an exact wrist angle, but to stay within a functional range that allows you to square the clubface and deliver the club efficiently.
That’s why HackMotion focuses on training patterns and ranges rather than forcing golfers into one fixed position.
What a Flat Lead Wrist Helps You Do
Let’s say you have been playing golf your entire life, you shoot around 95–100, and you know your lead wrist is anything but flat during the golf swing. What’s in it for you to make a change?
Obviously, all golf swing changes take some time to learn and feel comfortable with. But when golfers improve lead wrist control and move closer to a flatter position, they tend to notice some consistent improvements.
If you improve your lead wrist position, you’ll often see:
- A more square clubface at impact: The position of the lead wrist is directly tied to the clubface. A flatter lead wrist makes it easier to return the face square at impact.
- Increased ball compression: With a flatter or slightly flexed lead wrist, golfers are better able to compress the ball and produce a more penetrating ball flight.
- More consistent contact: When the lead wrist is under control, thin and fat shots tend to show up less often, making distance control more predictable.
- More speed through impact: A stable lead wrist allows golfers to swing through the ball with confidence instead of trying to manipulate the clubface at the last second.
- Tighter dispersion: When the clubface is more stable through impact, shots tend to start closer to the target line and finish straighter overall.
How to Flatten Your Left Wrist?
To flatten your left wrist in your golf swing it’s best to break the swing down into pieces.
Some players have a good setup but then struggle with the top of the backswing. Here is how to flatten your left wrist in each part of your swing.
1. Setup Check
Each player has a different way of holding the club. There are neutral, weak, and strong grips, and the grip type affects how easily you can control the lead wrist during the swing and whether a flatter, slightly flexed, or slightly extended position works best for you.
- For stronger grips, the lead wrist naturally tends to be more cupped (extended).
- For weaker grips, it tends to be more bowed (flexed).
- A neutral grip is generally a good goal for golfers looking to stay within a functional range and make it easier to control the lead wrist throughout the swing.
To check if your grip is neutral, look down at your left hand at address. If you see 2–3 knuckles, your grip is neutral, and you are on the right track for improving lead wrist control in the swing.
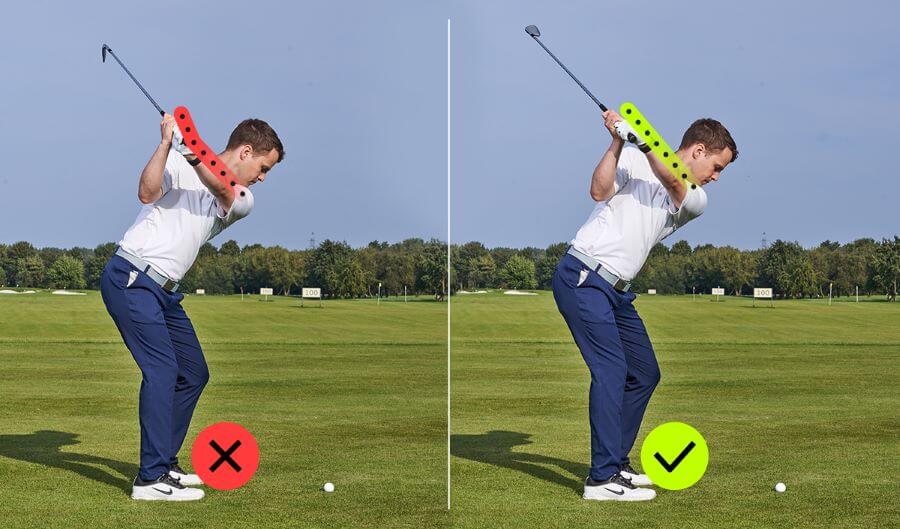
2. Reduce Extension During the Backswing
A common mistake many golfers make is increasing lead wrist cupping during the backswing. This added extension makes it more difficult to return the wrist to a strong position and square the clubface at impact.
Moving toward a flatter lead wrist at the top of the backswing is usually a better option, and the HackMotion Top Drill is a great way to work on this.
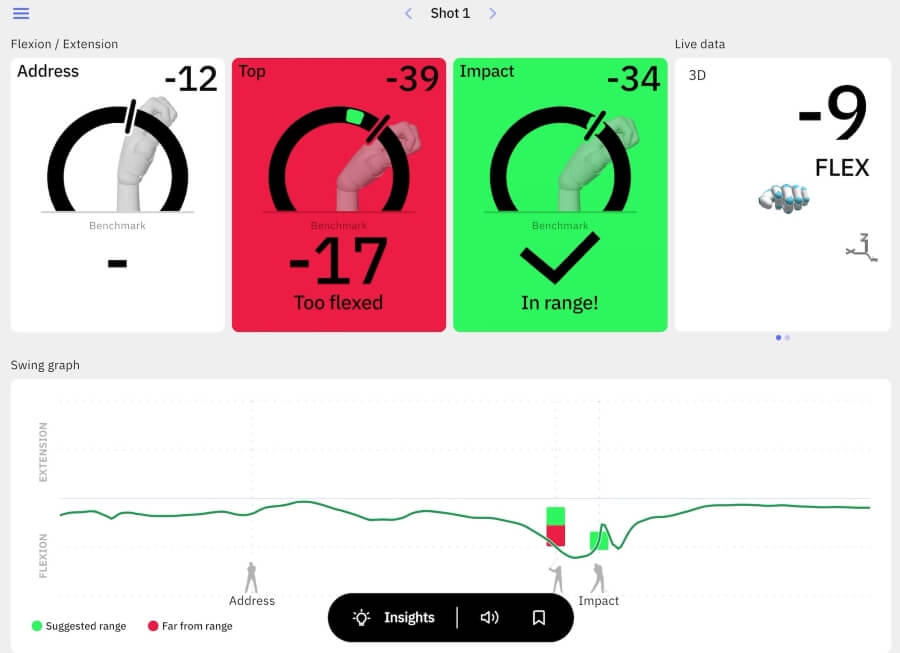
You’ll take a backswing and stop at the top to check your position. HackMotion alerts you if your wrist is too extended or too flexed.
Top Drill in HackMotion
By working on the Top Drill, you can build awareness and muscle memory for a more stable lead wrist position at the top of the backswing.
Top Drill – Step by Step
- Swing to the top of your backswing and pause.
- Use HackMotion to check your wrist position (green = flat/flexed; red = extended).
- Adjust your wrist until it’s closer to flat, then return to the address position.
- Repeat 10 times to build consistency.
- Start taking full swings and hitting shots, checking whether you can return to this position more naturally.
3. Control the Lead Wrist in the Downswing
The downswing is crucial because it’s where you generate speed and deliver the club to the ball.
If the lead wrist adds extension during the downswing, golfers often waste energy trying to square the clubface at the last moment. Even if you have some extension at the top of the backswing, you can improve wrist control during transition.
This is where the Motorcycle Drill becomes especially helpful.
The Motorcycle Drill has you make a motion similar to revving a motorcycle throttle at the top of your backswing. This “revving” motion helps reduce wrist extension as you transition into the downswing.
While you can work on this without HackMotion, the immediate feedback you get while wearing the wrist sensor can significantly speed up learning.
Motorcycle Drill – Master Wrist Flexion in the Downswing
Focus on gradually reducing extension as the club moves into the downswing, then allow the swing to flow naturally through impact.
Motorcycle Drill – Step by Step
- At the top of your backswing, “rev” your lead wrist as if twisting a motorcycle throttle.
- Focus on reducing wrist extension as you start the downswing.
- Use HackMotion to monitor your wrist movement in real time.
- Repeat until the movement feels more natural and less forced.
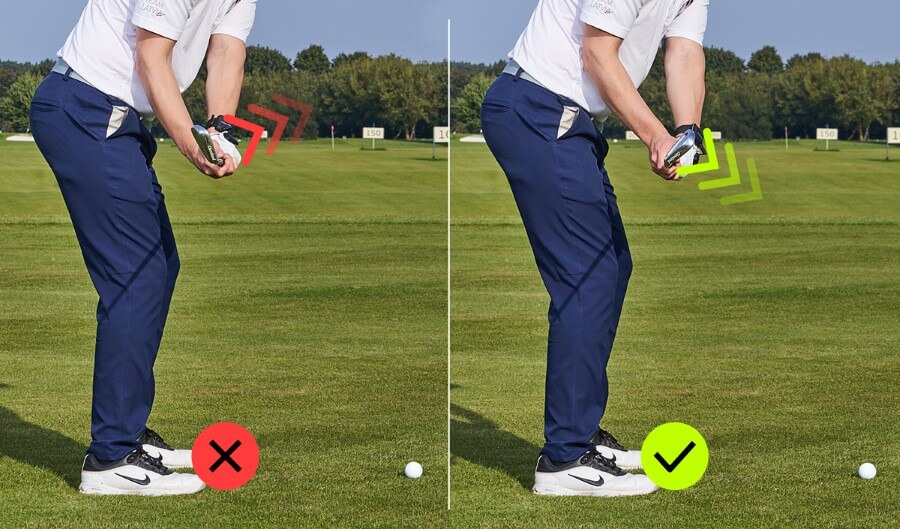
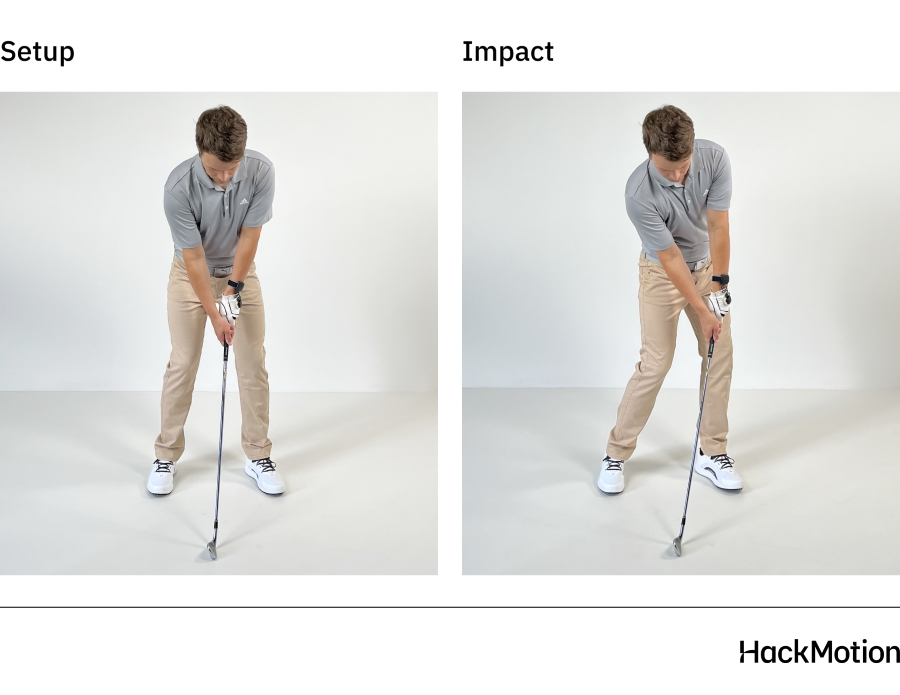
4. Refine the Wrist Position at Impact
At impact, the lead wrist should be flatter than it was at setup, helping the hands stay ahead of the clubhead for better ball compression and proper shaft lean.
If you are close to a stable lead wrist position at the top of the backswing and during transition, you’ll have much less work to do through impact.
The HackMotion Release Drill is an effective way to refine lead wrist position through impact and into the follow-through.
Perfect Your Release with HackMotion
The goal is to make shorter, controlled swings first, focusing on maintaining wrist stability, before gradually adding speed and length.
HackMotion Release Drill – Step by Step
- Address the ball, then swing back until the club is parallel to the ground.
- Ensure your lead wrist has not added extra extension.
- Swing through until the club is parallel on the other side while maintaining a flat or slightly flexed lead wrist.
- Check that your impact position feels solid and controlled.
- Start with shorter swings, then gradually increase swing length to add speed and distance.
Key Lead Wrist Checkpoints in the Swing
It can be difficult to know if your lead wrist is in a functional position without some form of feedback.
Rather than focusing on exact wrist angles, it’s more useful to understand how your lead wrist changes relative to your setup.
Grip strength and swing pattern will influence wrist position, which is why there is no single “perfect” number for every golfer. The goal is to stay within a functional range that allows you to control the clubface and deliver the club efficiently.
HackMotion provides real-time feedback on wrist extension and flexion, making it easier to identify patterns that lead to more consistent contact.
General Wrist Checkpoints
Use these checkpoints as guidelines, not fixed positions:
- Setup: Most golfers start with a small amount of extension in the lead wrist. This will vary based on grip and setup.
- Takeaway (Shaft Parallel): The lead wrist should begin moving toward a flatter or slightly flexed position rather than adding extension.
- Top of the Backswing: Many consistent players reach the top with a lead wrist that is generally flat or slightly flexed. Avoid increasing cupping compared to your setup.
- Transition: The lead wrist remains stable or begins reducing extension as the downswing starts.
- Impact: Strong ball strikers typically arrive at impact with a flatter or slightly flexed lead wrist, helping create shaft lean and solid contact.
- Follow-Through: Briefly maintaining wrist stability past impact can help control the clubface.
What a Good Lead Wrist Position Should Feel Like
While wrist positions can be measured, most golfers don’t improve by thinking about angles during the swing. They improve by using simple swing thoughts that create the right feel.
When lead wrist control improves, golfers often notice these sensations and these are the swing thoughts that tend to go with them:
- “Quiet hands through impact”: The clubface feels more stable, and there’s less flipping or last-second manipulation.
- “Heavy, compressed contact”: Solid shots feel dense off the face, with better feedback and more predictable distance.
- “Knuckles facing the ground longer”: A common feel that helps reduce excessive cupping and keeps the clubface from opening early.
- “Cover the ball with my hands”: Encourages forward shaft lean and a flatter lead wrist at impact without forcing positions.
- “Less effort to square the club”: The club releases naturally instead of feeling like it has to be saved at the bottom.
Final Thoughts
At this point, you have all the information you need to start working on your flat lead wrist. HackMotion allows you to make big changes in wrist position in a very short period of time.
Remember, getting into the proper range of wrist angles is what matters most.
There is no single perfect wrist position; instead, you need to follow the patterns identified from the best players in the world.
Ready to improve your game? Explore HackMotion now and see the difference it can make!