How to Achieve Proper Shaft Lean at Impact: Fixes, Drills, and Common Mistakes
Shaft lean at impact is one of the biggest differences between pros and amateurs. By keeping the handle slightly ahead of the clubhead, the face stays square through the strike for longer, making it far easier to hit solid, straight shots.
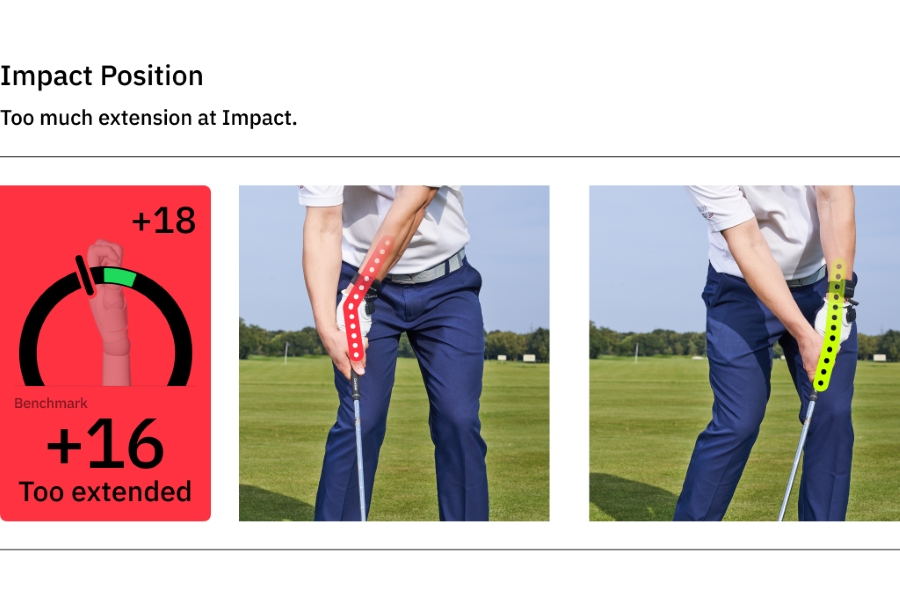
The problem? Most golfers chase shaft lean the wrong way, often adding wrist extension or forcing the handle forward, which actually opens the face and leads to poor contact.
After studying over 1,000,000 swings with HackMotion, we know exactly how much forward shaft lean you should have and the precise wrist moves that create it.
Shaft Lean at Impact (Key Takeaways)
- Forward shaft lean only works when paired with a flat-to-flexed lead wrist; handle-forward with an extended lead wrist opens the face and forces a flip.
- Your transition sets it up: from the top, start down while adding lead-wrist flexion (not extension) so the face is slightly down by club-parallel (P6).
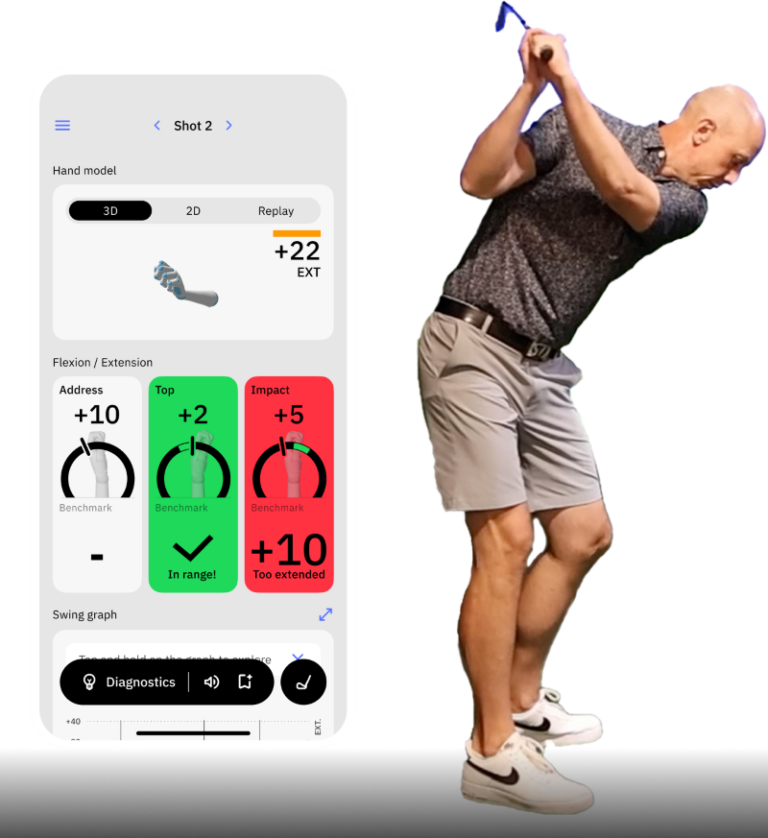
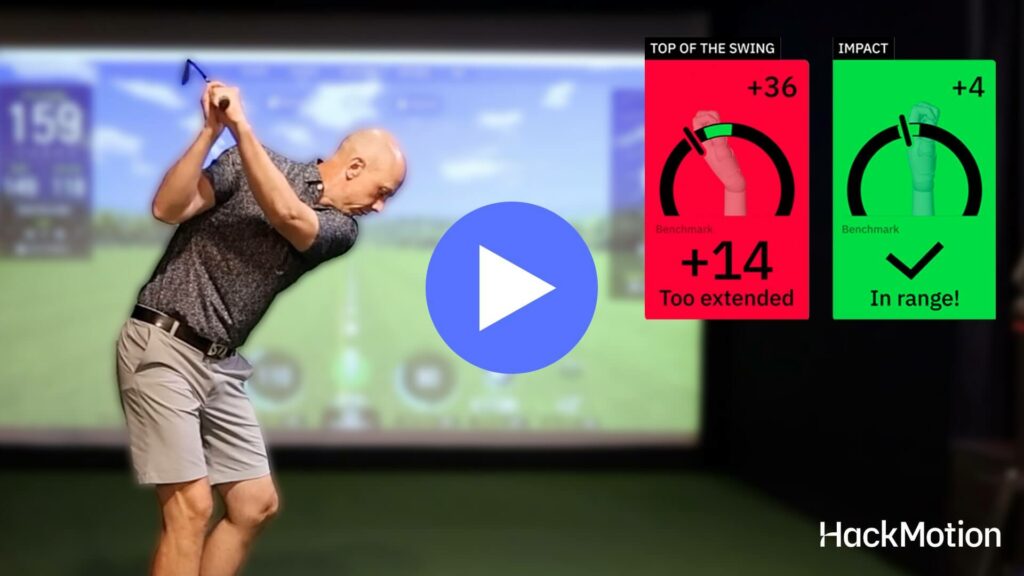
- Use HackMotion to stabilize extension to the top, then decrease it into impact (pros typically reduce extension ~20–25°).
- Train a short follow-through holding lead-wrist flexion just past impact to keep the face square to the arc.
- It’s fine to over-train (see “too flexed” on HackMotion in practice) to learn the feel—then blend it back to neutral on the course.
If you prefer to learn via video, take a look at the mistakes and fixes, Rob Cheney talks about in this video about shaft lean at impact.
Contents
Most Common Mistakes in Creating Shaft Lean at Impact
Most amateur golfers understand that the shaft being forward at address is important.
All it takes is one or two small chips around the green to realize that this is really the only position for the golf club at impact that makes sense.
However, many mistakes still happen when players try to create shafts lean at impact.
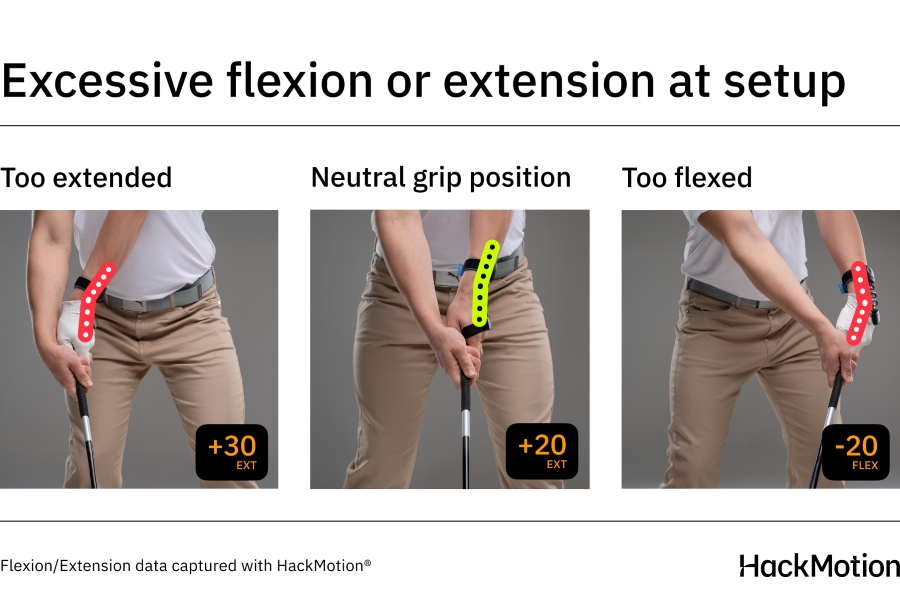
Too Much Shaft Lean at Address
A little bit of shaft lean at address is great. However, if you add too much shaft lean, you will put yourself in a position you can’t recover from.
Place the hands slightly in front of the golf ball. Check your address position continually by using the HackMotion device.
HackMotion records wrist data at the address, and you can use this to see if you are creating a consistent address position.
Hinging Too Quickly in the Backswing
One of the best golf swing tips is to let your wrists hinge naturally. Instead, focus on the right arm’s position and the right wrist staying bent.
You will get to a much better place at the top of the backswing if you focus on that as opposed to a hinge as your first movement away from the ball.
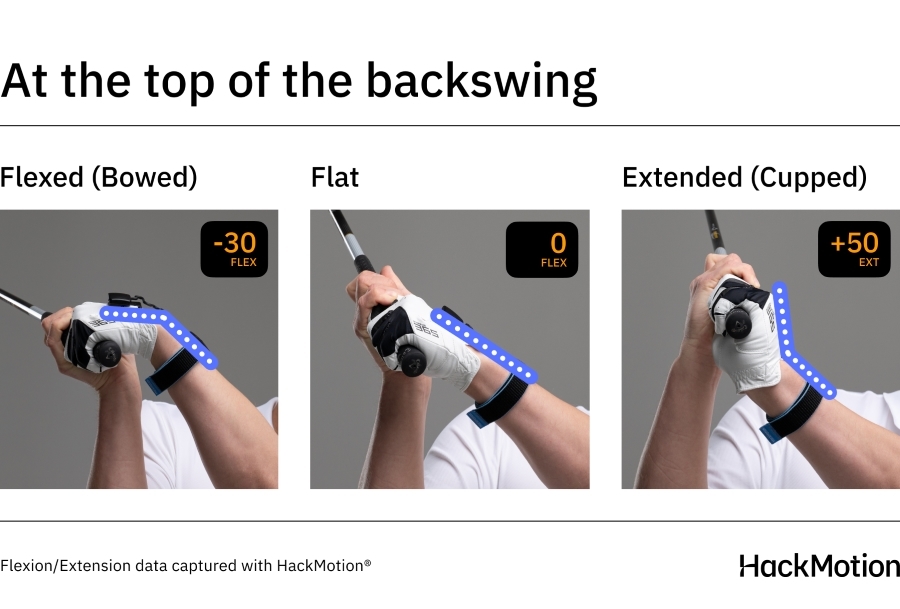
Too Much Extension at the Top of the Backswing
At the top of the backswing, many amateur players have added too much extension in their wrists.
From this position, it’s hard to square the clubface, and shaft lean is probably not going to happen.
Look at players like Jon Rahm, Collin Morikawa, and Dustin Johnson to see how they have more flexion than extension at the top of their backswing.
Although we all don’t have the same wrist flexibility or grip position that they do, getting your position at the top to have less extension is the goal.
Improper Wrist Action Throughout the Swing
Wrist action is often overlooked by amateur golfers as it can be difficult to understand at first.
When using HackMotion, you can quickly learn the proper patterns that all great players use and apply them to your swing.
There is no perfect wrist angle or wrist position in golf. The shape of your hands, wrists, arms, body, and individual playing styles come into play here.
However, learning proper wrist action and wrist action patterns in the swing and then developing it with HackMotion training will absolutely lead to more shaft lean at impact.
How to Create More Shaft Lean at Impact
If you are a golfer who struggles with getting enough shaft lean, you’ll need to learn some adjustments that help you get your consistency back.
Here is how to create more shaft lean at impact.
Step 1: Recognize the Difference Between Horizontal and Vertical Motions
First, you should be able to recognize horizontal and vertical motions.
Wrist hinging and bending are not the same thing. There is a clear difference between the motion of wrist hinging and bending created.
- Wrist hinge (adding radial deviation) moves the shaft vertically.
- Bending the wrists back and forth (extension/flexion) moves the shaft horizontally.
The bending of the wrists is the key motion you should be optimizing for when working on creating shaft lean at impact. With this bending (extension/flexion) of the wrists, you can control the clubface; the wrist hinge does not provide this same amount of control.
If you are looking for additional explanation on how wrist motion affects the golf swing, read about the role of wrist angles here.
Step 2: Know What Proper Shaft Lean Looks Like
The shaft should be pushed forward slightly at address and again at impact, but the motion is not exaggerated. In fact, when the shaft lean is exaggerated, it can cause issues with ball flight and direction.
At impact, the hands are pushed just forward enough that they are in line with your lead leg. Set up to hit a shot and then rotate forward to the position you will be at impact.
You should notice that your left wrist didn’t hinge at all; in fact, all it did was bow a little more, decreasing even more of the extension.
This is why flexion and extension of the wrists should be your primary concern in your golf game.
Step 3: Understanding the Wrist Hinge
As you swing the club back, your wrists will naturally hinge to help set the vertical plane and generate power.
But hinging isn’t what creates shaft lean that comes from a repeatable pattern of flexion and extension in the lead wrist.
The lead wrist should gradually lose extension on the way down. Whether it’s completely flat at impact depends on your grip strength (stronger grips keep a touch more extension).
HackMotion data shows that pros do two things consistently:
- Keep extension stable from address to the top.
- Decrease extension by 20–25° on the way to impact.
This reduction in extension moves the hands ahead of the ball, creating the forward shaft lean that compresses the shot.
Step 4: The Role of the Body
At HackMotion, we deal a lot with the wrists and how they control the clubface. However, the legs and lower body rotation play a huge part in all of this.
If you can get your wrist extension so it remains stable from the address position to the top of your swing and then decreases on its way down to impact, you will be able to use your body to fire through impact.
For golfers who forget to incorporate the lower body, the core, and the hips, the consistency and the power just won’t be there.
The body plays a huge role in everything you do in golf. Start your golf swing with some lower body rotation, and you will find it easier to get the club to a position where you have more shaft lean at impact.
Drills to Get the Perfect Amount of Shaft Lean at Impact
There are a variety of drills and training aids out there in order to get more shaft lean at impact.
One of the most famous options is an impact bag. With the impact bag, you get resistance at impact, which helps you see where your wrists should be.
We like to take a bit more of a technology-based approach to this and use the HackMotion feedback to perfect the amount of shaft lean at impact.
Faldo Drill
If you tend to overswing or lose control at the top, this drill teaches you to reach a proper top-of-swing position with the right amount of wrist hinge and body rotation.
By presetting the hinge early, you build a more compact, repeatable backswing and eliminate extra arm movement.
HackMotion Faldo Drill
Reach a solid Top position with just the right amount of wrist hinge.
HackMotion Faldo Drill – Step by Step:
- Preset Wrist Hinge: At address, lift the club until it’s parallel to the ground without moving your hands. This should create about 90° of wrist hinge. HackMotion will confirm if your wrist angles are in the correct range.
- Turn the Shoulders: From this hinged position, complete your backswing using only shoulder rotation. Keep arms and wrists relaxed.
- Avoid Overswinging: Don’t let your arms or wrists travel beyond this top position. The goal is a compact, efficient top of swing.
- Gradual Reps: Start slow to build awareness of the new sequencing. Once the motion feels comfortable, increase speed while checking your wrist hinge with HackMotion.
HackMotion Tip: Track your wrist flexion/extension at the top. If you’re overhinging or losing structure, the numbers will show it. Aim to repeat your best “green zone” hinge on every rep.
Flexion Freeze Drill
This drill exaggerates lead-wrist flexion at impact and teaches you to hold that position just past the ball.
It’s the fastest way to train the feeling of shaft lean with a square clubface.
Flexion Freeze Drill – Step by Step:
- Setup: Wear HackMotion and use a short or mid iron. Address the ball with your hands slightly forward and lead wrist close to flat.
- Impact Position: Swing down and stop just after impact, holding the lead wrist in a flat-to-flexed condition.
- Short Follow-Through: Keep the follow-through abbreviated, focusing only on maintaining flexion. The ball flight may draw slightly left — that’s expected.
- Check HackMotion Data: You want to see flexion readings of around 11–15° at impact during practice. Don’t worry if it says “too flexed” — overtraining builds the right feel.
- Repetition: Hit 10–15 balls this way, then blend back to normal swings while trying to keep some of that flexion feel.
P6 Face-Down Check
Most golfers lose shaft lean during the transition. This drill trains the early downswing so your lead wrist is flexing (not extending) as the club approaches parallel to the ground.
P6 Face-Down Check – Step by Step:
- Backswing: Make a normal backswing to the top.
- Slow Transition: Start the downswing and stop when the shaft is parallel to the ground (P6).
- Check Clubface: The clubface should point slightly down. If it’s pointing up, your lead wrist is extended and you’ll flip later.
- HackMotion Feedback: Track your lead wrist moving from extension at the top toward flexion in transition. Set the device to alert you if you add extension instead.
- Reps: Repeat in slow motion 8–10 times, then hit balls at half speed, keeping the same face-down look at P6.
FAQs
How much forward shaft lean should you have at impact?
At impact, it is best to have your hands in front of the ball, your lead wrist in a flexed position, and your hands in line with your lead leg.
Why can’t I get a forward shaft lean in my golf swing?
Most golfers who struggle with forward shaft lean in golf also struggle with too much extension in their lead wrist; this often leads to an open clubface. As you are moving through impact, the tendency is to flip the club and close the face, but that motion adds extension instead of flexion.
Should you have a forward shaft lean with driver?
Excessive shaft lean in a driver is a problem. However, you won’t want your hands to be behind the ball at impact, either. Very little or almost no shaft lean is acceptable, but don’t reverse this concept and take the hands behind the ball with the driver.
Does forward shaft lean increase distance?
Forward shaft lean can increase distance because the clubface is square and the golf ball is compressed. There is no benefit to exaggerating forward shaft lean; at some point, you will deloft the club so much it loses forgiveness and ball flight.
Final Thoughts
At this point, you should understand why your golf swing has had issues with shaft lean at impact. If you have been thinking about this concept incorrectly, you are certainly not the only one.
Shaft lean at impact takes a bit of time to learn, and the best way to do so is by working with the HackMotion device. The wrist angles at address, the top of the backswing, and impact give us so much insight into why a golf ball does what it does.