Golf Swing Basics: Master Your Swing Mechanics
Learning the golf swing can be a complicated task. For most golfers, breaking this process down into pieces and sections is the best way to learn and adapt.
Understanding the golf swing basics is the first step toward building a solid foundation.
By focusing on the perfect golf swing mechanics and mastering the golf swing sequence, you can achieve greater consistency and power in your game.
If you have big goals for your golf game, these are the basics that must first be in place.
Golf Swing Basics Overview
If you don’t have time to go through all the golf swing basics right now here are the most important things to take with you.
| Swing Element | What to Do |
|---|---|
| Grip | Neutral, firm hold with proper hand placement |
| Weight Positioning | Balanced center of feet; trail foot pressure |
| Stance & Setup | Shoulder-width stance, natural arms, spine tilt |
| Ball Position | Adjust based on club (driver forward, wedges back) |
| Aim & Alignment | Body parallel to target line; clubface at target |
| Takeaway | Low and slow; body rotation leads |
| Backswing | Full turn, controlled hinge, stay centered |
| Transition | Lower body starts move; maintain lag |
| Impact | Lead wrist flat, weight forward, hit down or up accordingly |
| Finish | Balanced, facing target, full rotation |
Contents
Golf Swing Basics
Grip
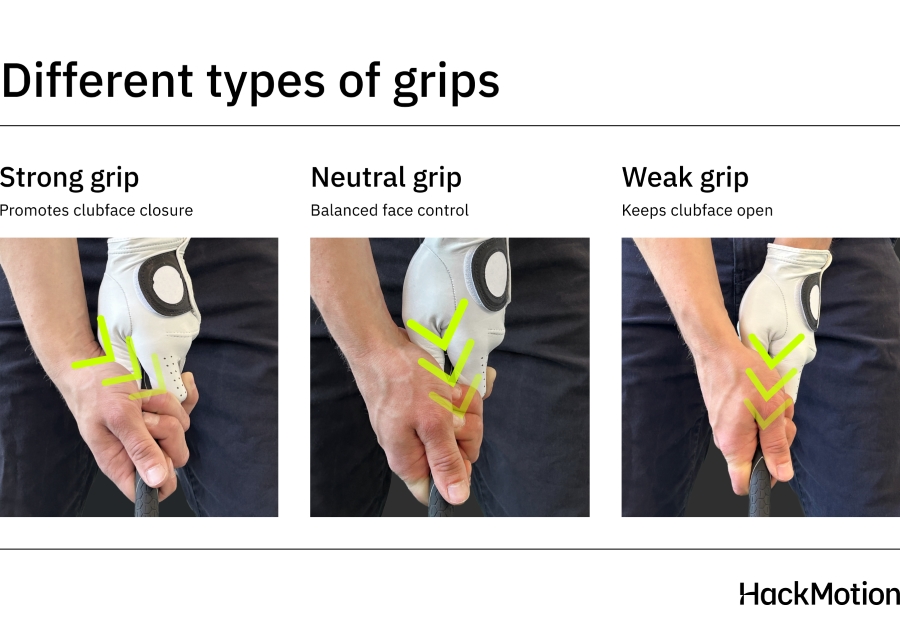
The grip is your only connection with the golf club. To be a great golfer, your grip should typically be neutral. Some golfers need a stronger or weaker grip to square the clubface consistently.
There are three grip types that you can have:
- Overlapping grip
- Interlocking grip
- Ten-finger grip
In addition, the position of your hands can leave you with a neutral, strong, or weak grip.
Here are the steps you should follow to get your hands into the right position on the club (for a right-handed golfer).
- Hold the club with your left hand across your fingers, placing the butt end in the pad of your hand, not the palm.
- Position your right hand on the club by interlocking, overlapping, or placing the pinky finger next to the left hand’s index finger.
- Ensure your grip is firm but not overly tight, allowing control of the club.
- The V formed by your right thumb and forefinger should point between your right eye and shoulder.
With your hands properly on the club, the next step is to build a strong base—starting with your weight positioning.
Weight Positioning
Now that your hands are on the club, let’s look at weight positioning, stance, and setup.
For weight position, you will start most swings with a balance of weight between your lead and trail leg. The weight must be positioned in the center of your foot, not towards the toe or the heel.
In addition, keeping weight on the inside of your trail foot can help you utilize ground forces and get more power.
On the driver swing, feeling a little lean on the right side (right-handed golfers) at setup is helpful. With wedge and iron shots, you will feel a little more pressure on your left side. The extra weight on the left side encourages a downward strike that helps with the precision of your golf shots.
Stance and Setup
Once your weight is properly distributed, it’s time to fine-tune your stance and setup. These are the building blocks of a repeatable, balanced swing.
Ensuring that your stance and setup are stable, properly aligned, and positioned correctly can help ensure that ball flight, distance, consistency, and accuracy are ideal.
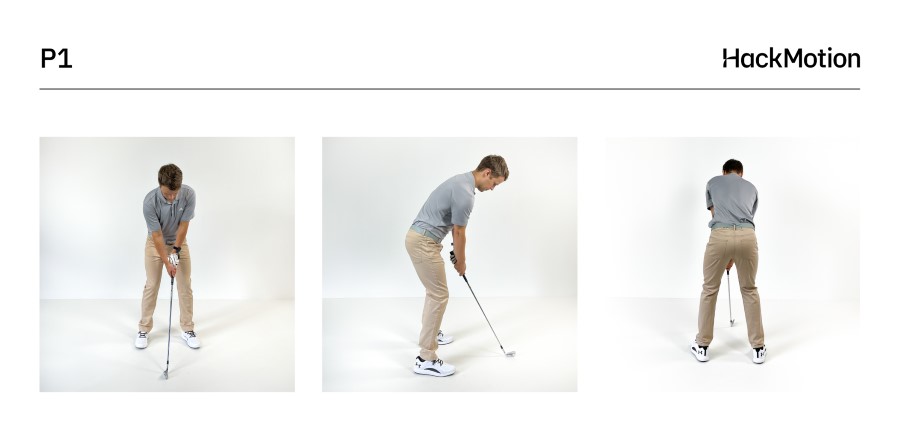
When setting up your golf stance, stand parallel to your target with your feet shoulder-width apart. For longer clubs or challenging lies, slightly widen your stance, but for shorter clubs like wedges, a narrower stance is better.
Bend your knees slightly, as if about to sit on a stool, and tilt your spine forward at a slight angle.
Ensure your knees aren’t bent too much to maintain balance and let your arms hang naturally from your shoulders without feeling cramped or reaching for the golf ball.
To read about hand and wrist position at setup, check out this article: Wrist Position at Address – Do’s, Don’ts.

Ball Position
Proper ball position will help improve consistency in ball striking. The ball position changes with each club in the bag. Good ball strikers must be aware of where the golf ball is positioned in the stance.
The golf ball will be in the middle of your stance for golf clubs like your irons and most wedges.
If you are playing with a driver or fairway woods, the ball gets moved more toward the heel of the lead foot.
Put irons in the middle of your stance and wedges just slightly behind the middle.
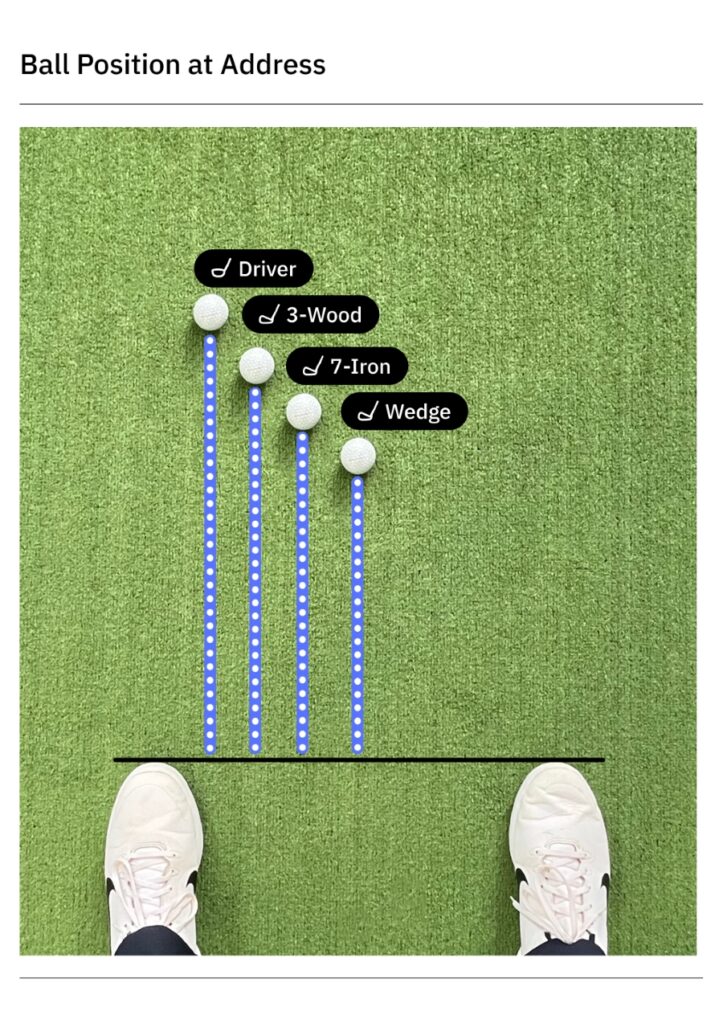
When you take half-swing shots, be sure to narrow your stance but pay close attention to where the ball should be in terms of position. For most shots, it will still be in the middle of the stance.
Aim and Alignment
If your golf club is not aimed at the target, the ball will never end up where you want it to. Aim and alignment in golf are a little tricky because we are not facing the target when we swing.
Instead, golfers stand parallel to the target.
Stand behind the ball and look at a spot between you and the hole you can use as an alignment point.
Takeaway
How you take the club back from your setup position can determine how the rest of your swing plays out.
Start by ensuring the club is turning back because of a rotation in your hips and shoulders. If the golf club starts to go back simply because your arms and hands moved, your timing and tempo in the golf swing will be off.
Takeaway is best when it is low and slow. This allows you to create extension in your backswing and ensure that the clubface is not opening or closing as the club moves back.
Takeaway with the wedges, irons, and longer clubs should all look the same, with no extension being added to the lead wrist.
For drills to help you perfect your swing takeaway, go here. If you want to learn how poor wrist action affects your takeaway, read this article.
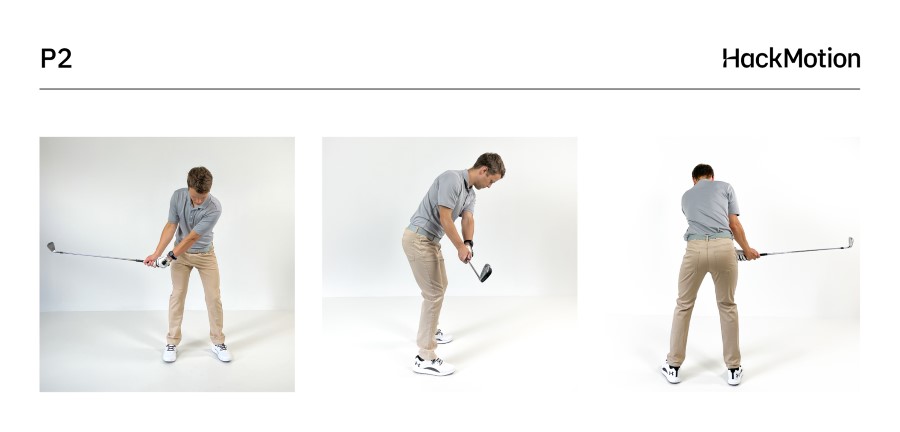
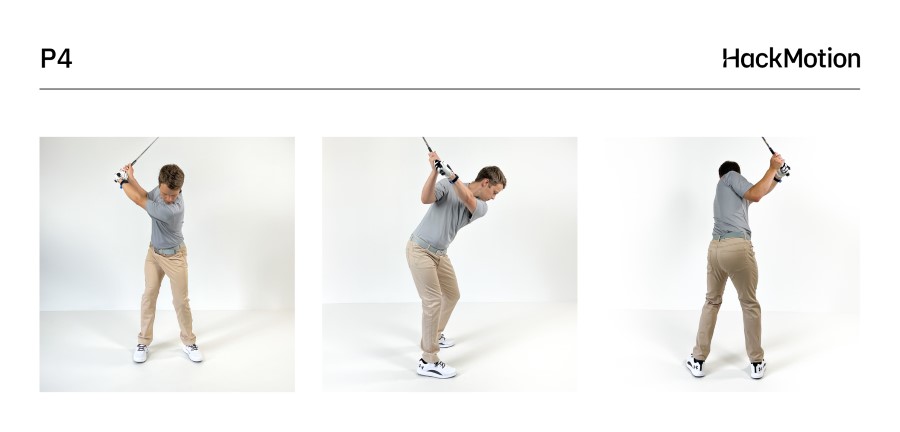
Backswing
Now that you have made it past the takeaway, you will work your way into the backswing.
As your body turns and rotates, the club will swing further back and around you.
The top of your backswing is a point when you have transferred your weight to the trail side, the club is parallel to the ground at the top, and your hips and lower body have made a complete rotation.
During the backswing, you will want to make sure of a few things:
- Do not add extension to the lead wrist, causing the lead wrist to cup at the top of the swing; this will open the clubface of your golf club.
- A wrist hinge creates power and leverage as the club is swung back. However, it should not occur too early in the swing, or it could open the clubface.
- Keep your left arm relatively straight but allow rotation in your swing.
- Stay relatively stable with no swaying back from the ball or changing of the spine angle.
- Always keep balance throughout the swing and ensure that the upper and lower body are involved, not just the wrists and hands.
To read more about wrist position at the top of the backswing, visit that link. For drills to help you perfect your golf backswing, visit this post.
Transition and Downswing
The transition occurs when the backswing turns to the downswing. The moves you make during the transition will again impact the angle of the clubface at impact.
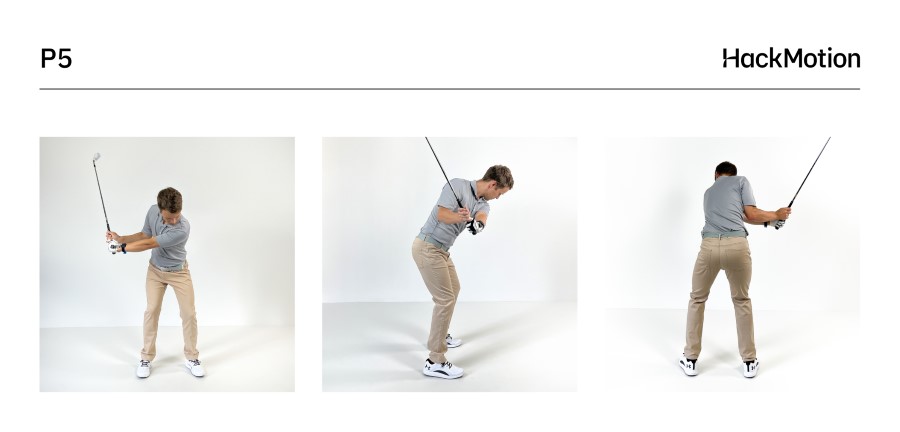
One of the major mistakes that golfers make is using their arms, hands, and wrists to swing down, creating an over-the-top motion in the transition.
Make sure to start the downswing by rotating your hips toward the target. Many players feel as though there is a slight pause at the top before the rotation begins.
Your arms will follow the motion of your body, creating some lag in your golf swing.
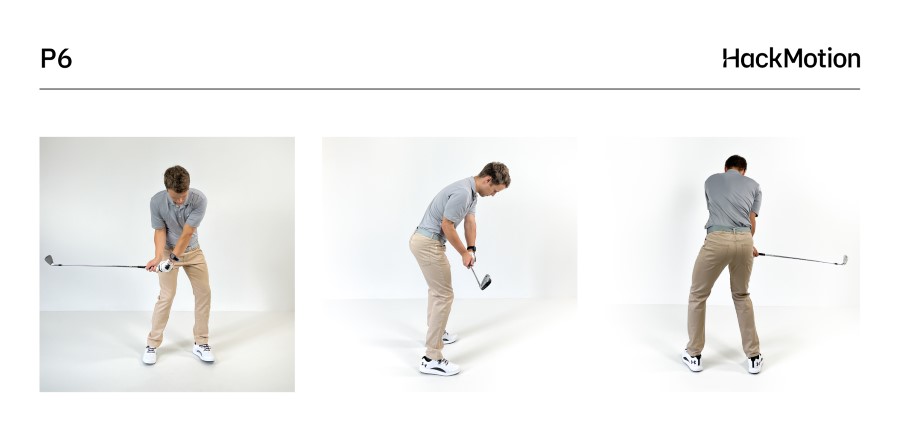
During this time, keeping your flat left wrist is important to ensure it is not opening towards the target.
On the downswing, your wrists can move from a slightly extended or flat position to a more flexed position at impact.
To see how your wrists work throughout the entire golf swing, especially during the downswing, interact with the slow-motion video element below.
Pause at key positions to gain a better understanding of how wrist action should look in slow motion.
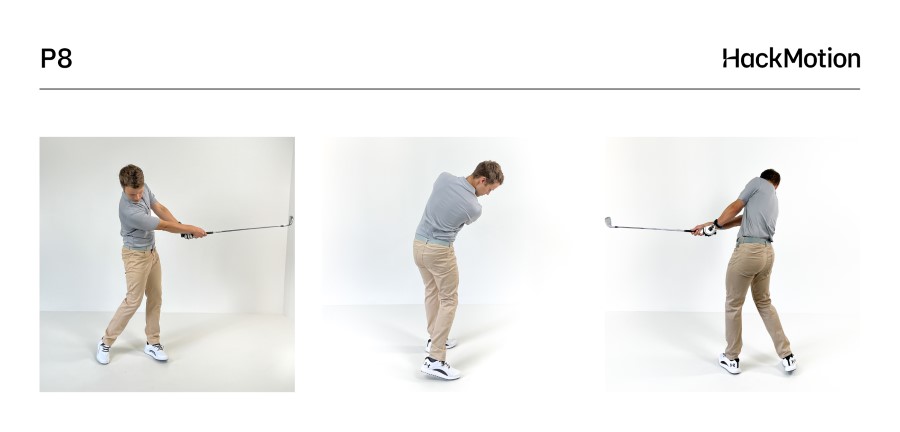
Impact
The impact position varies slightly from the driver swing to the iron swing. The key to the impact position is to have a slightly flexed lead wrist.
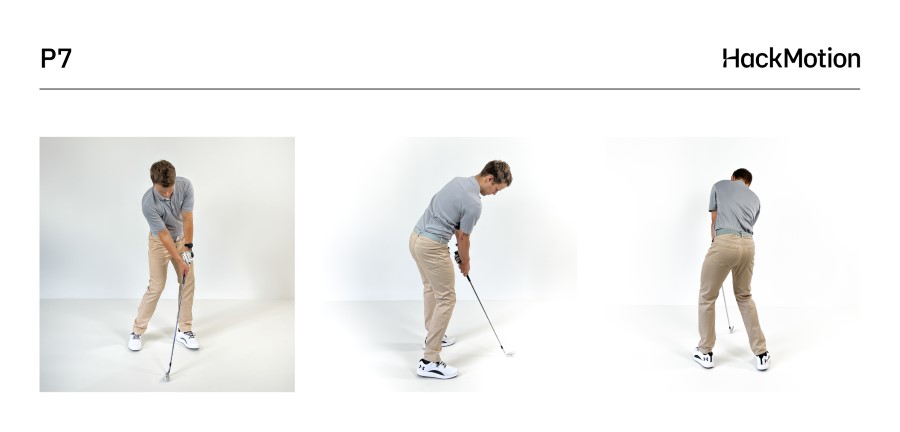
With this lead wrist position, your golf clubface should be square to the target. Starting a golf swing and ending one with a square clubface takes some work, but it’s absolutely possible.
As you move towards impact, your head will stay behind the ball, ensuring clean and consistent contact.
In addition, your arms and forearms will start to rotate, helping to encourage a square clubface when you reach the golf ball.
Weight should be transferred toward your lead side as you reach the impact position.
In addition, make sure you are hitting down and through the ball with the irons; with the driver, you catch the ball as part of your upswing. (Some of this happens naturally because of the ball position.)
The impact position in golf is the most important part of the game. If the impact is correct, you’ll hit the shot you want to hit.
To check if your impact position is correct, read this article: Impact Position Checkpoints and Proper Impact Position with Driver. To master your wrist position at impact, read this article.
Finish
The finish must be balanced, and it is the natural unwinding of your body through impact.
To have a solid finish, you must face your target with your club over your shoulder. Your weight should be on your front foot, and the back foot should be up on the toe.
At this point, you should be able to watch your golf shot.
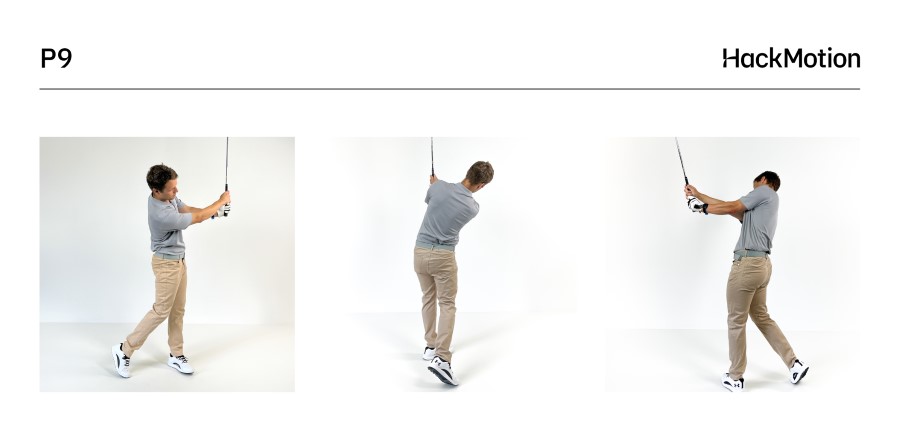
Not getting to a balanced finished position means that there was an error early in the swing that slowed you down or took your club off track.
The golf swing doesn’t stop at the golf ball; it continues until you are all the way through and facing your target.
Iron Swing Sequence Explained
The iron and driver swing sequences are slightly different. With irons, the focus is on precision and accuracy. With the driver, power often takes priority.
To better understand the iron swing sequence, interact with the slow-motion video below and pause at key moments to see each part in action.
- The sequence starts with a smooth takeaway, where your upper and lower body rotate together to move the club back as one unit.
- As you move into the backswing, maintain a stable base and allow the wrist hinge to develop naturally a bit later in the motion. This helps set up a more consistent strike.
- During the downswing, your weight should shift toward the lead foot, and the club should contact the ball before the ground, producing a divot just after impact.
- This downward strike is critical for compressing the ball and creating a penetrating, controlled ball flight.
Driver Swing Sequence Explained
The driver swing sequence is all about generating power. Of course, keeping the ball straight matters — but if you want distance, the right sequence is essential.
Watch the slow-motion video below and pause at key checkpoints to see how power is created through each phase of the swing.
- It starts with a wide takeaway, creating extension and width in your swing. At this stage, avoid focusing on wrist hinge let the width lead the motion.
- As you move into the backswing, your priority should be a full shoulder turn while maintaining a slight tilt away from the target. This tilt helps set up the upward strike needed for a powerful launch.
- The downswing is initiated by the lower body, with hip rotation leading the way and creating separation between the upper and lower body.
- At impact, the goal is to catch the ball on the upswing, with your hands leading and the lead wrist flat. You don’t need to force the launch the club’s loft will do the work when the sequence is right.
Short Game Swing & Specialty Shots
The short game swing is a miniature version of the larger swing. When hitting short game shots, you will adjust your setup, stance, and overall positioning to get the ball closer to your target.
In addition, choosing the correct club for the length and trajectory of your shot allows you to be more accurate in the short game.
Specialty shots include things like a punch shot or a stinger shot. In addition, learning to hit a fade or draw can take your golf game to the next level.
For more articles on the short game and putting, go here. You’ll find drills to practice and actionable tips to improve your short game.
Troubleshooting
The majority of golfers’ issues in the golf swing lead to either a slice or a hook. Both need to be fixed in order to play great rounds of golf.
Using technology like HackMotion and working with a professional instructor can help to fix any of the issues that you may come across in your golf game.
To read articles about different types of swing faults and how to fix them, visit our Swing Faults section. If you prefer more actionable drills, you’ll like our Drills Library – packed with drills for every swing fault that you can take to the driving range today.
If you slice the ball…
- The clubface is too open at impact.
- Try this: Work on flattening your lead wrist at the top and keeping it flexed through impact. Use the Motorcycle Drill to close the face earlier.
If you hook the ball…
- The clubface is too closed at impact.
- Try this: Check your grip and setup. At the top, avoid over-flexing the lead wrist. Use HackMotion to see if the face is shutting too early.
If your shots go right (push)…
- The club path is too far inside-out.
- Try this: Rotate your chest more through impact so the face can catch up.
If your shots go left (pull)…
- The club path is too far outside-in.
- Try this: Check your alignment and avoid starting the downswing with just your arms.
If you hit it fat or thin…
- Your low point is off.
- Try this: Practice hitting a line in the turf after the ball. The Low Point Control Drill helps build consistency.
Final Thoughts
These golf swing basics are just high-level ways to fix the issues that you may come across in your golf game.
If you want to explore any of these topics in more depth, be sure to check out our complete library of articles on everything from the grip to wrist action in the golf swing to power.